Table of contents
How to add an own EAM account using the EAM interface?
How to add an EAM account for another user using the EAM interface?
How to approve an EAM account approval request using the EAM interface?
How to disable an EAM account using the EAM interface?
How to restore an EAM account using the EAM interface?
How to promote an Authenticated User to Access manager using the EAM interface?
How to demote an Access manager to Authenticated user using the EAM interface?
How to view all users within the own organization(s) using the EAM interface?
This documentation is being updated regularly. We try to provide as correct, complete and clear as possible information on these pages. Nevertheless, if you see anything in the documentation that is not correct, does not match your experience or requires further clarification, please create a request (type : request for information) via our portal (https://sciensano.service-now.com/sp) or send us an e-mail via support.healthdata@sciensano.be to report this documentation issue. Please, do not forget to mention the URL or web address of the page with the documentation issue. We will then adjust the documentation as soon as possible. Thank you!How to add an own EAM account using the EAM interface?
End-to-end process:
Navigating to the HD EAM Portal and Access Manager profile
To log into our Entity Access Management system, you need to navigate to the URL https://eam-v3.healthdata.be.
The healthdata.be Entity Access Management (HD EAM) Portal page appears on your screen.

Logging in with itsme, eID
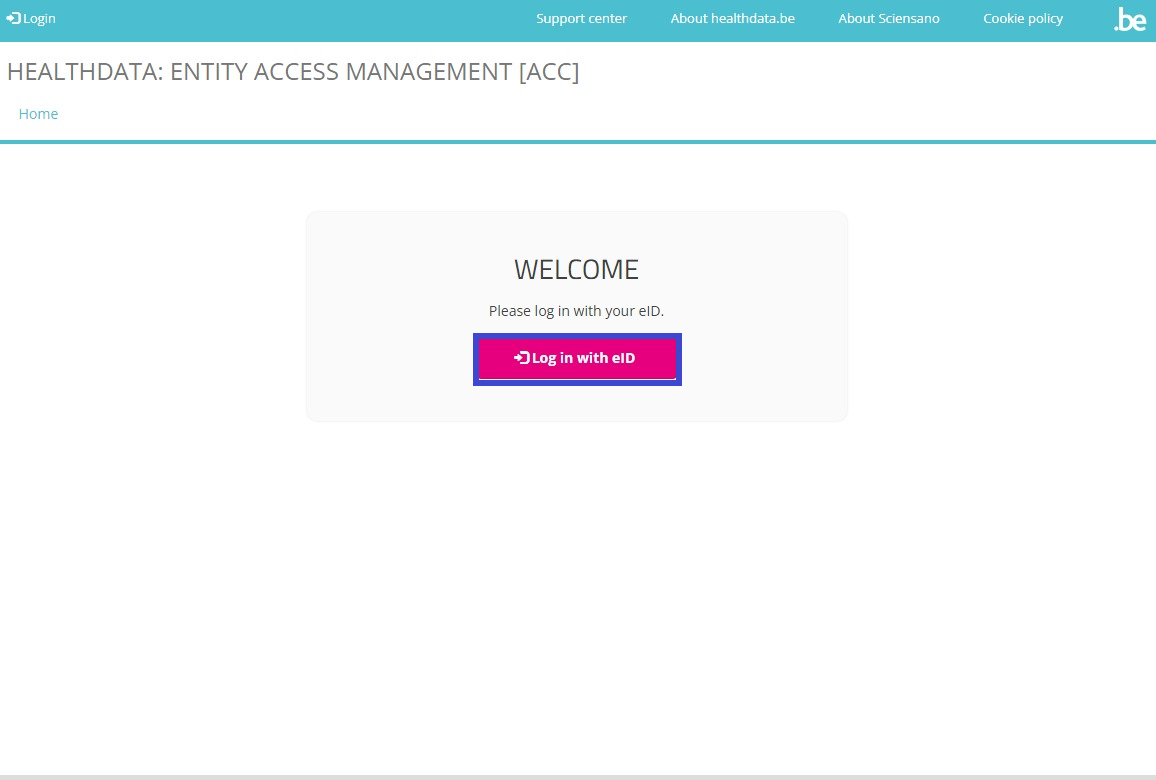
To log into the HD EAM Portal you need to click on the Login symbol at the top left of your screen.

The Welcome screen appears. Select the Log in with eID button.
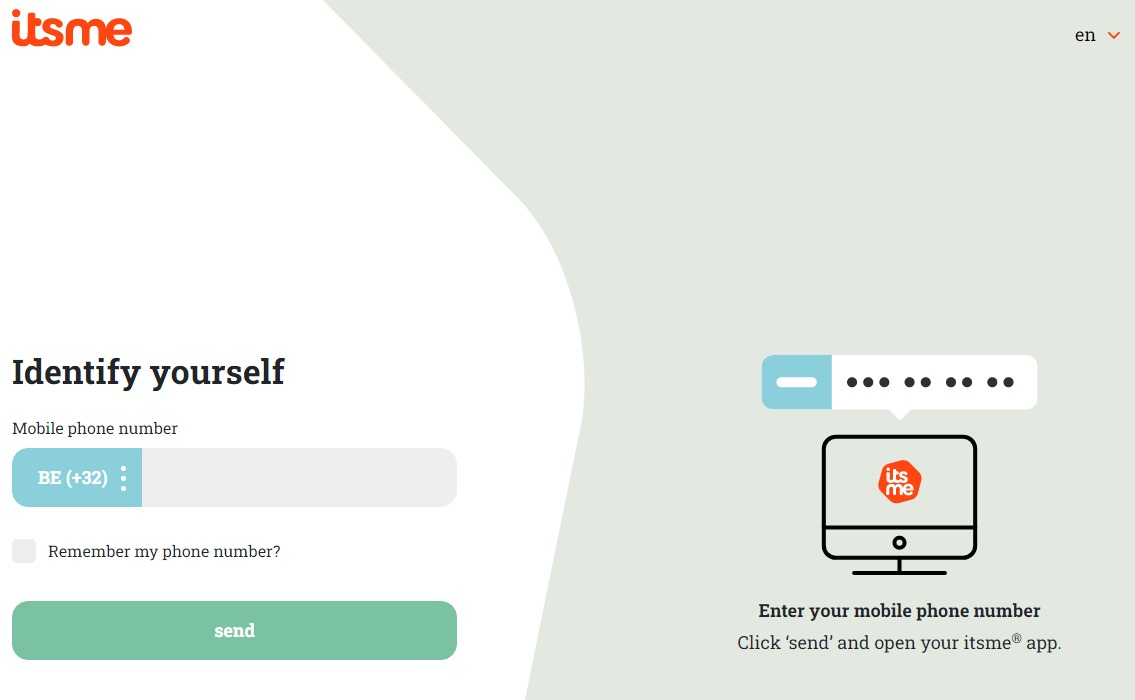
You will be redirected to the government's Federal Authentication Service (FAS), where you can log in with multiple digital keys with eID or digital identity.

If you choose to connect via itsme, you will need to enter your cell phone number.
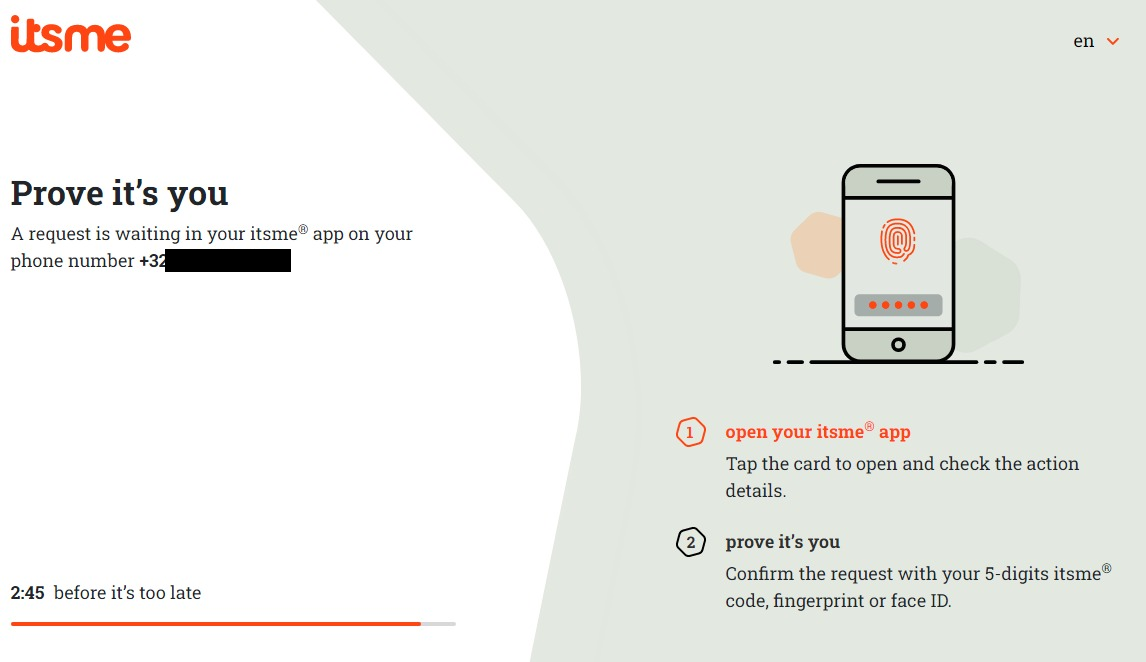
Follow the instructions on your mobile device via the ItsMe application.
Once the itsme login procedure has been completed, you select the green profile validation button ("Profiel bevestigen" or "Confirmer le profil") to log in into the HD EAM system (see image below).
| NL | FR |
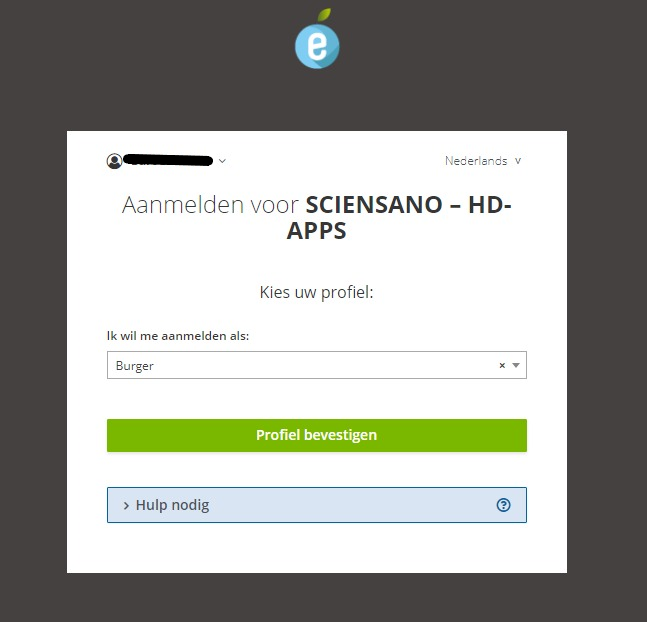 | 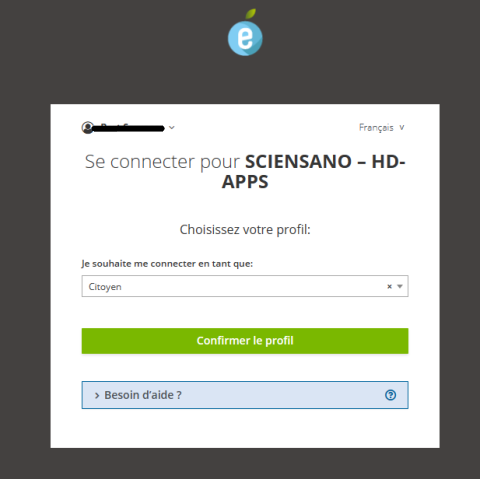 |
You have landed on the profile page of an Access Manager.
The Access Manager profile page
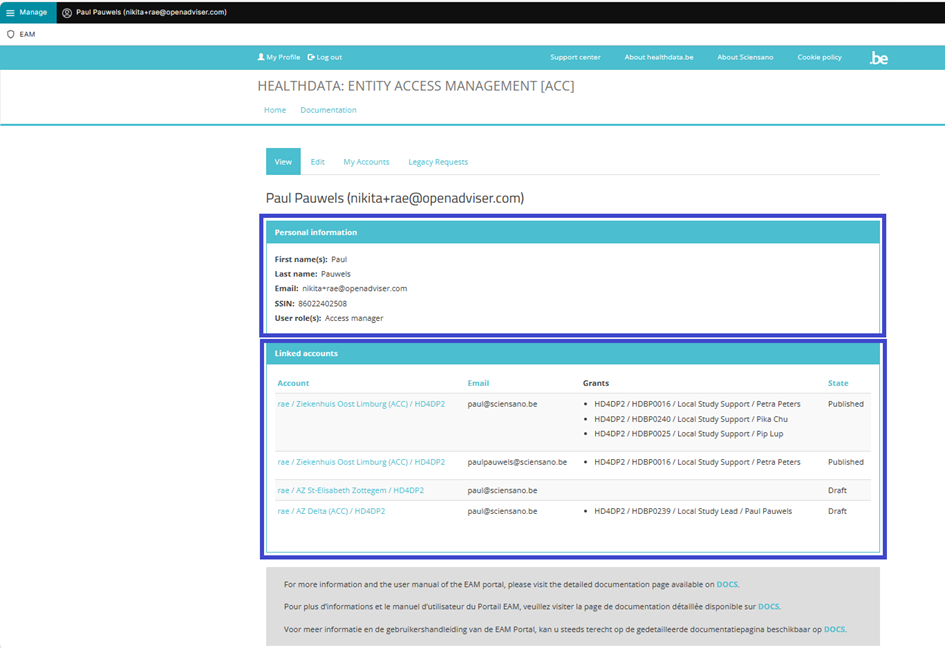
The main My profile screen that appears after selecting the confirmation button shows the Personal information of the Access Manager as well as the Linked accounts of this profile. The list can be sorted by Account, Email or State.
Attention: The accounts listed in Linked accounts are your OWN accounts. These are NOT the accounts you will manage as an Access Manager.
Creating an own account
By selecting one of the accounts in the Linked accounts window, you will be able to manage grants for your own accounts and to carry out several advanced actions.
When clicking on your name and e-mail address at the top left of the screen, you toggle a toolbar (see image below) with four tabs: View profile, Edit profile, My Accounts and Log out. Select the My Accounts tab if you want to create an account.

On the My accounts screen you will find a list of accounts that you can edit. Click on the Add new Account button at the bottom to create a new account.

The Add a new Account window opens. To provision the account, you complete the Account e-mail address and select an Organisation/Application. Click on the Save button.

The created account is automatically added to the list of accounts.

It will also appear in the Linked accounts section of the profile page.

How to add an EAM account for another user using the EAM interface?
End-to-end process:
Navigating to the HD EAM Portal and Access Manager profile
Go here to learn how to login via the Federal Authentication Service (FAS) with eID or itsme.
Creating an EAM account for a another user
Click on Manage to the top left of the screen, so that the EAM menu appears. When hovering over this, the items EAM Users and EAM Accounts become visible. Click on EAM Users.

The users overview opens. Select the user you want to create an account for, by clicking on first name, last name or SSIN.

The user's My page with all the details appears. Click on the Add new Account button.

The Add a new account window opens. To provision the account, you complete the Account e-mail address and select an Organisation/Application. Click on the Save button.

Return to the User details to see that the account has been added.

How to approve an EAM account approval request using the EAM interface?
End-to-end process:
Navigating to the HD EAM Portal and Access Manager profile
Go here to learn how to login via the Federal Authentication Service (FAS) with eID or itsme.
Approving an EAM account approval request
Click on Manage to the top left of the screen, so that EAM appears. When hovering over this, the items EAM Users and EAM Accounts become visible.
Select EAM Accounts and Approval successively.

When clicking on Approval you open the page with end-user accounts that are waiting to be approved:

There are two ways to approve these account requests:
- By checking the selection box of the relevant account request and selecting the Approve action. Click on the Apply to selected item button to perform the action.

- By clicking on the Edit button in the Operations column for the relevant account ...

... and subsequently on the Approve button in the Account: Manage grants screen.

The Account state changes to Approved.

After this, a fulfilment process will start to run in the background, finally resulting in an account state change to Published.
Performing a push action
If this change does not take place within a reasonable amount of time - usually between 15 minutes and up to three hours - the account could be updated by means of a "push".
Therefore, return to the accounts overview screen.

First, check the Approved account that needs to be pushed (1). Then, open the Action drop-down menu and select the Update account (push) option (2). Finally, validate this action by clicking on the Apply to selected items button (3).

In case the push action does not trigger the expected result, you need to contact our Support service.
How to disable an EAM account using the EAM interface?
End-to-end process:
Navigating to the HD EAM Portal and Access Manager profile
Go here to learn how to login via the Federal Authentication Service (FAS) with eID or itsme.
Disabling an EAM account
Click on Manage to the top left of the screen, so that EAM appears. When hovering over this menu item, the subitems EAM Users and EAM Accounts become visible. Select EAM Accounts.

An overview with the accounts of the Authenticated Users appears.

Scroll down the list and tick the selection box of the account(s) you want to disable. Go to the bottom of the page and click on the Action toggle button to select Disable account.

To complete the action, you need to click on the Execute action button.

This action triggers an e-mail to the Authenticated User to inform about the account being disabled: the user can't log in anymore with the credentials at hand.
How to restore an EAM account using the EAM interface?
End-to-end process:
Navigating to the HD EAM Portal and Access Manager profile
Go here to learn how to login via the Federal Authentication Service (FAS) with eID or itsme.
Restoring an EAM account
Click on Manage to the top left of the screen, so that EAM appears. When hovering over this menu item, the subitems EAM Users and EAM Accounts become visible. Select EAM Accounts.
An overview with the accounts of the Authenticated Users appears. Click on the Edit button of the disabled account you want to restore.

The Manage grants page for the selected account opens up. To undo the state Disabled, you need to click on the Create New Draft button.

The account state is restored to Draft, so that the Access Manager has again all action options at hand:

How to promote an Authenticated User to Access manager using the EAM interface?
End-to-end process:
Navigating to the HD EAM Portal and Access Manager profile
Go here to learn how to login via the Federal Authentication Service (FAS) with eID or itsme.
Promoting to Access Manager
Click on Manage to the top left of the screen, so that EAM appears. When hovering over this, the items EAM Users and EAM Accounts become visible. Click on EAM Users.
The Users overview is shown. To promote a certain user to Access Manager, you need to select the relevant checkbox and go to the Action drop-down toggle at the bottom of the page.

Click on the toggle button and select Promote to Access Manager. Select Apply to selected items down-right of the screen to perform the change of the user type to Access Manager.

In case the Authenticated User is associated with multiple HCOs, you need to select the one for which the user needs to be promoted to Access manager. Confirm successively.

The change is published in the users overview.

How to demote an Access Manager to Authenticated user using the EAM interface?
End-to-end process:
Navigating to the HD EAM Portal and Access Manager profile
Go here to learn how to login via the Federal Authentication Service (FAS) with eID or itsme.
Demoting to Authenticated User
Click on Manage to the top left of the screen, so that EAM appears. When hovering over this, the items EAM Users and EAM Accounts become visible. Click on EAM Users.
The Users overview is shown. To demote an Access Manager (to user type of Authenticated User), you need to select the relevant checkbox and go to the Action drop-down toggle at the bottom of the page.

Click on the toggle button and select Demote Access Manager. Select Apply to selected items down-right of the screen to perform the change of the user type to Access Manager.

On the security query screen you click on the Execute action button to perform the change.

The change is published in the users overview.

How to view all users within the own organization(s) using the EAM interface?
End-to-end process:
Navigating to the HD EAM Portal and Access Manager profile
Go here to learn how to login via the Federal Authentication Service (FAS) with eID or itsme.
Viewing all users within own organization(s)
Click on Manage to the top left of the screen, so that EAM appears. When hovering over this menu item, the subitems EAM Users and EAM Accounts become visible. Select EAM Users.

The page shown displays an overview of all users for the organization(s) that are within the scope of the Access Manager.

This documentation is being updated regularly. We try to provide as correct, complete and clear as possible information on these pages. Nevertheless, if you see anything in the documentation that is not correct, does not match your experience or requires further clarification, please create a request (type : request for information) via our portal (https://sciensano.service-now.com/sp) or send us an e-mail via support.healthdata@sciensano.be to report this documentation issue. Please, do not forget to mention the URL or web address of the page with the documentation issue. We will then adjust the documentation as soon as possible. Thank you!