HD4DP v2 web (Health Data for Data Providers - online version)
HD4DP v2 web (Health Data for Data Providers - online version)<<Documentation in progress>>
General description of the application HD4DP v2 web
General description of the application HD4DP v2 webThe HD4DP version 2.x WEB is an electronic data capture (EDC) system: a computerized system designed for the collection of clinical data in electronic format for use in research supporting human public health policy. HD4DP (Health Data for Data providers) replaces the traditional paper-based data collection methodology and the proliferation of websites to streamline data collection and expedite the time to analysis and reporting.
Position of HD4DP v2 web in HD Architecture 2.0
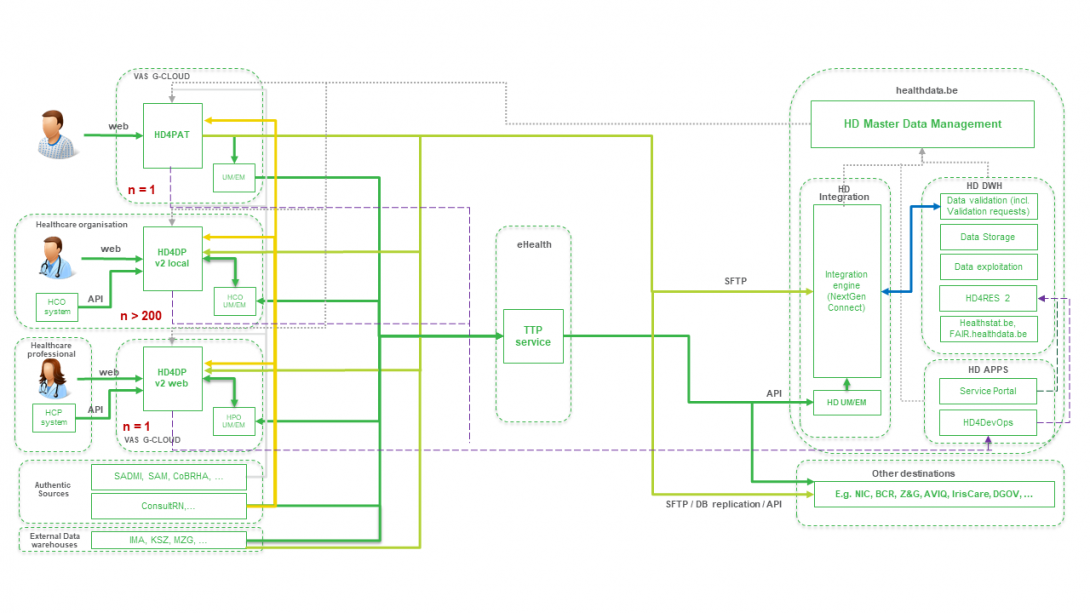
Position of HD4DP v2 web in HD Architecture 2.0The application HD4DP v2 web is one of the components of the broader data collection and management architecture managed by the healthdata.be service of Sciensano. Below you can find a high level view of that data collection and management architecture (version 2).
User manual of the application HD4DP v2 web
User manual of the application HD4DP v2 web manager Sun, 12/05/2021 - 18:55Request account for HD4DP v2 web
Request account for HD4DP v2 web manager Sat, 01/29/2022 - 13:11Access the HD4DP v2 WEB application
Access the HD4DP v2 WEB application<<Documentation in progress>>
Navigate to a project
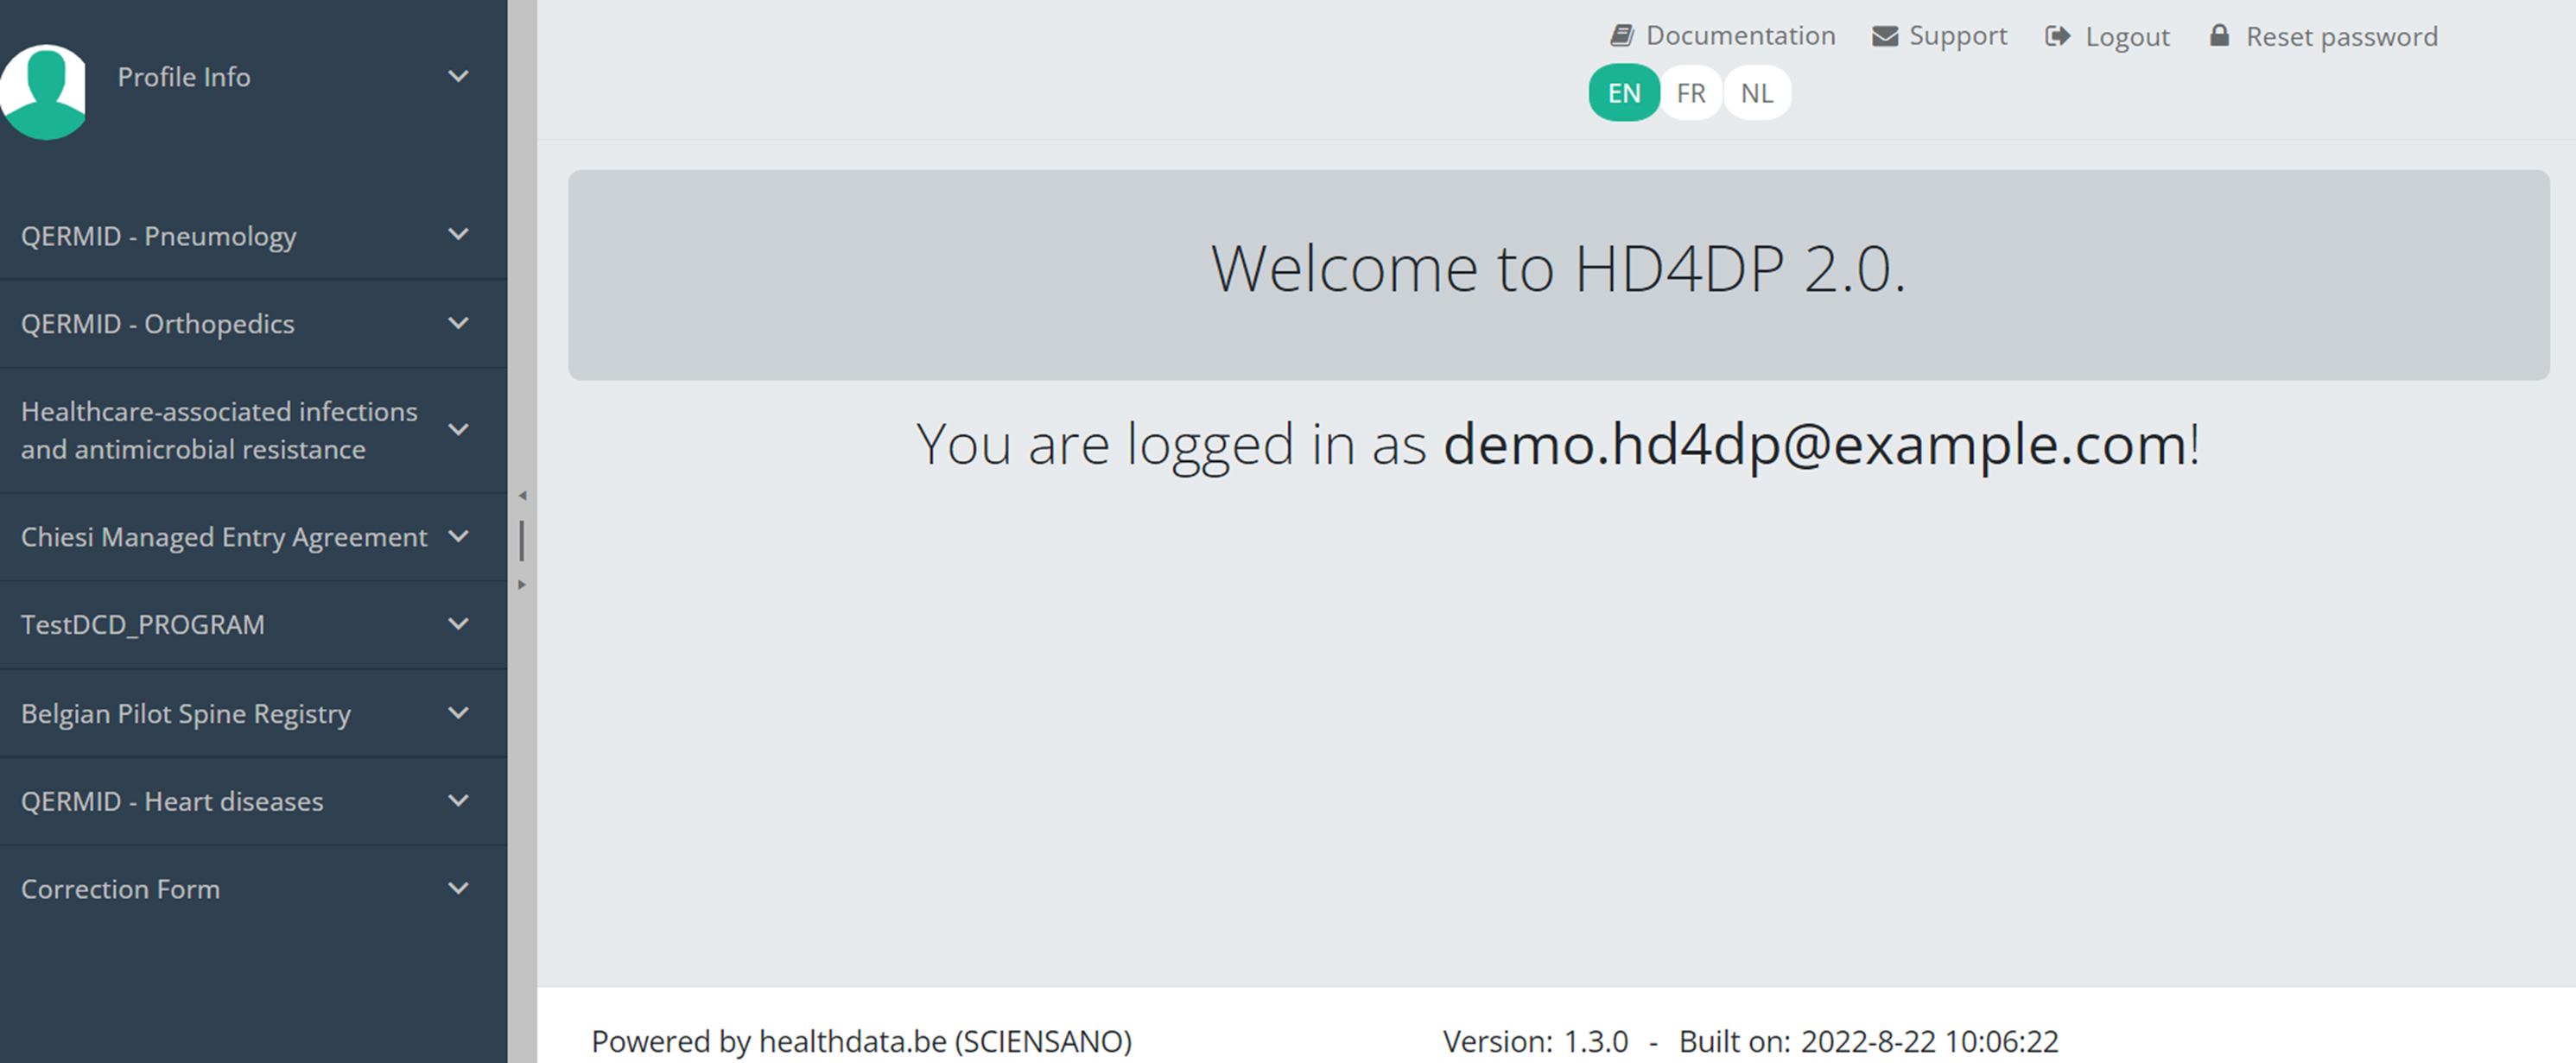
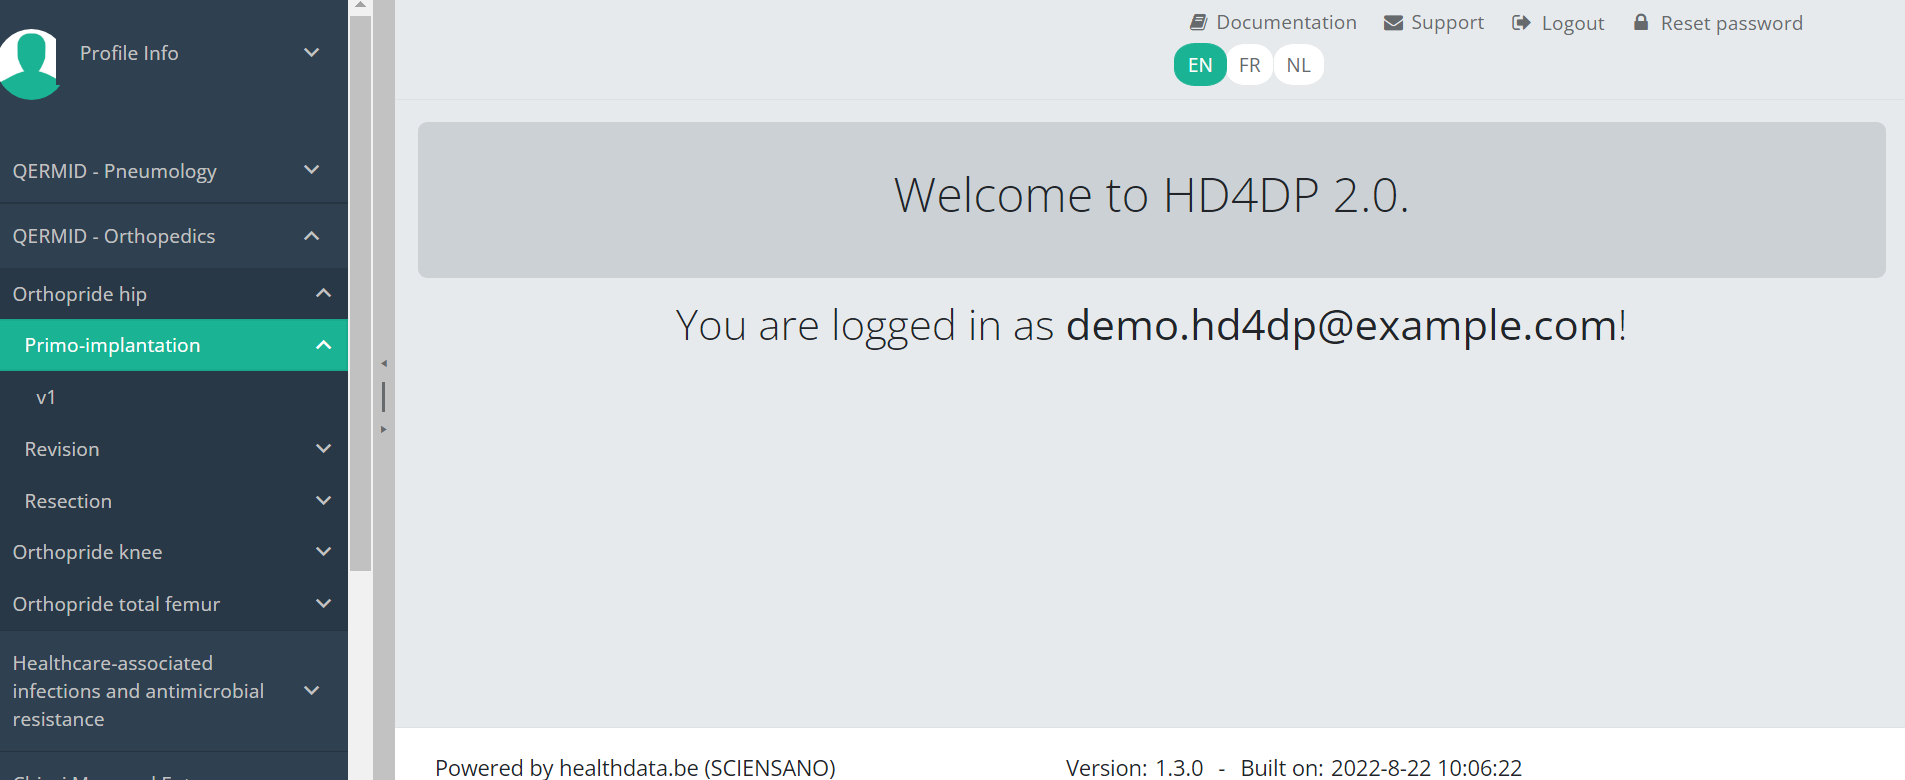
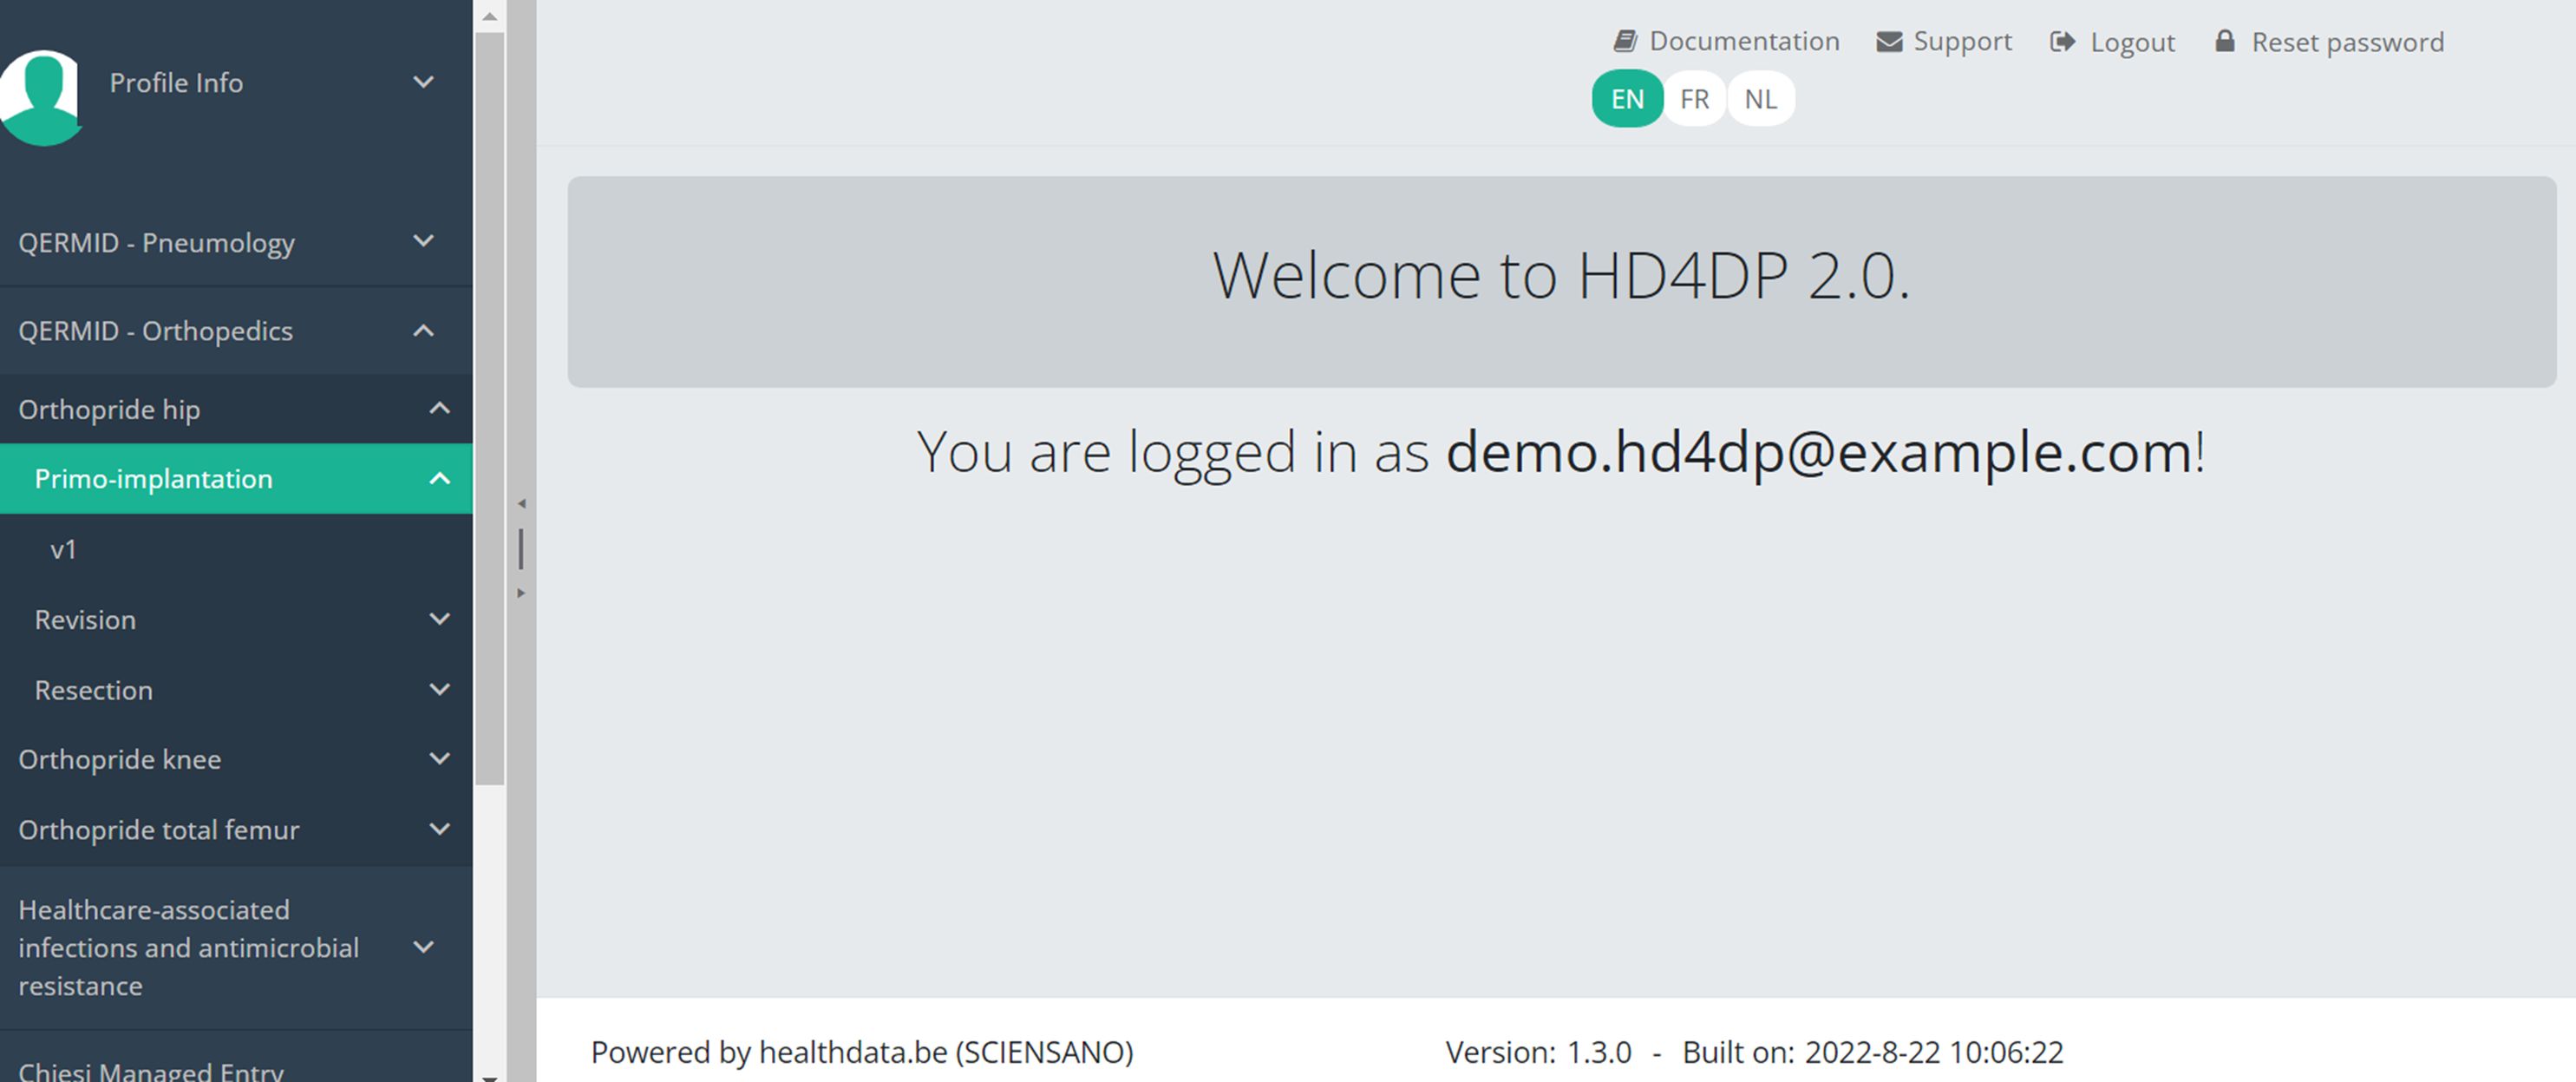
Navigate to a projectWhen logged in, you will see the Welcome page of HD4DP v2. In the left dark blue menu you can see all the study programs and projects you have access to.
Suppose we want to participate in study Orthopride Hip. In that case, we must select the study program QERMID Orthopedics first. You can see now three study projects: Orthopride Hip, Orthopride Knee and Orthopride Total femur.
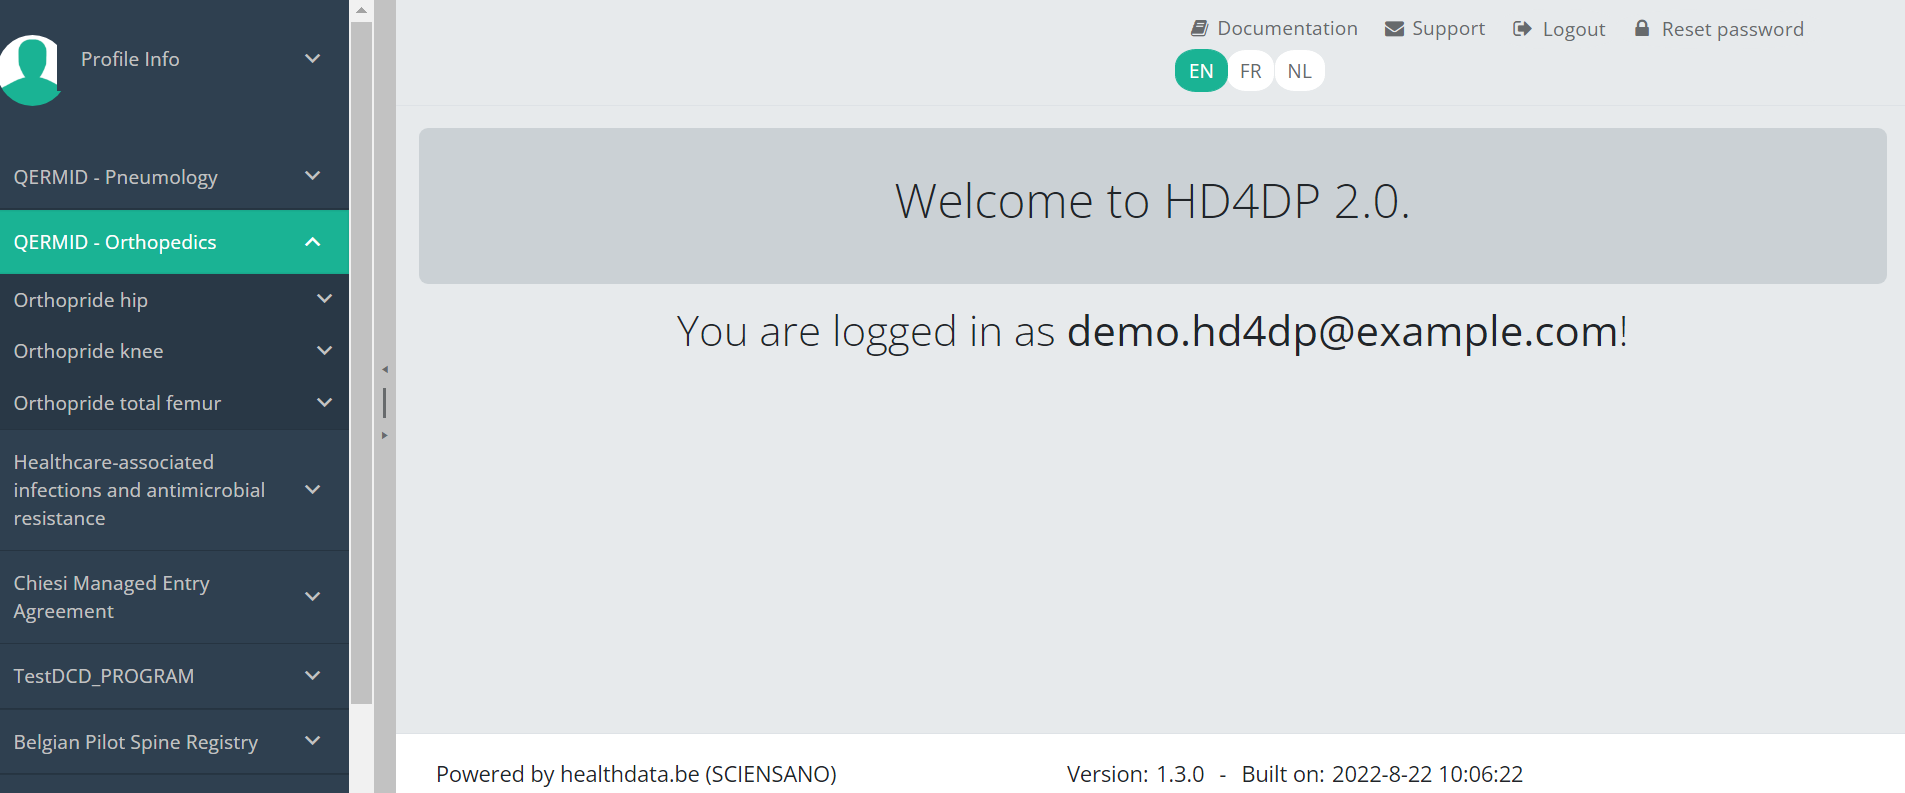
Select the study project Orthopride Hip.
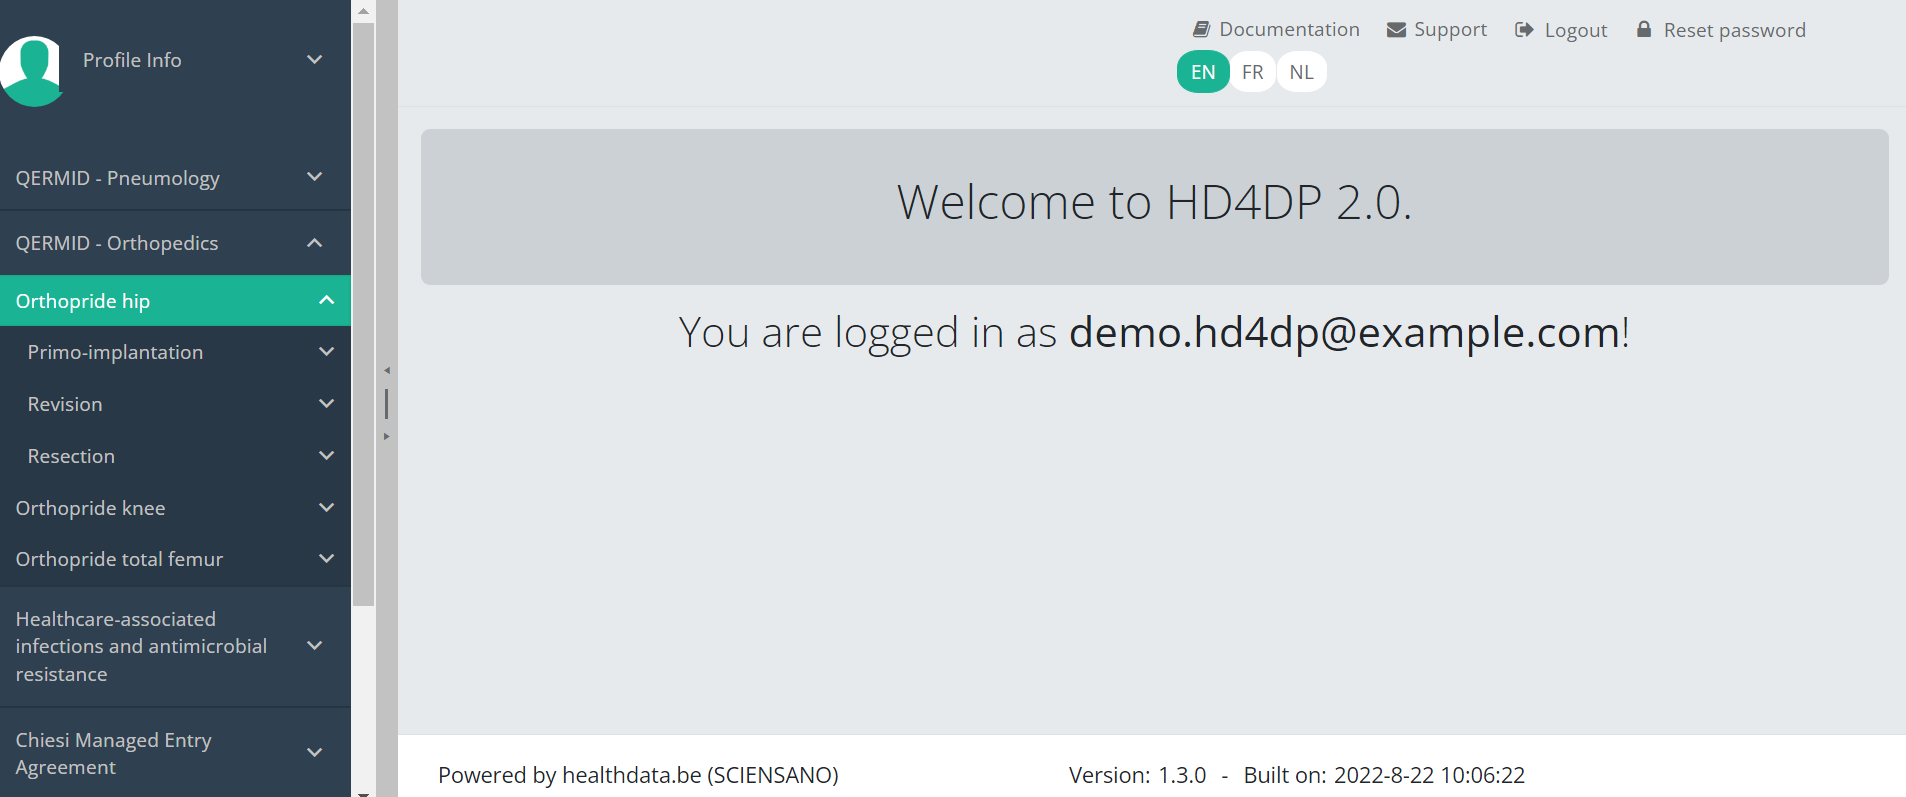
You will see that the study project Orthopride Hip consists of three study sections: Primo-implantation, Revision and Resection.
Create a registration
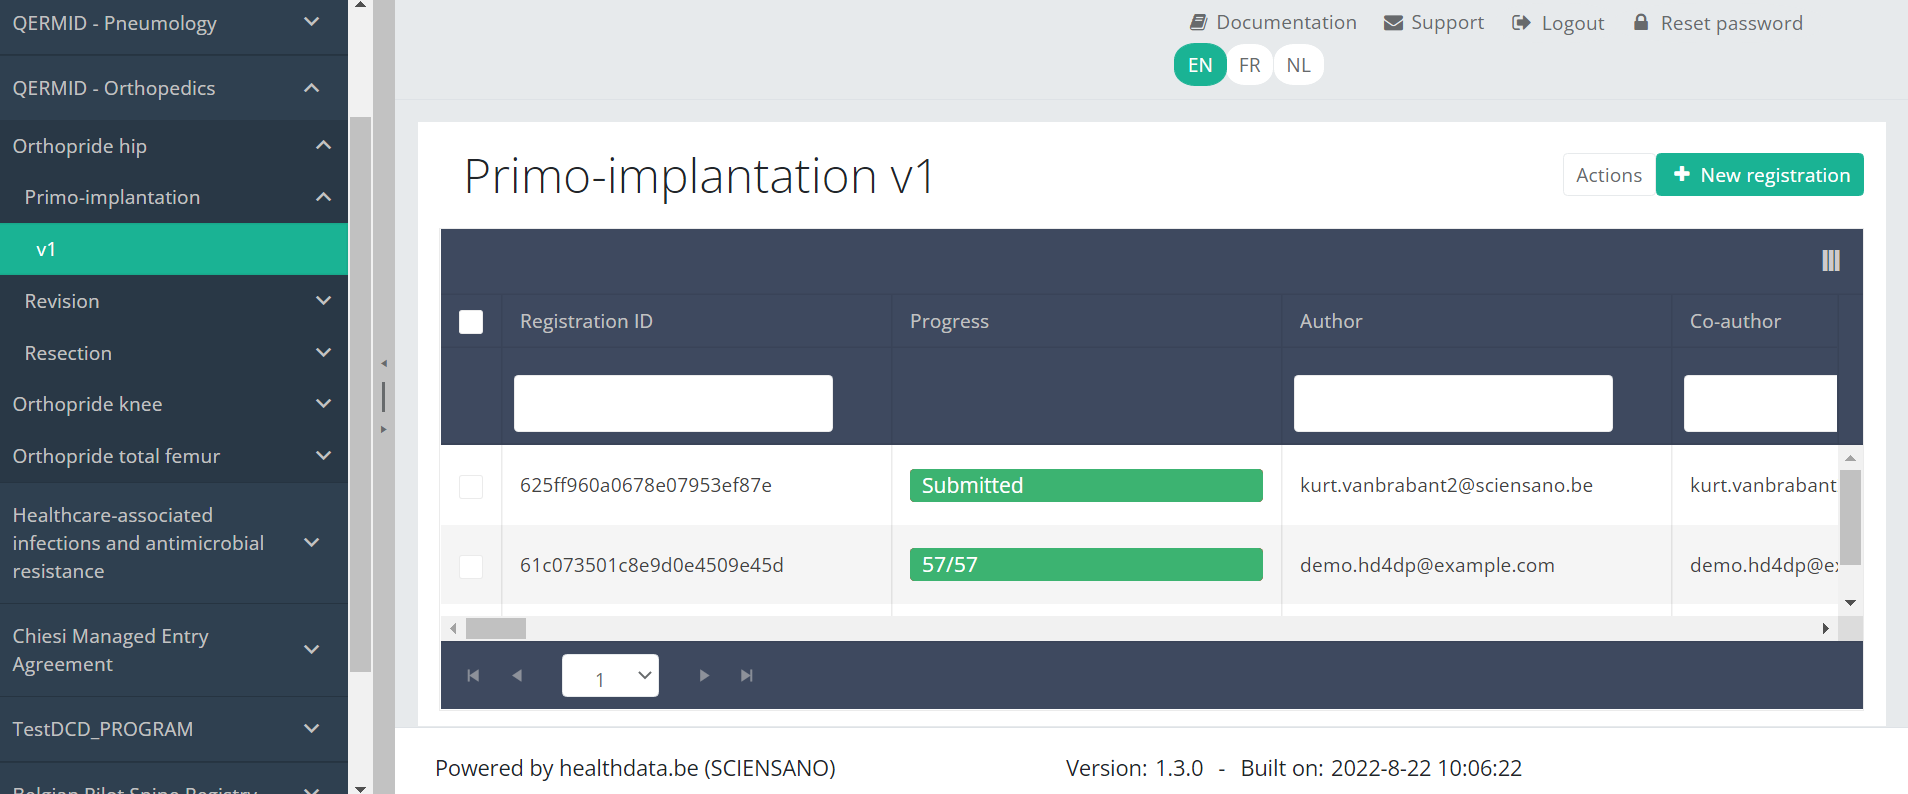
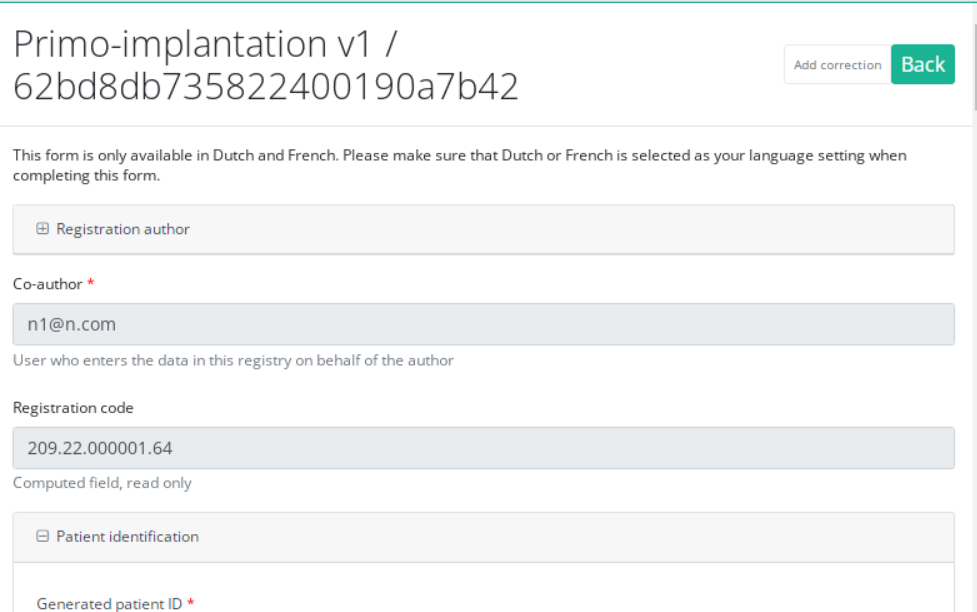
Create a registrationSuppose we want to create a "Primo-implantation" registration for the study project Orthopride Hip. In that case, we need to navigate to the study program QERMID Orthopedics and then to the study project Orthopride Hip. There we need to select "Primo-implantation" in the dark blue left menu.
You will see the number of versions of this study section. In this case, there is only one version.
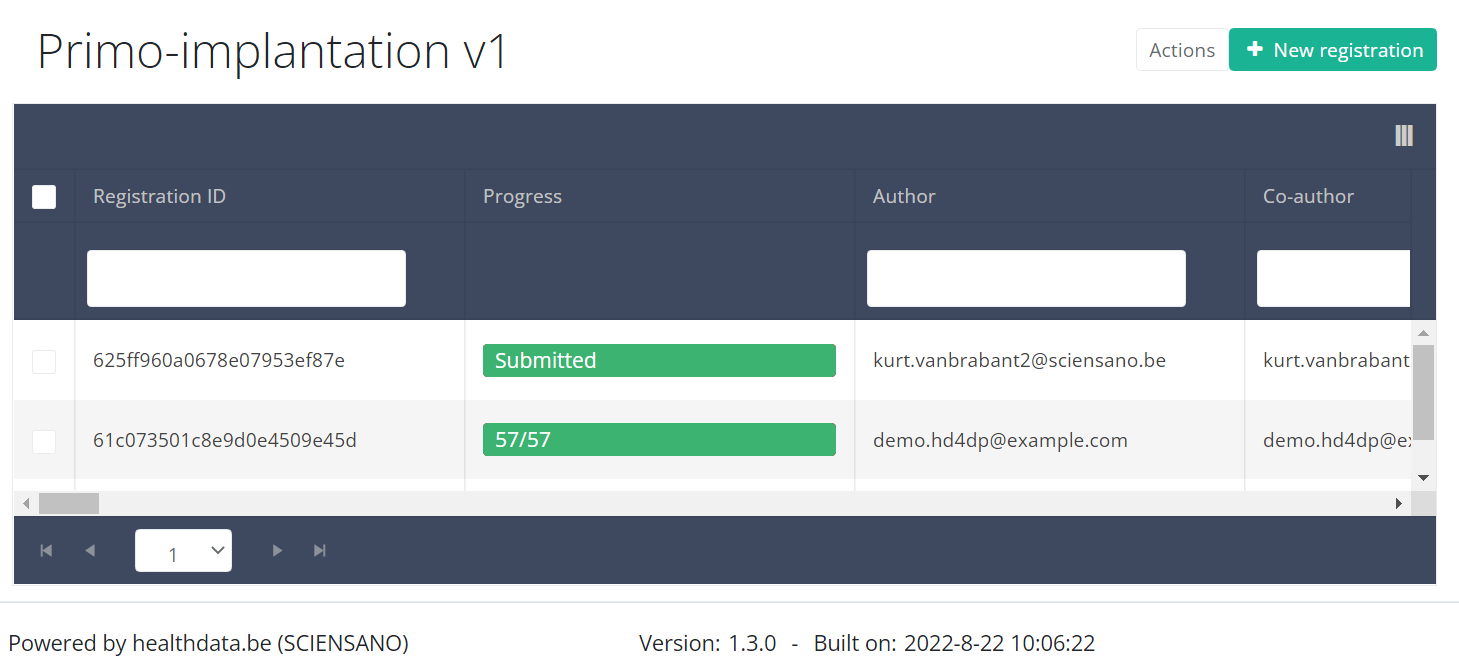
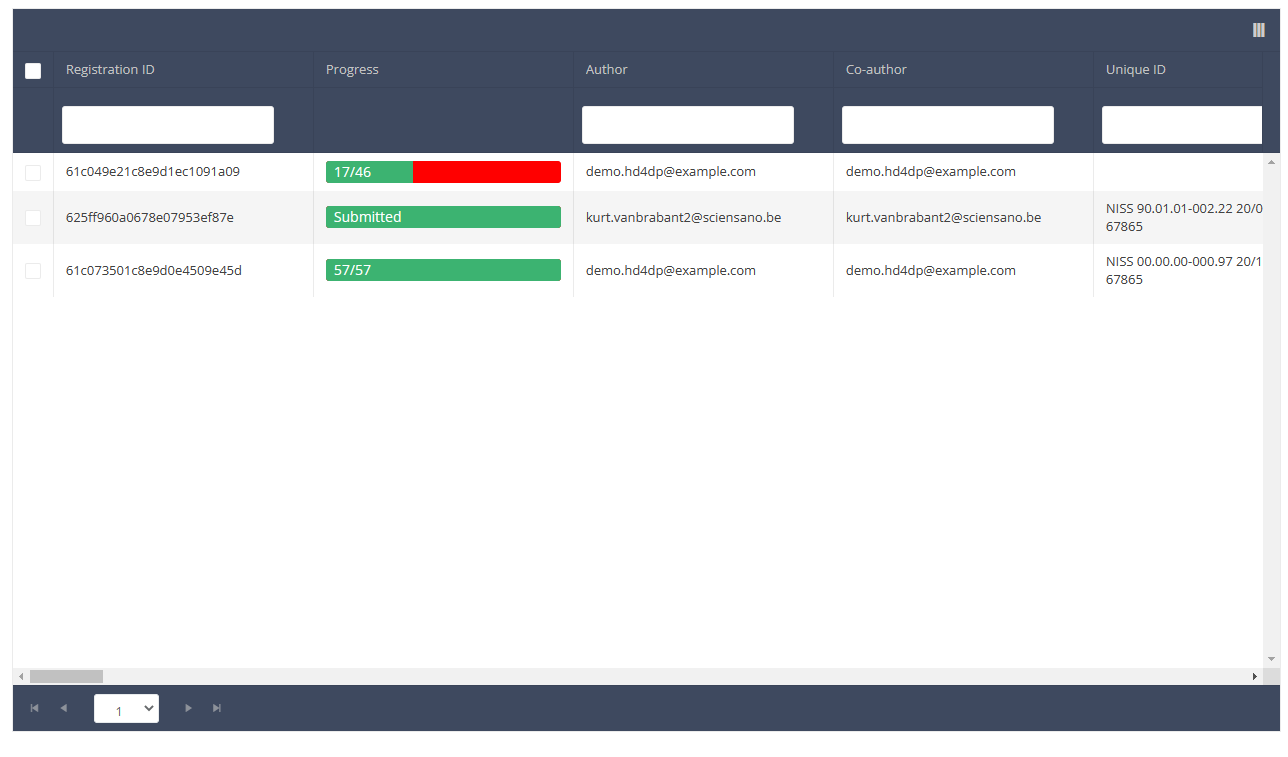
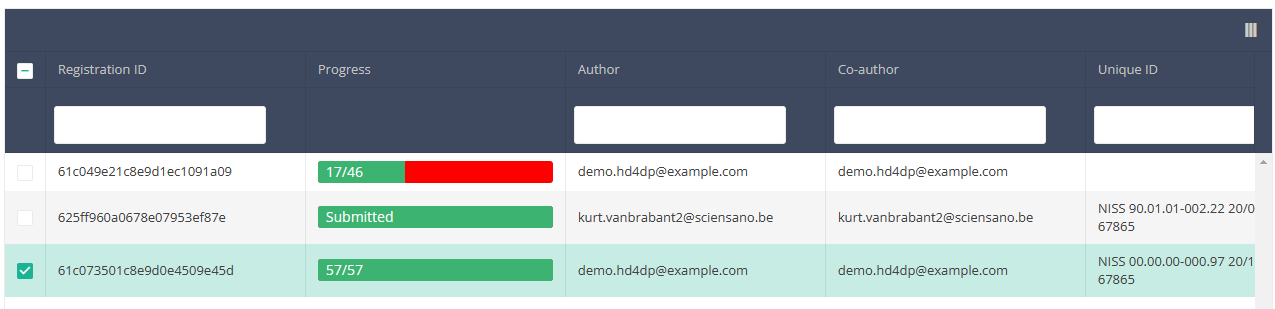
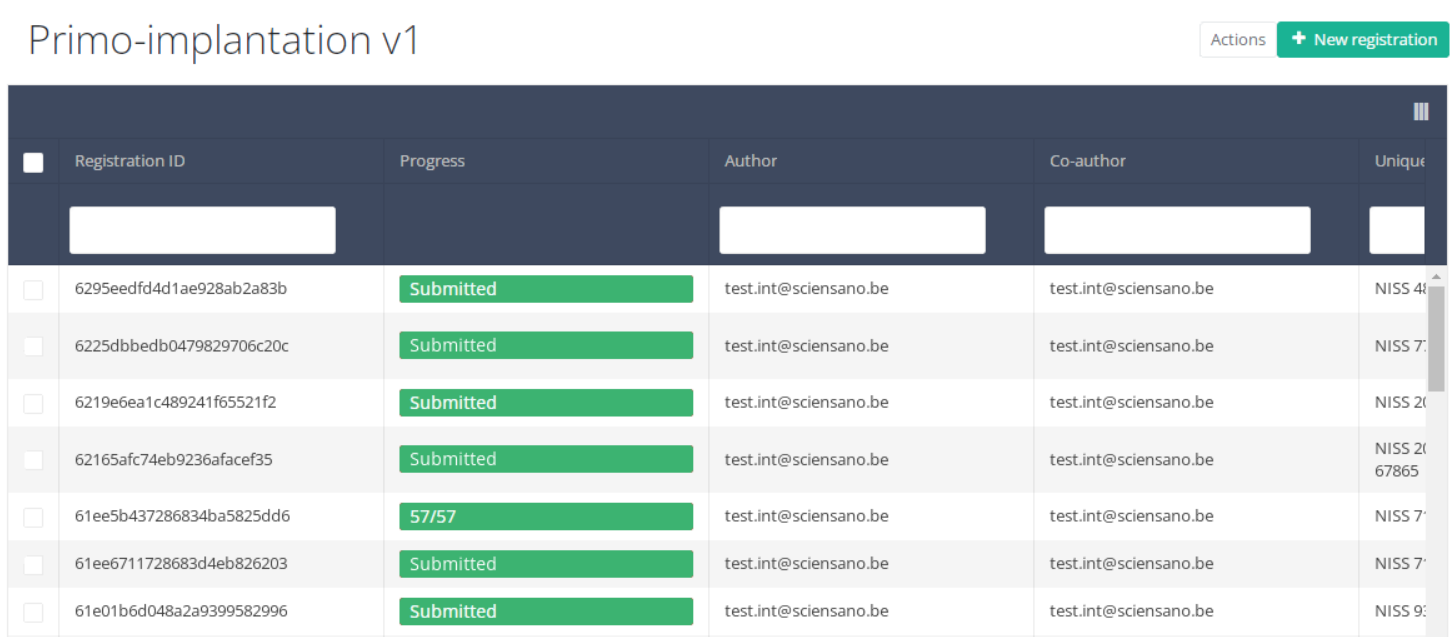
When you select the highest version of this study section for the first time, you will see an empty table in the main part of your screen. The table contains, among others, the following items: Registration ID, Progress, Author, Co-author, Unique ID, Business key, Registration code, National registry ID of the patient...
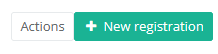
In the top right corner of the screen you can find a green button "+ New registration". Press this button.
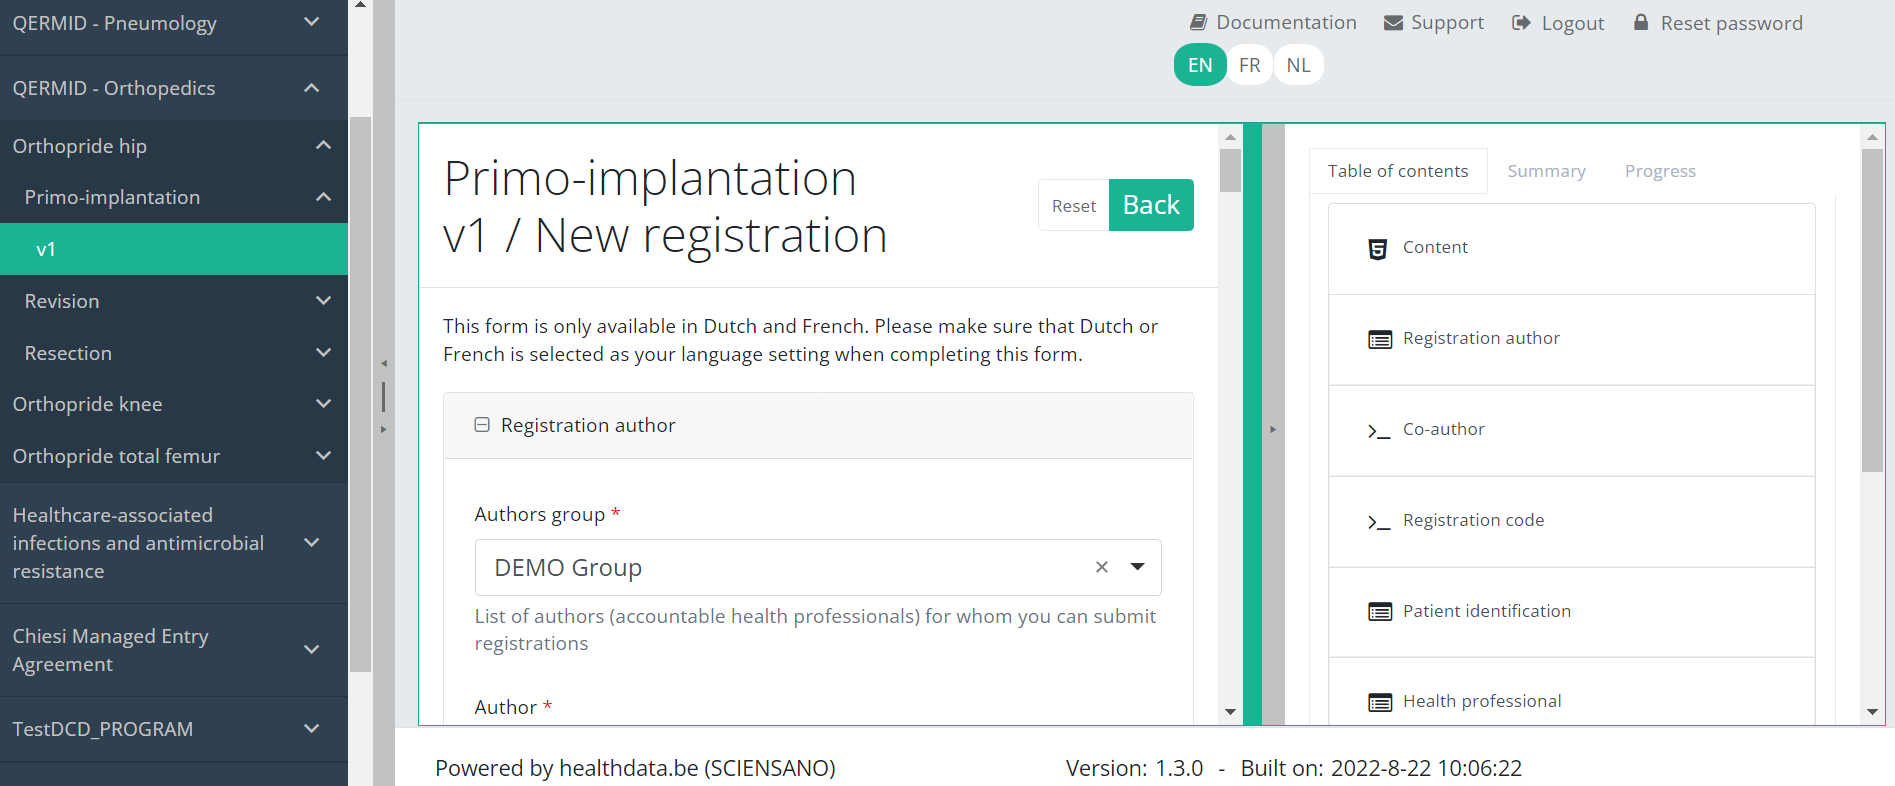
After pressing the button "+ New registration", the main screen will now be replaced with 2 sections: a study form (in the middle of the screen) and a Table of contents (on the right side of the screen).
By completing the study form, you will create a "Primo-implantation" registration for the study project Orthopride Hip.
The Table of contents indicates which sections you must complete. You can also use the table of contents to navigate through the study form: pressing a section in the table of contents will take you to this section in the study form.
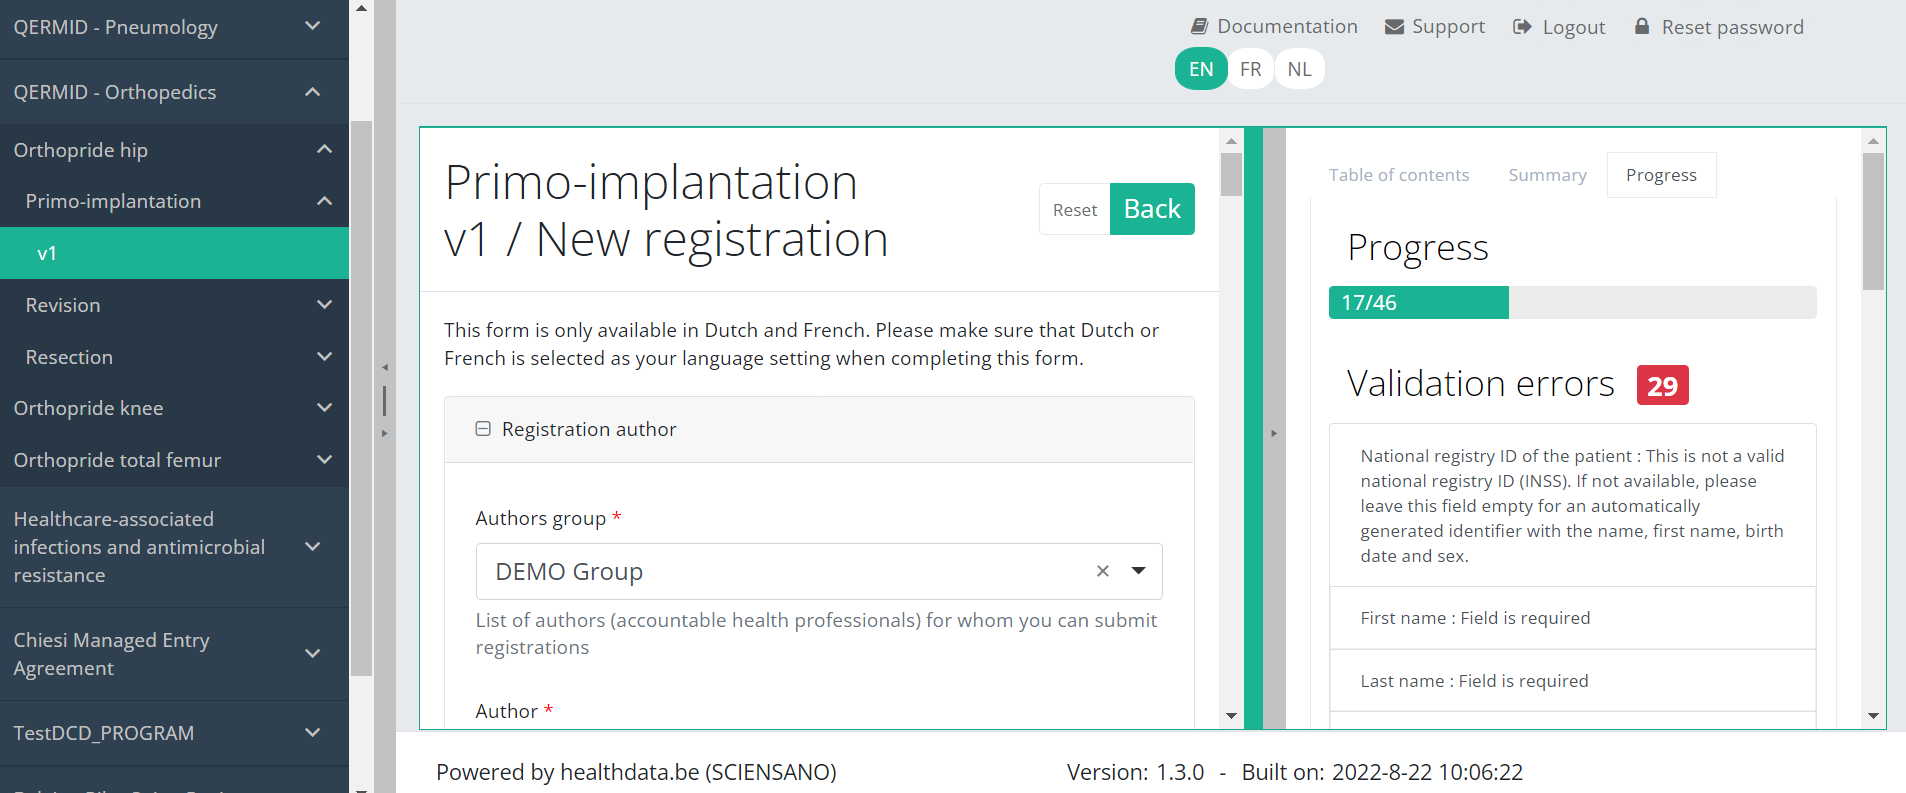
By pressing the tab "Progress" on the right side of the screen , the Table of contents will be replaced by a progress bar and a list of open validation errors.
You can use the list of open validation errors to navigate through the study form: pressing a validation error in the list will take you to this section in the study form.
When the study form is completed and there are no validation errors, you can Save or Submit this registration. Notice that the Submit button is in clear green.
When the study form is completed but there are validation errors, you can Save but not Submit this registration. Notice that the Submit button is in dim green.

When the study form is saved or submitted, the screen switches to the overview table. Now, this table is not empty anymore but shows the saved or submitted registration.
Find a registration
Find a registrationSuppose we want to find a "Primo-implantation" registration of the study project Orthopride Hip. In that case, we need to navigate to the study program QERMID Orthopedics and then to the study project Orthopride Hip. There we need to select "Primo-implantation" in the dark blue left menu.
When you select a version of this study section, you will see the summary table in the main part of your screen. This table contains, among other things: Registration ID, Progress, Author, Co-author, Unique ID, Business Key, Registration Code, National Patient Registry Number…
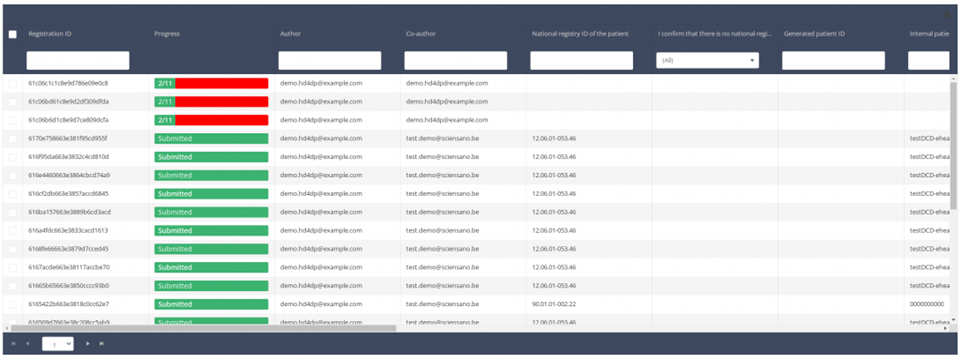
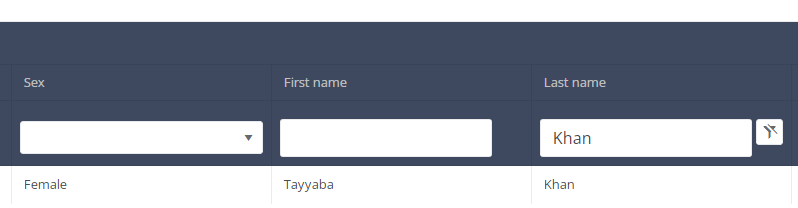
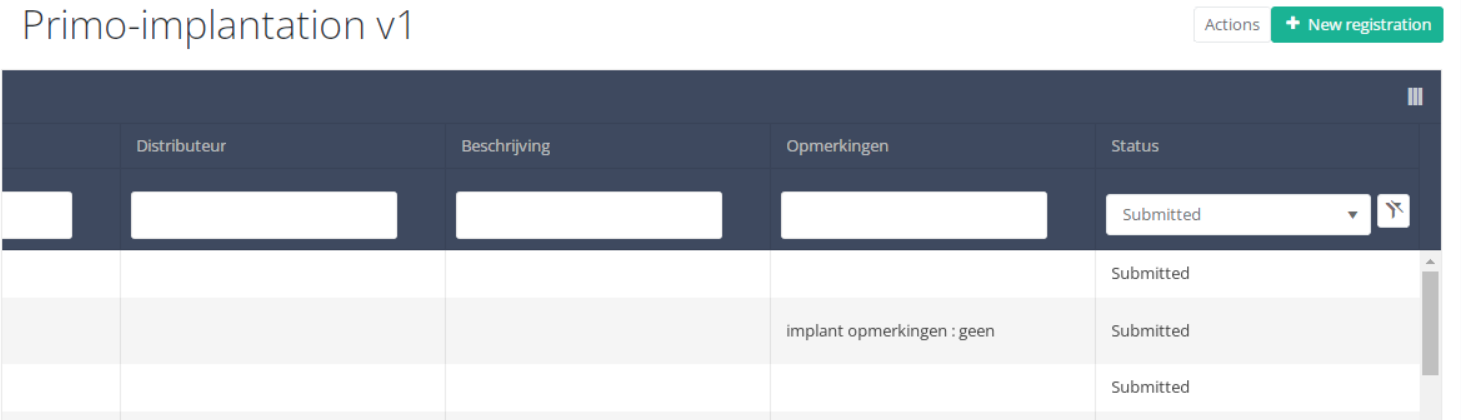
In the header of the summary table, you can use the filter below each column label. In the example below, the last name "Khan" has been entered in the filter (text field), so only the record with "Khan" is displayed.
Update a registration
Update a registrationSuppose we want to update a "Primo-implantation" registration of the study project Orthopride Hip. In that case, we need to navigate to the study program QERMID Orthopedics and then to the study project Orthopride Hip. There we need to select "Primo-implantation" in the dark blue left menu.
Important: a registration can be updated as long as the registration has not yet been submitted. If the status of a registration is "Saved" , the registration can still be updated.

When you select a version of this study, you will see the summary table in the main body of your screen. The table includes the following items: Registration ID, Progress, Author, Co-author, Unique ID, Business Key, Registration Code, National registry number of the patient.…

Use the filters in the header of the table to find the registration you want to update.
Once you have found the registration, you can open the registration's study form by clicking on the corresponding row in the summary table.
You can complete missing fields and/or change previously completed fields in the survey form.
At the end of the survey form, you can Save or Submit the registration.
A registration can be updated as long as it has the status "Saved" and as long as the registration not has been submitted. A submitted registration cannot be updated or deleted again.
Delete a registration
Delete a registrationSuppose we want to delete a "Primo-implantation" registration of the study project Orthopride Hip. In that case, we need to navigate to the study program QERMID Orthopedics and then to the study project Orthopride Hip. There we need to select "Primo-implantation" in the dark blue left menu.
Important: a registration can be deleted as long as the registration has not yet been submitted. If the status of a registration is "Open" , the registration can still be deleted.

When you select a version of this course of study, you will see the summary table in the main body of your screen. The table includes the following items: Registration ID, Progress, Author, Co-author, Unique ID, Business Key, Registration Code, National registry number of the patient...

Use the filters in the header of the table to find the registration you want to delete.
Once you have found the registration you want to delete, you must select the registration by checking the checkbox at the beginning of the row in the summary table.

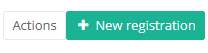
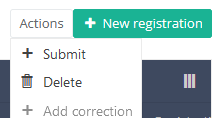
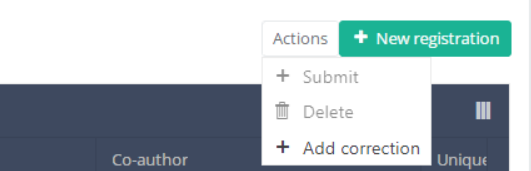
Then you need to press the "Actions" button at the top right of the summary table.
There are now two options, "Submit" and "Delete". Now press "Delete".

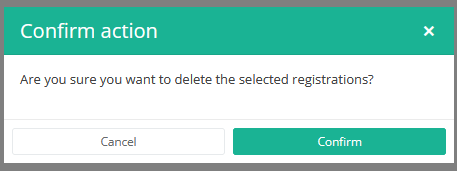
After you press "Delete," a pop-up message will appear asking you to confirm the deletion of the selected registration(s). If you are sure about this action, press "Confirm." If not, press "Cancel."
If you delete the registration, you cannot change its status or content.
The deleted registration will not be removed from the summary table. It remains present, but the status has changed from "Open" to "Deleted".
If you want to see only Open and Sent registrations, you can adjust the filter on the "Status" item in the summary table.
A registration can be deleted as long as the registration has not yet been submitted. If the status of a registration is "Open", the registration can still be deleted.
Submit a registration
Submit a registrationSuppose we want to submit a "Primo-implantation" registration of the study project Orthopride Hip. In that case, we need to navigate to the study program QERMID Orthopedics and then to the study project Orthopride Hip. There we need to select "Primo-implantation" in the dark blue left menu.
A registration can be submitted in two ways. The first way is at the end of the creation process using the study form (see: "Create a registration").
When the registration was completed using the study form, saved and there are no more validation errors, the registration can also be submitted via the overview table. This method can be useful to submit multiple registrations in the same action.

When you select a version of this course of study, you will see the summary table in the main body of your screen. The table includes the following items: Registration ID, Progress, Author, Co-author, Unique ID, Business Key, Registration Code, National registry number of the patient…
Use the filters in the header of the table to find the registration(s) you want to submit. For example, you can use the filters "Status" (set to "Open") and "Validation Errors" (set to "0") to find the registrations that are eligible for submission.

Once you have found the registration(s) you want to submit, you must select the registration(s) by checking the checkbox at the beginning of the row in the summary table.
Then you need to press the "Actions" button at the top right of the summary table.
There are now two options, "Submit" and "Delete". Now press "Submit".
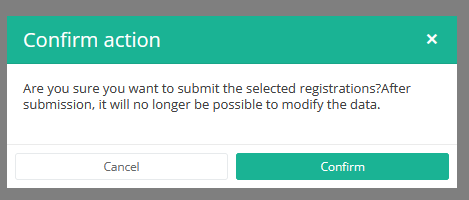
After you press "Submit," a pop-up message will appear asking you to confirm the submission of the selected registration(s). If you are sure about this action, press "Confirm." If not, press "Cancel."
Once you confirm the submission, you cannot change the content of the registration(s). Sent registrations can also no longer be deleted.
The sent registration remains present in the summary table, but the status has changed from "Open" to "Submitted".
If you want to see only "Open" registrations, you can adjust the filter on the "Status" item in the summary table.
A registration can be submitted at the end of the creation process using the study form (see: Create a [project] registration).
When the registration was completed using the study form, saved and there are no more validation errors, the registration can also be submitted via the overview table. This method can be useful to submit multiple registrations in the same action.
Send a correction of a registration
Send a correction of a registrationSuppose we want to send a correction registration of "Primo-implantation" registration of the study project Orthopride Hip. In that case, we need to navigate to the study program QERMID Orthopedics and then to the study project Orthopride Hip. There we need to select "Primo-implantation" in the dark blue left menu.
Important: a correction registration can be added only if the status of the registration is submitted.
A correction registration can be added in two ways. The first way is via the overview table and second way in the preview page of a registration.
1. Send a correction via Overview table
When the registration was submitted, the correction registration can be added via the overview table:

When you select a version of this study section, you will see the summary table in the main part of your screen. This table contains, among other things: Registration ID, Progress, Author, Co-author, Unique ID, Business Key, Registration Code, National Registry ID of the patient…
Use the filters in the table header to find the registration that need a correction. For example, you can use the "Status" (set to "Submitted") filter to get only submitted registrations.
Then, you must press the "Actions" button at the top right of the summary table.
Three options are displayed : "Submit" and "Delete" and "Add correction" but only option "Add correction" is available for submitted registrations. Now press "Add correction".
After you press "Add correction", a pop-up window will appear asking you to confirm the action of adding a correction registration for selected registration. If you are sure of this action, press "Confirm". If not, press "Cancel".

If you confirm, you will be redirected to the correction registration form.
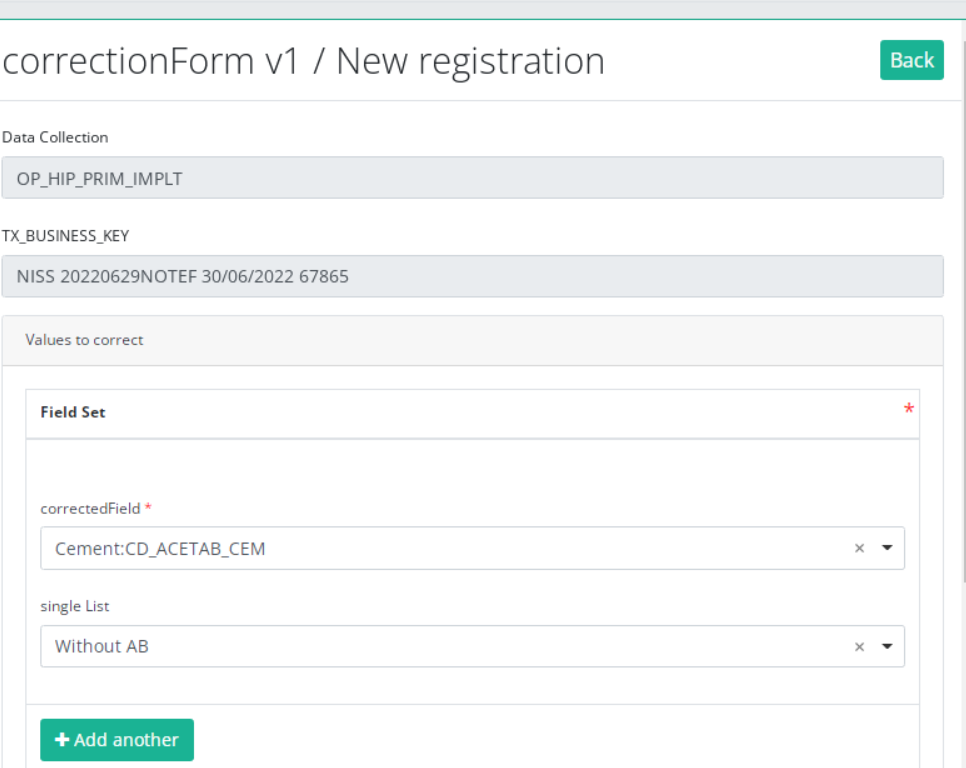
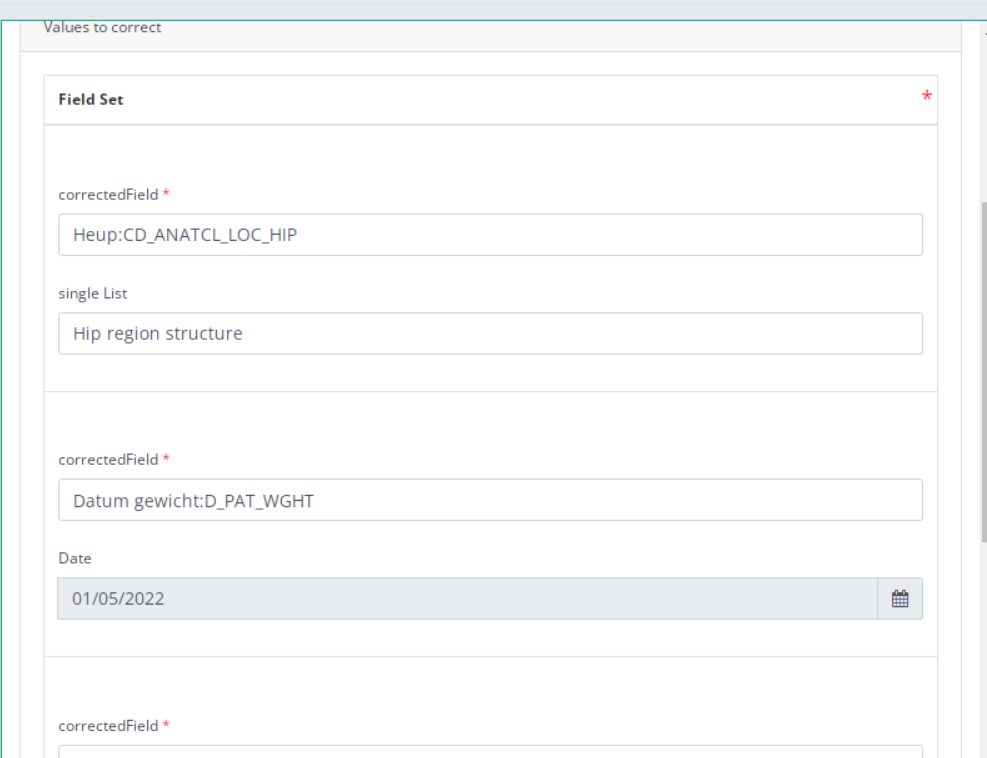
The correction DCD has no more than:
- Business key of original registration
- The name of Data Collection
- The field or variable which is wrong
- The correction value
- Comment field
Some fields are automatically filled with values of original registration, like "Data collection " and "Business_KEY".
The number of fields to correct in the same correction registration is limited to three. You can add another field to correct by clicking on "Add another" button.
When you finish filling the correction registration, you can add a comment and send the correction by clicking on "submit" button.

2. Send a correction via Preview page
We can also add a correction form in the preview page of a registration.
Click on the registration to correct in overview table, you will be redirected to the preview page.
Click on "Add correction" button to add a correction for current registration.

Follow same steps described in previous section (See "1. Send a correction via Overview table")
3. Preview a correction registration
Correction form is a generic form available for all projects and DCDs.
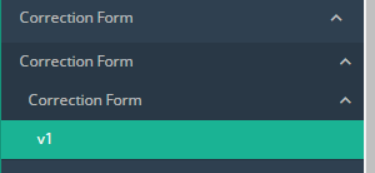
If you want to preview "correction registrations" already submitted, you have to navigate to the study program Correction form and then to the study project Correction form. There you need to select the last version of "correction form" in the dark blue left menu.
All corrections registrations will be displayed (of different projects). You can use the filters in the table header to find a specific registration.
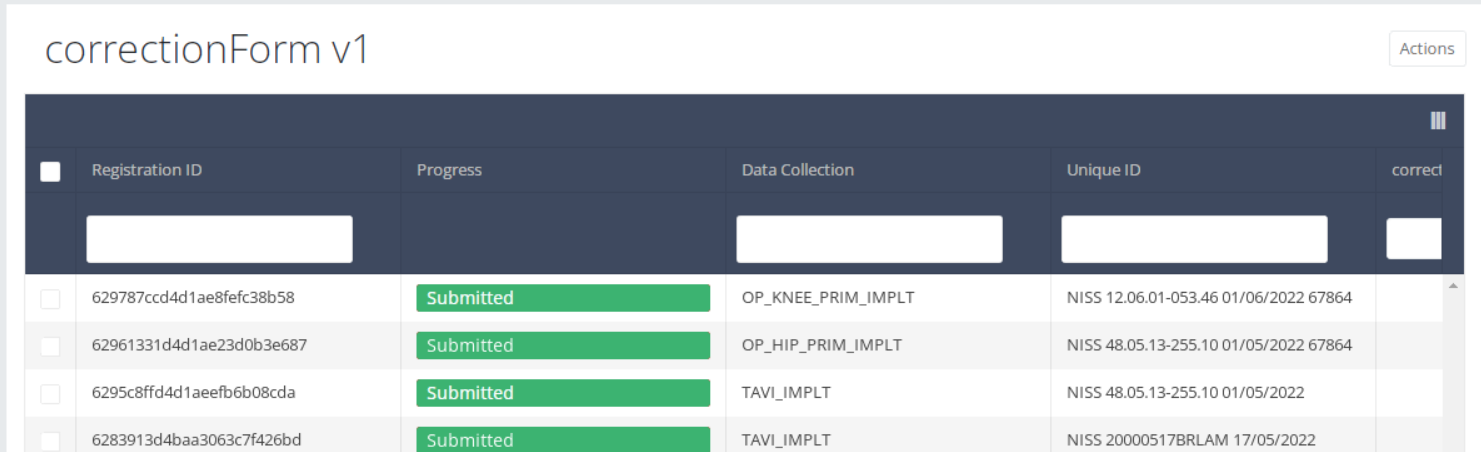
If you want to preview a correction registration, you need to click on, then you will be redirected to preview page.
Support services HD4DP v2 web
Support services HD4DP v2 web<<Documentation in progress>>
Dataflow description HD4DP V2 correction form
Dataflow description HD4DP V2 correction formIn HD4DP V 2 it was asked that a Data Provider can initiate himself the Correction Flow.
Below we describe (high level) the dataflow of correction registration between the data provider web and the healthdata.be platform.
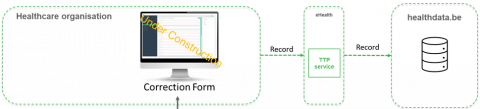
Step 1. The data provider (e.g., hospital) can send himself a correction record based on a correction DCD and start the correction flow. They have to initiate correction of data previously submitted to HD by manual completion of a correction form (see send a correction registration)
You have the full form for the project on the one hand, and a generic correction form (a very minimal form) on the other hand.
A correction DCD which has no more than:
• Business key of original record,
• The name of Data Collection,
• The field or variable which is wrong,
• The correction value,
• Comment field.
Step 2. The correction record has also to pass via eHealth TTP service
Step 3. DWH receives the correction records in a separate table. A new record needs to be generated and loaded into staging . For the data manager it needs to look like the whole record was received again with the corrected value(s).