User manual of the application HD4DP v1
User manual of the application HD4DP v1 manager Thu, 10/27/2022 - 18:29Getting started
Getting started manager Thu, 11/11/2021 - 17:00Where can I find the application HD4DP v1?
Where can I find the application HD4DP v1?HD4DP v1 is a local application - which means that it is installed on the IT infrastructure of your organisation or that of your partner organisation - that is accessible via a web browser, such as Internet Explorer or Chrome, which has a specific link in every organisation.
- Open the link for the HD4DP v1 application
- If you do not know the link of the HD4DP v1 application in your organisation, contact healthdata.be at support.healthdata@sciensano.be to get the link.
How can I access the application HD4DP v1?
How can I access the application HD4DP v1?To access the HD4DP v1 application, you need an account, a username and a password. If you do not have an account, you can request one by following the steps below. If you have an account, follow the "sign in" instructions at the end of this page.
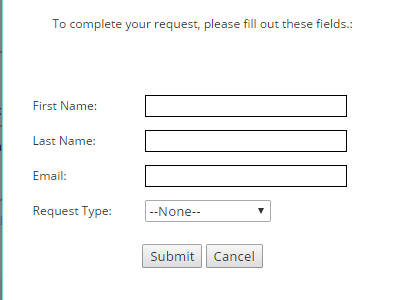
- Open the link for the HD4DP v1 application. You will see this screen:
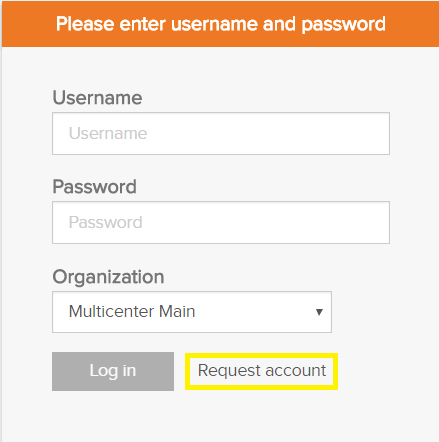
- Click on the Request account link on the login page.
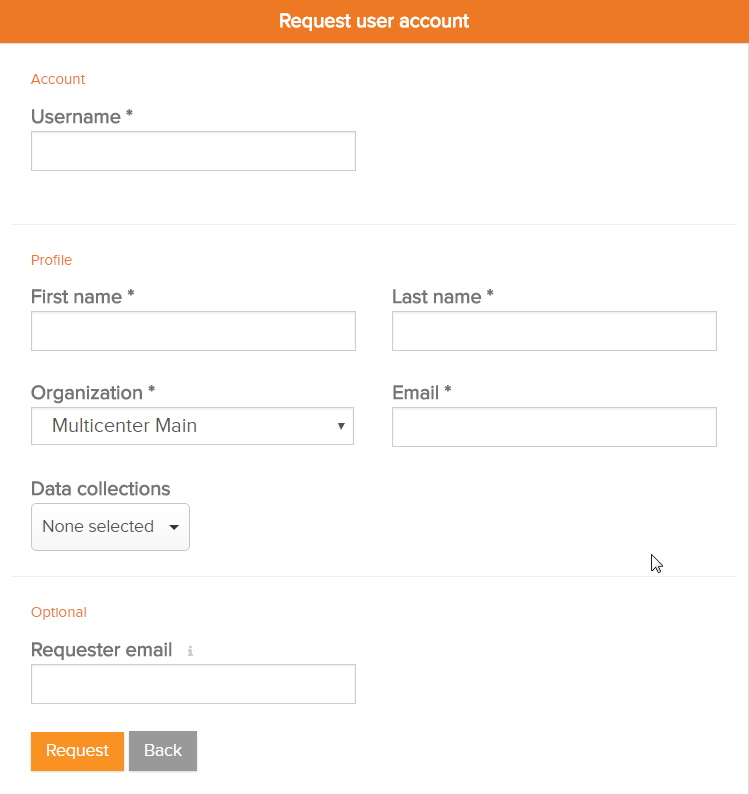
- Fill out the request form:
- Enter a username, first name, last name and e-mail address
- Select the organization and data collection(s)
- Fill in the Requester e-mail field if a person requests an account for a third person
- Submit the request user the Request button
- Confirmation e-mails are sent to the person for whom the account was requested as well as the requester, if the field "Requester e-mail" was filled.
- The approval or rejection for the user account is confirmed by mail. Depending on your organization, this could take a few hours.
- This action will be done by an HD4DP v1 administrator in your organization
- The confirmation mail will include all the necessary information to log in
Sign in
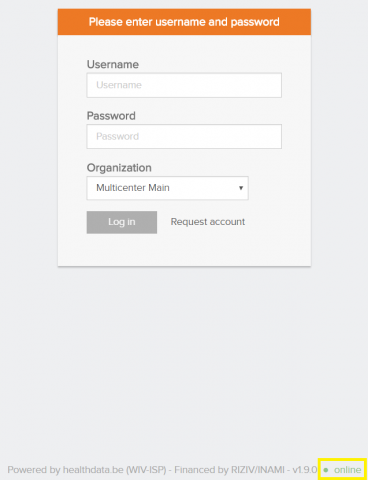
Logging in to the HD4DP v1 application is done in 3 steps:
- Enter your username and password in the appropriate fields
- Select the correct organization
- Click on "Log in"
Request access to data collection
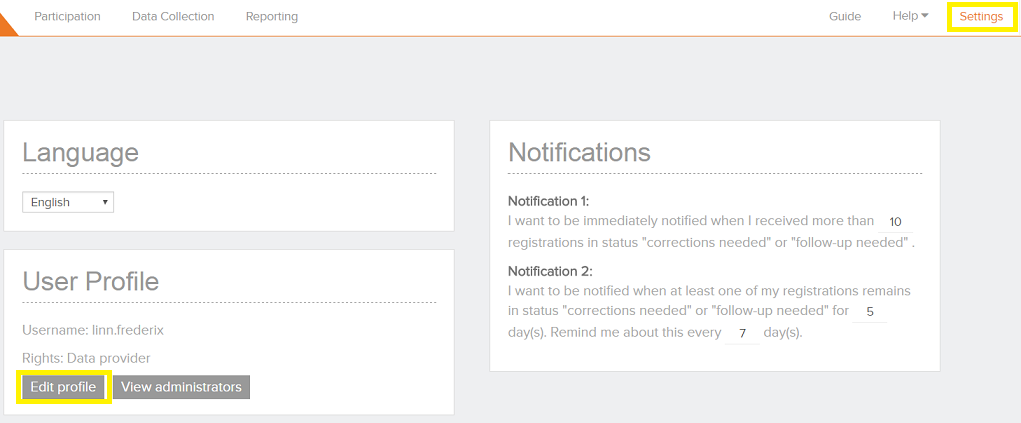
Request access to data collection- Go to your Settings in the right upper corner of the screen
- Choose Edit Profile
- Open the dropdown under the section Request data collection access
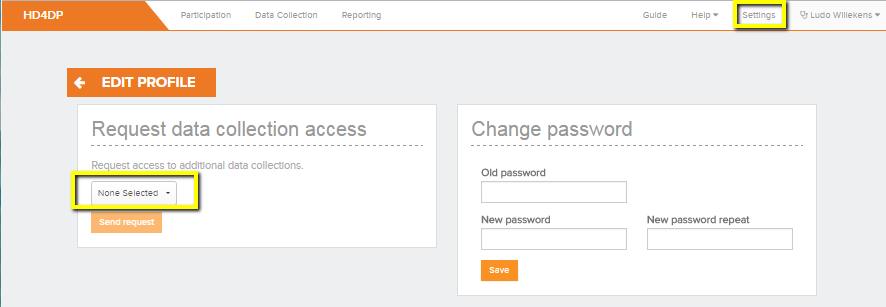
- Select the desired data collection
- Send request
- A mail is sent to the responsible HD4DP administrator to handel your request.
Change the settings
Change the settingsChange your password
The password of a user account can be changed in the account settings by the user:
- Select ‘Settings’ on the top right corner
- Select 'Change password'
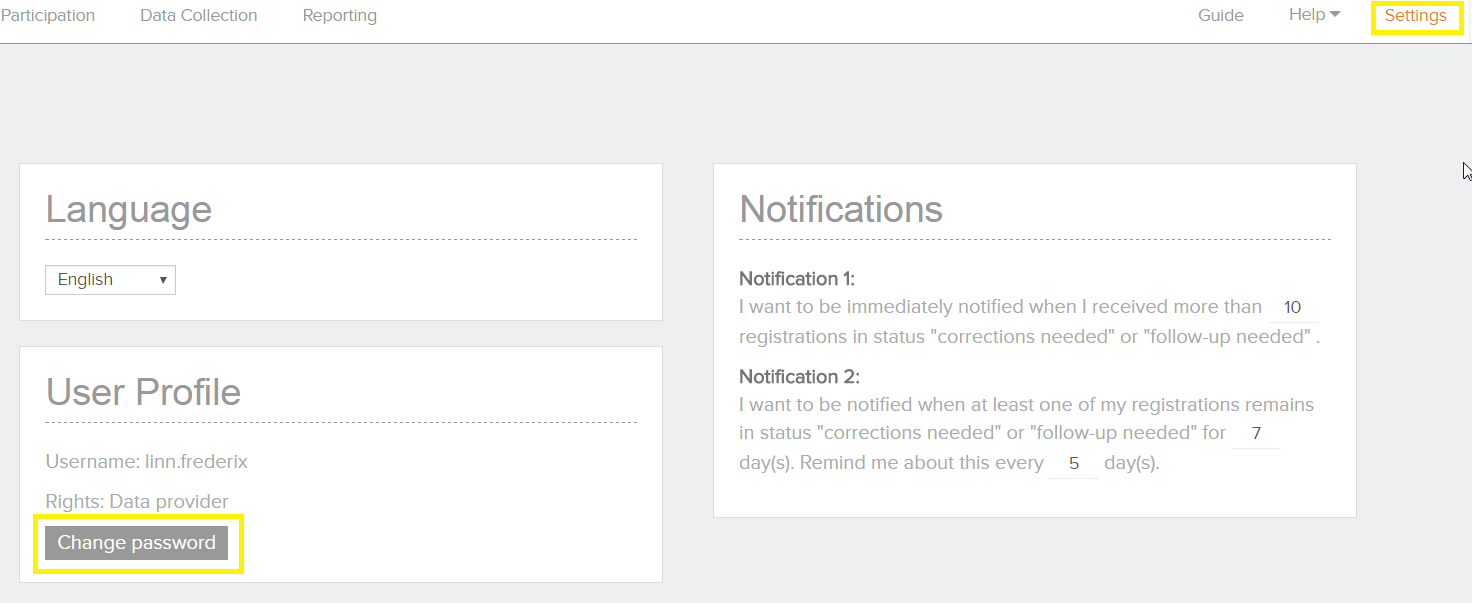
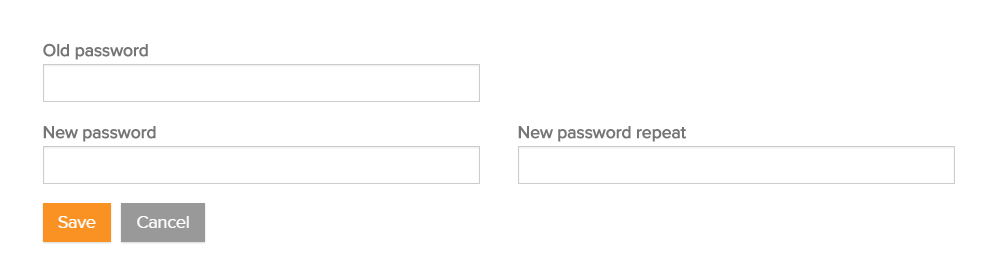
- Change the password in the popup window that will appear
- Enter the "Save" button.
Change language
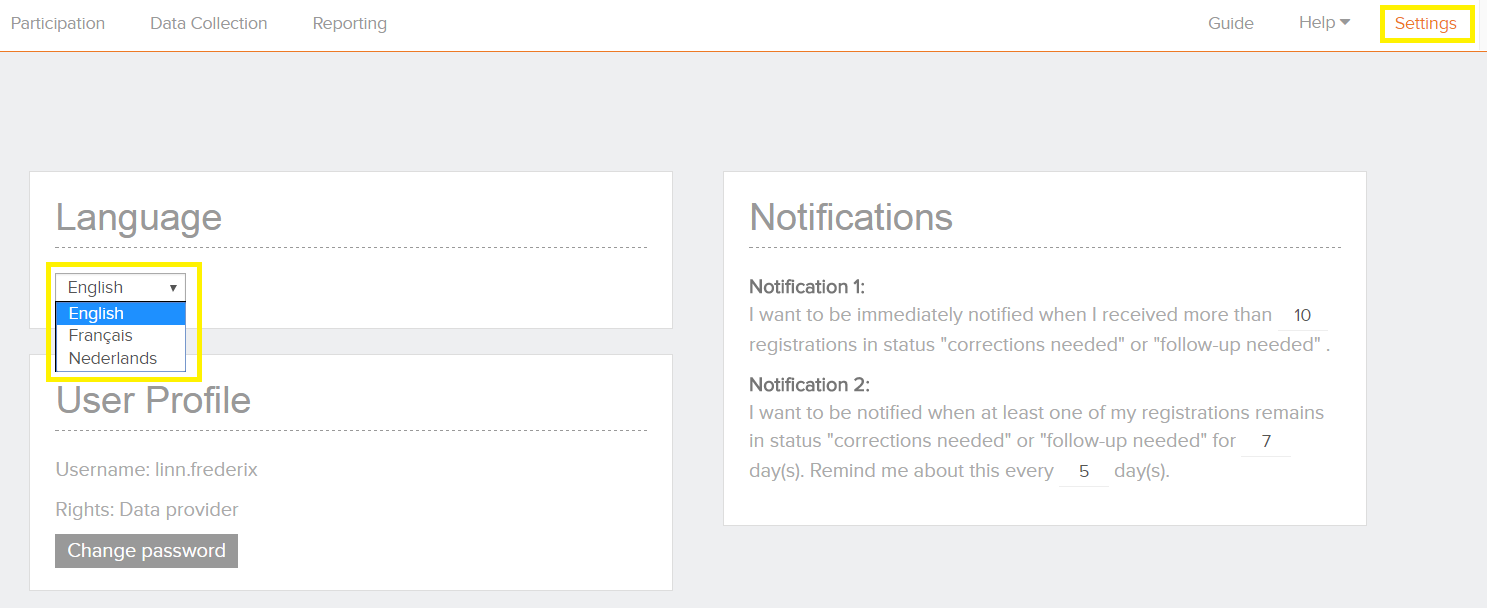
The language settings can be changed for HD4DP:
- Log in with your account and password
- Select ‘Settings’ on the top-right corner
- Select the preferred language under the language section:
- English
- French
- Dutch
- Click on "Change password"
Main menu
Main menu manager Thu, 11/11/2021 - 17:01The Participation Panel
The Participation PanelOver time, the questions that are being asked in a registry can change: new questions are added, other questions become obsolete, or even the list of potential answers for a given question can change.
To account for these changes, the HD4DP application works with versions for a registration form. Per data collection (e.g. that of 2015) only one version can be active.
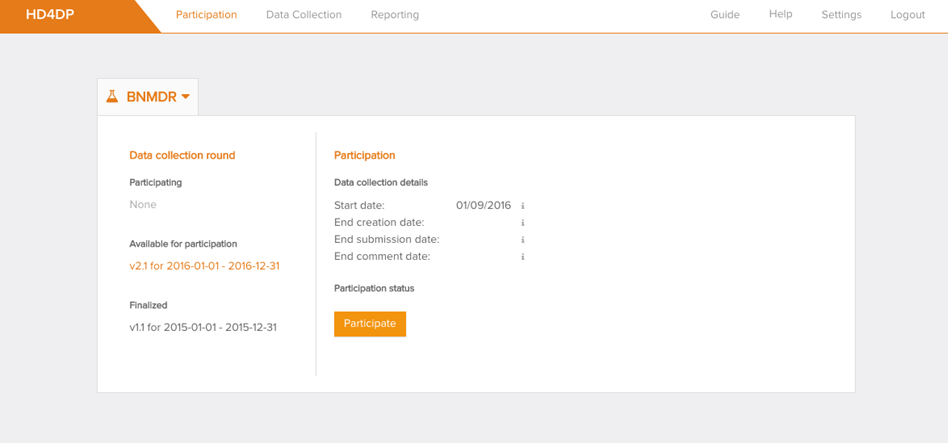
The participation panel gives more information about the different versions that exist for a given registry and allow you to manage which version(s) you're working on.
- Select 'participation' in the top menu to navigate to the registry participation panel
- Select the registry of your choice in the dropdown menu

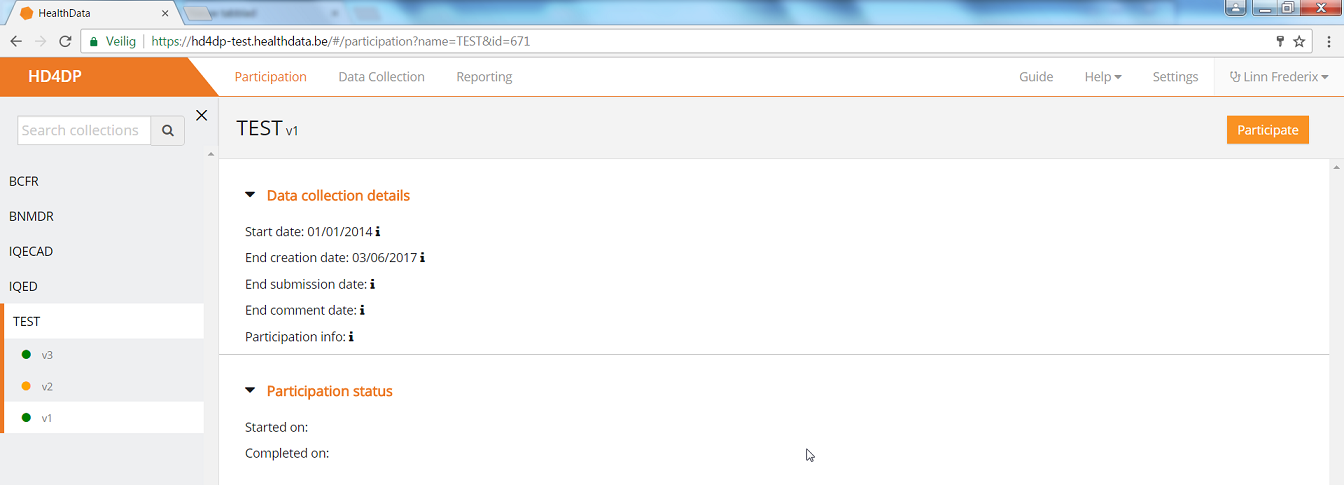
In the left panel, the most recent versions of the registration form for each data collection are visible:

When a version is selected, the user gets an insight of the history and current status of the register in the right panel by using sections and key dates and to give the user the option to go view the report or to finalize the collection of the data by using the action buttons.
Sections
The different versions are split up in 3 sections:
- Participating: shows the versions of the registration forms that a user is currently actively participating in. Normally, this should only be one version
- Available for participation: other available versions for a user
- To start participating on this version, please refer to the article Participate in a data collection
- Finalized: all the versions for that registry where your organization has indicated that you are finished with collecting data for a given data collection round (Finalize the data collection)
Key dates
Selecting a version by clicking on it gives a user more information about some key dates as determined by the registry responsible:
- Start date: from this date on, this registration form is available for activation by the data providers. Once activated, new registrations can be created
- End creation date: from this date on, it is no longer possible to create new registrations using this registration form. Submitting and/or correcting existing registrations remains possible
- End submission date: from this date on, it is no longer possible to submit registrations. It is only possible to correct existing registrations and to submit these registrations
- End comment date: the data collection is no longer active and no corrections can be done
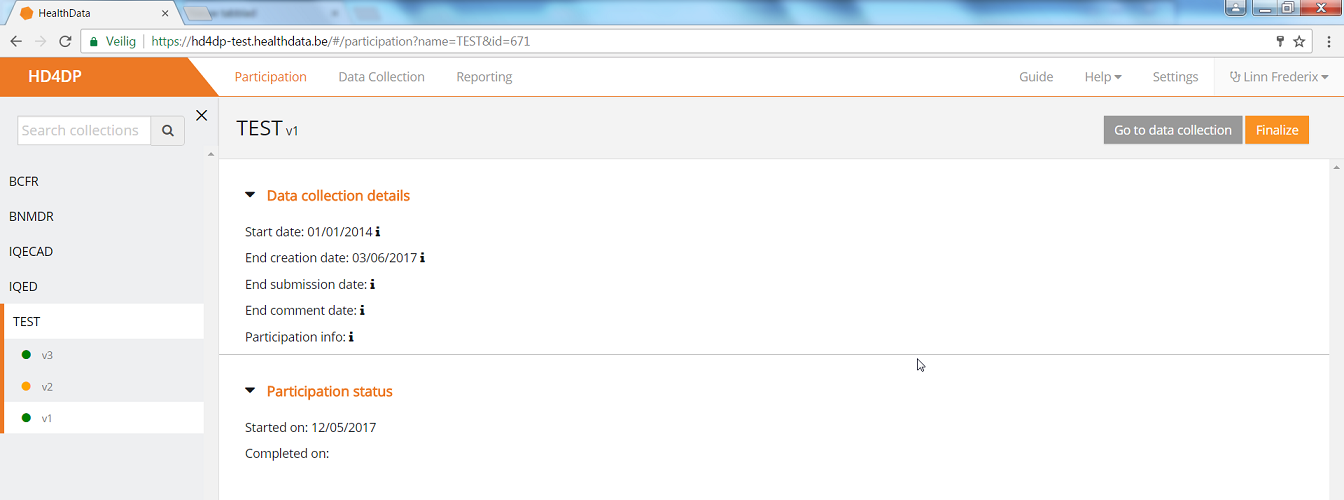
Action buttons
Notice that there are two buttons:
- Create and submit a registration
- Finalize the data collection
Data Collection view
Data Collection viewThe Data Collection view leads a user to the existing registers. A user can start collecting data from this view.
See also "Create and submit a registration"
The Reporting Section
The Reporting SectionThe reporting part of the menu leads to the Healthstat.be website.

Healthstat.be is the data visualization platform of the Healthdata.be project, which is part of the national Action Plan eHealth 2013-2018. Here, the researchers publish tables, figures and maps they made based on the data they have collected among Belgian hospitals, laboratories, physicians, and patients.
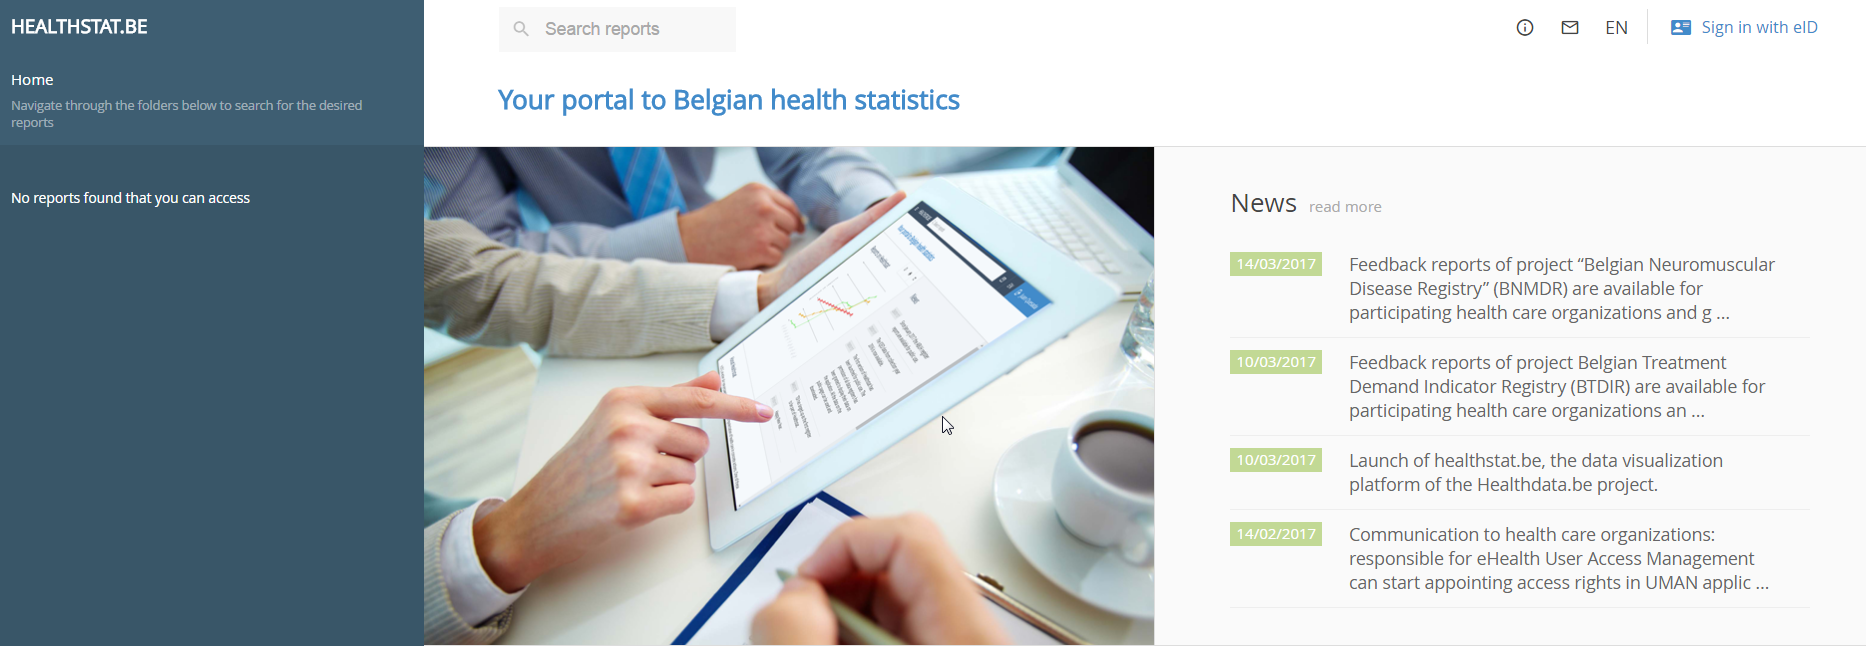
With these reports, researchers want to give health professionals, healthcare institutions, patients, governments and the general public an up-to-date insight into the prevalence of certain diseases, their causes and impact, and the effectiveness of their treatment.
Healthstat.be is a service of the Sciensano and funded by the National Institute for Health and Disability Insurance.
The 'Help' and 'Guide' menu
The 'Help' and 'Guide' menuThe 'Guide' and 'Help' menu that is located in the upper right corner and can help in using the HD4DP application.

Page 'Guide'
This wizard helps to explore the application. It provides more information on the possibilities within the application. Click 'next' to go to the following function.

Page 'Help'
In the 'Help' menu, you can choose from the following subjects: 'Support' and 'Contact'.
Support
Choose ‘Support’ to be redirected to the support page from Healthdata. Articles on how to use HD4DP can be found here.
Use the search bar for a specific item. Enter a key word and the related articles will be shown.
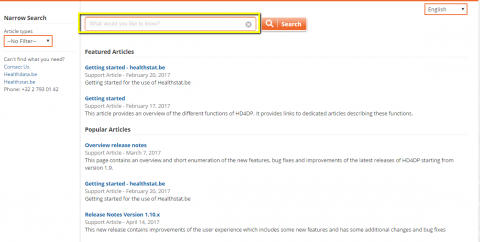
In the left sidebar you can find the links to:
- Healthdata.be
- HealthStat.be
- Public question
- Telephone number
Contact
Selecting 'Contact' in the menu will first invite you to ask your question, to check whether the answer is not yet in our support articles.
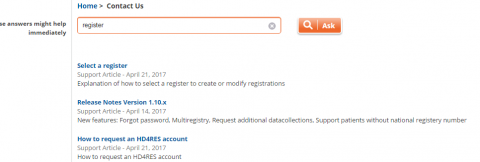
On the bottom of the search result you can then indicate whether you have found your answer or you can still choose to submit your question.

In case you click 'Yes, submit my question', a dialogue box appears that you can fill in. Automatically a case is created which will further be followed up by the healthdata support team.
You can of course always send an email with your questions directly to support.healthdata@sciensano.be.
Display Errors and Warnings
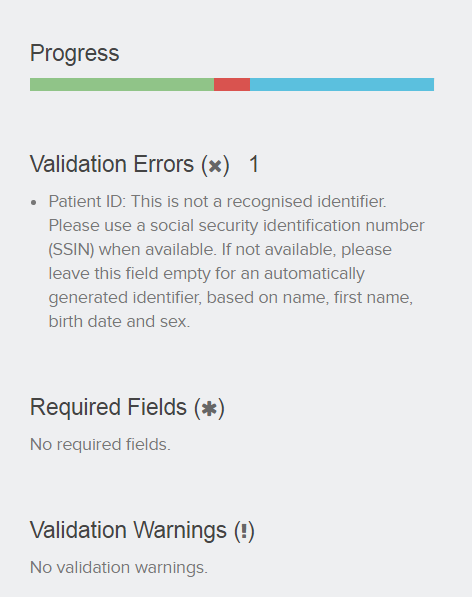
Display Errors and WarningsData that are filled in manually or that are present in the uploaded file can contain errors.
These errors will be shown as validation errors, the absence of required fields, validation warnings under the validation part which in the right panel of the screen. An explanation of the error is given.
Clicking on the validation error or warning will navigate to the field concerned.
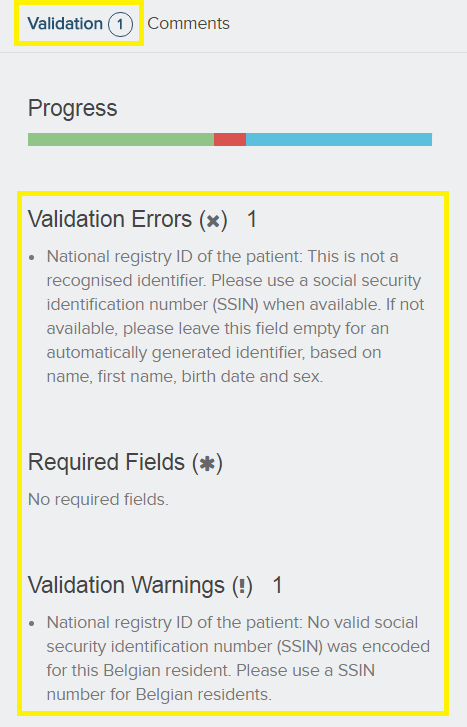
These records need to be corrected first and then submitted for registration.
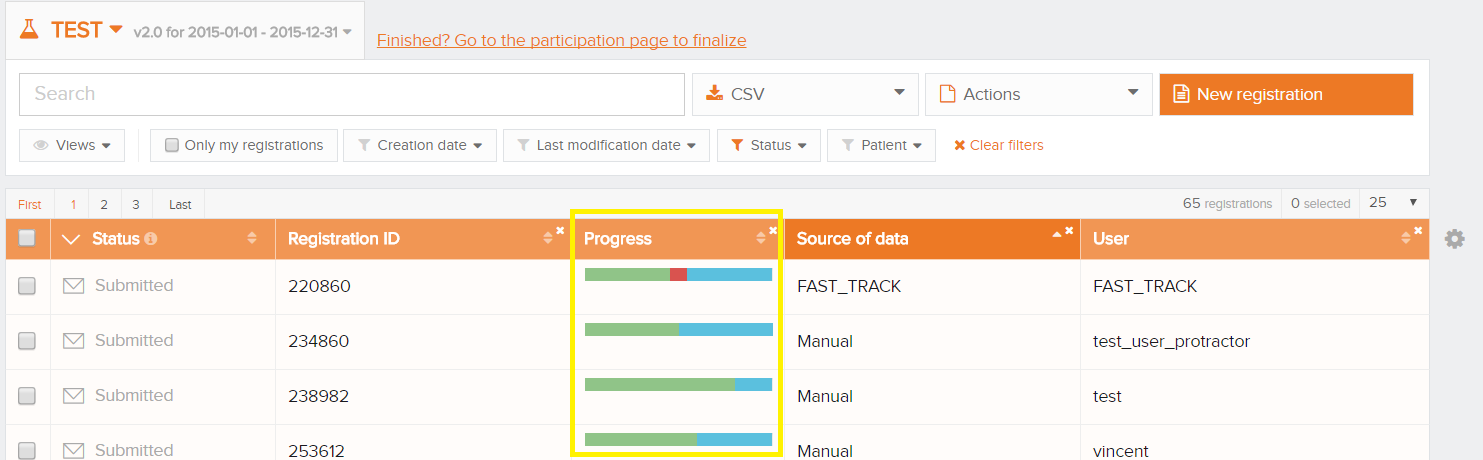
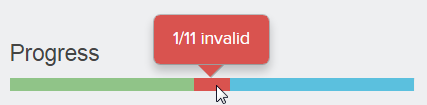
The progress bar
The progress barThe progress bar shows the progress of the data collection. It lists the number of errors, remarks and correct fields in a data collection.
The progress bar can be found in:
- The view list of a register
- The detailed view of a record
View list
Detailed view
The progress bar can be divided in three sections, each section has its own color and meaning.
- Red: mandatory fields and fields containing an error. These need to be solved before the registration can be submitted.
- Blue: Empty optional fields. The registration can be submitted with empty optional fields.
- Green: correctly filled fields.
It is possible to hover over the progress bar. The number of fields per section are displayed.
Collecting data
Collecting data manager Thu, 11/11/2021 - 17:03General
General manager Thu, 11/11/2021 - 17:03Select a register
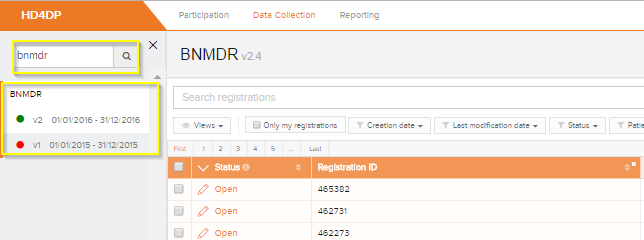
Select a register- Select the register to create or modify registrations. Click on the top left corner and a drop down menu will be shown. The list of available registers is provided: Data Collections (in this article, we randomly selected the project BNMDR).
- Select the correct version of the registry. In case of different versions/periods select the one with the green bullet

Customize the list view
Customize the list viewThis article explains how a user can customize the list view in HD4DP. The list is shown in default view list. The view list can easily be adapted to the needs of the user. These are the main actions to customize the view list:
- Sorting
- Filtering
- Columns displayed
- Number of registrations per page
Sorting
By simply clicking on a column header, all registrations are sorted ascending or descending according to this column.
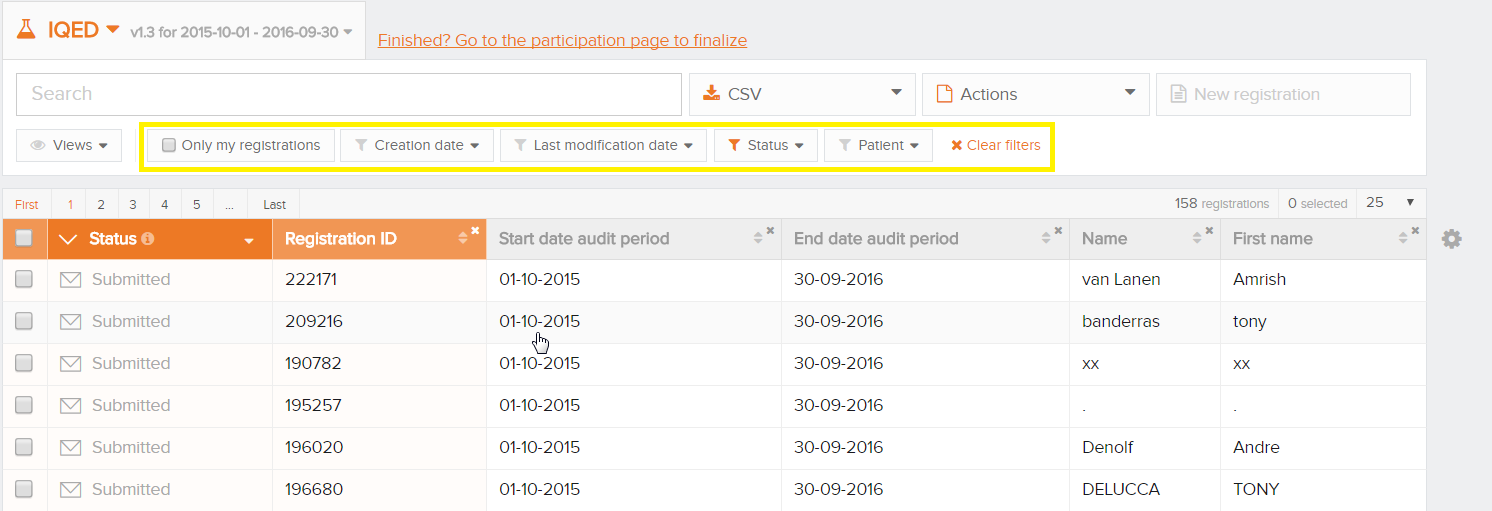
Filtering
Predefined filters are provided to filter on the most commonly used columns.
Click 'Clear filters' to display all registrations again.
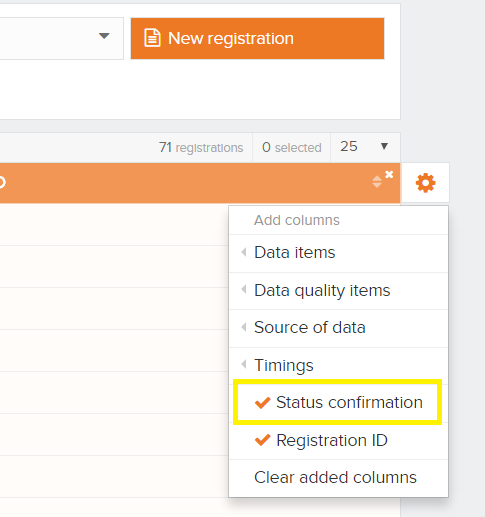
Columns displayed
For each registry, the researcher has defined a default view that consists of a set of columns. To display this set of columns, click 'Restore default view' as illustrated below.
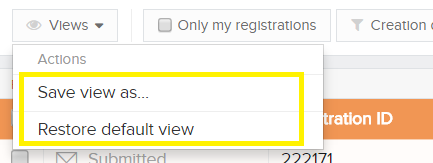
You can add and remove any columns. While columns can be removed by clicking on the 'x' at the top right of each column, adding columns is done via the 'gear icon' at the right of the table.
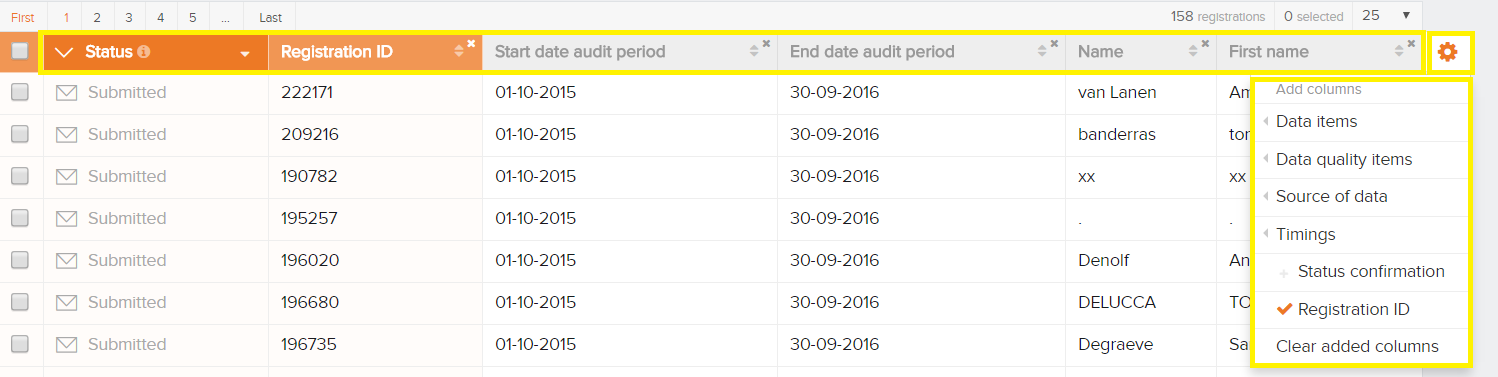
An interesting colum to add to the overview is the Progress Bar where you can see the status of every registration. The bar represents the status of the fields i.e. valid, invalid or optional.
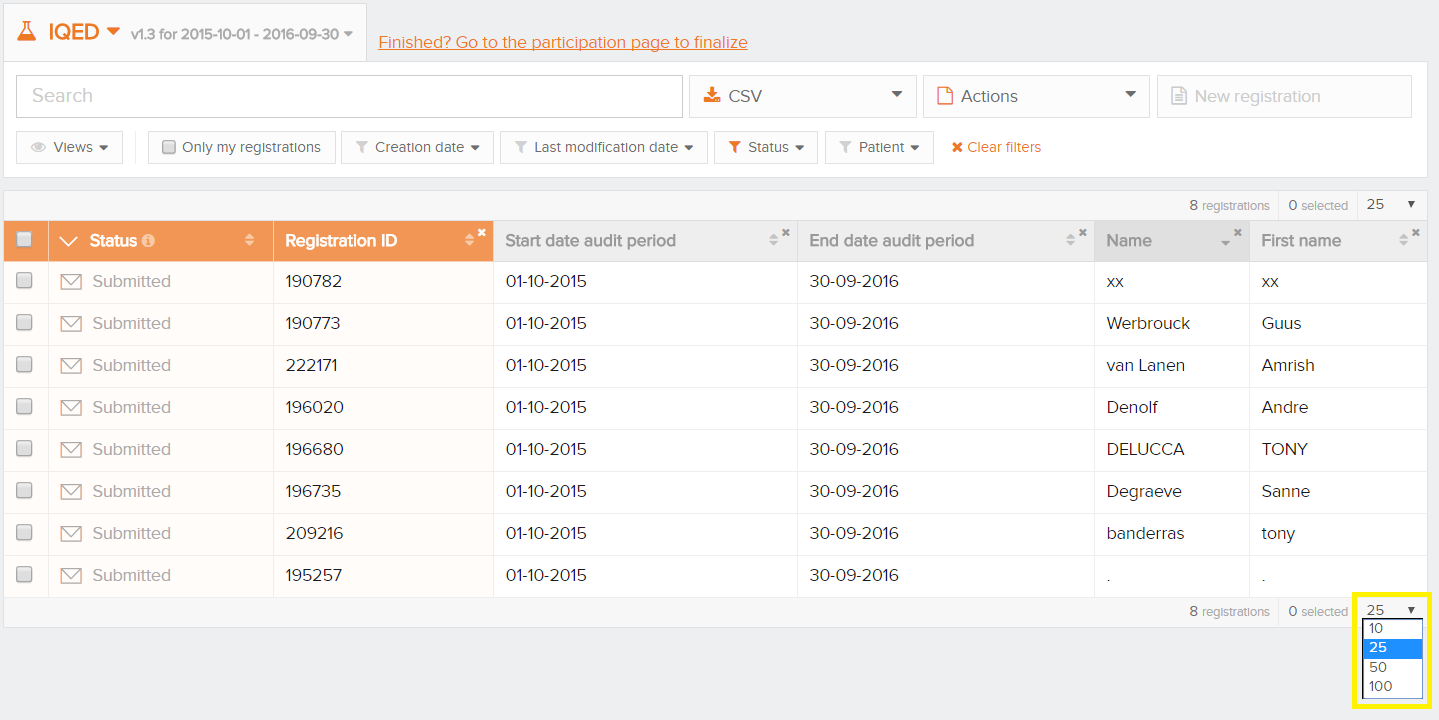
Number of registrations per page
The number of registrations displayed per page can contain 10, 25, 50 or 100 registrations per page.
Participate in a data collection
Participate in a data collection- Go to the Data Collection section and select the version in which you want to participate.
- Click the button "Go to the participation page":
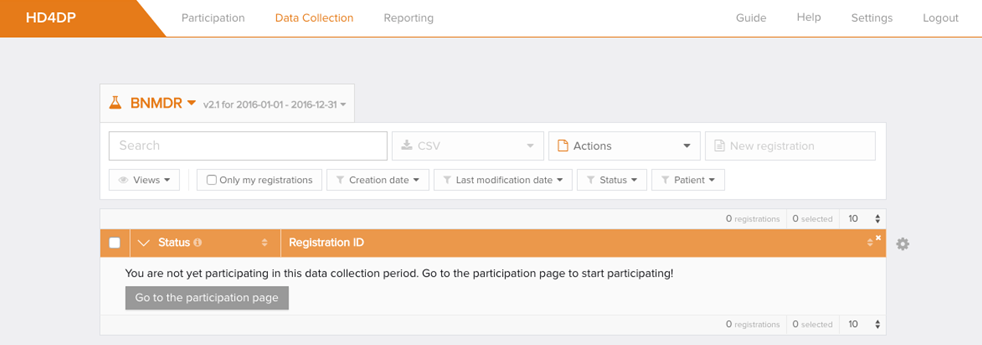
Click on ‘Participate’ and then you can click on ‘Go to data collection’:
Overview of the registration statuses
Overview of the registration statusesThis article explains the different registration statuses in HD4DP v1 as of v1.8.
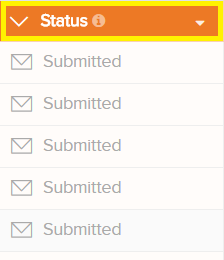
Where to find the status of a registration?
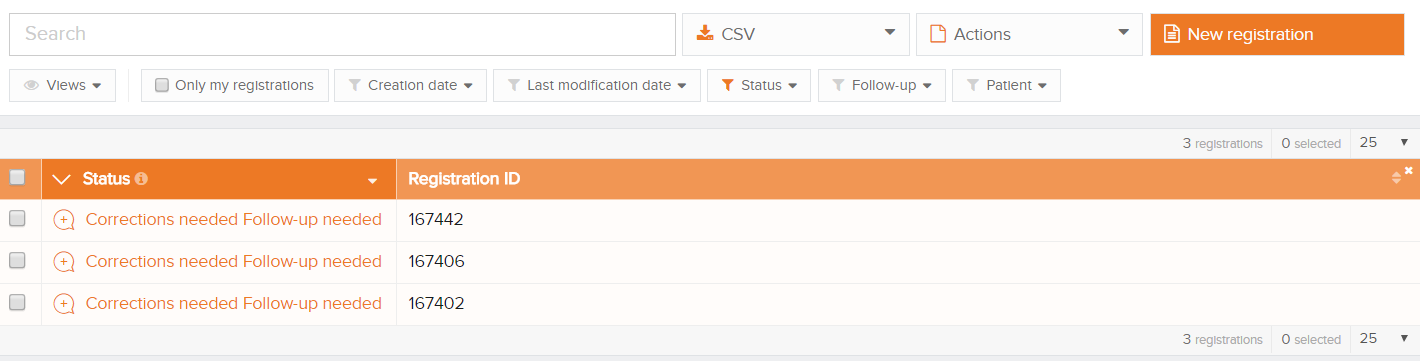
Statuses are shown in 'Status' column which is per default the first column in the overview:
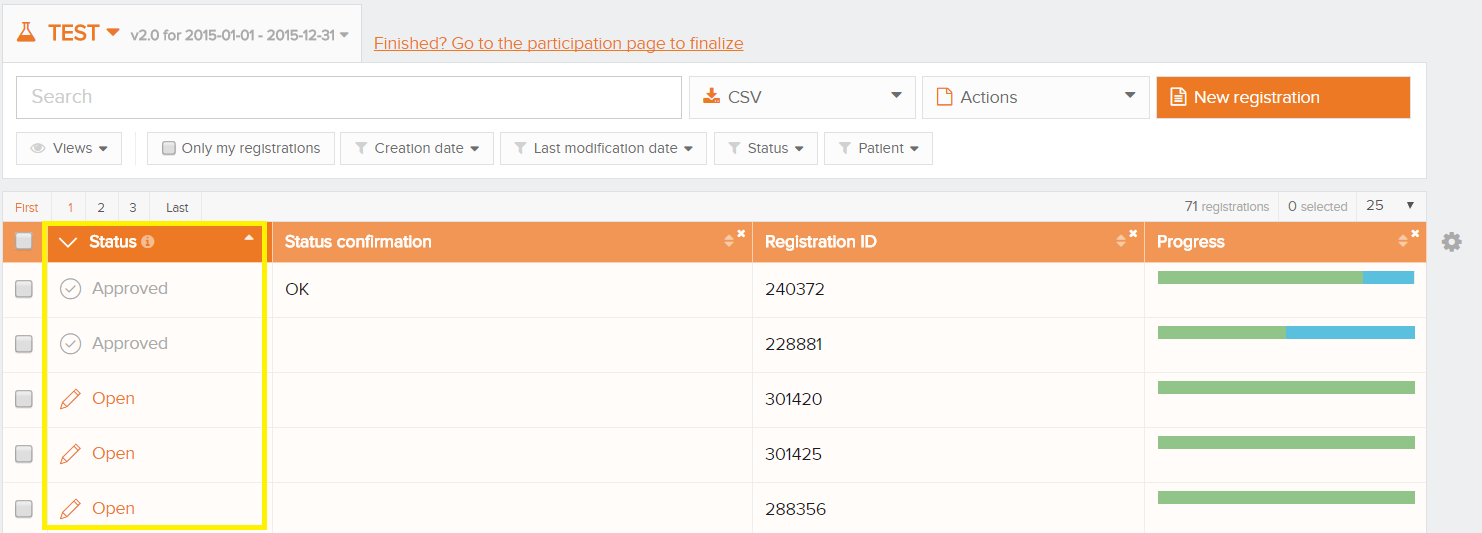
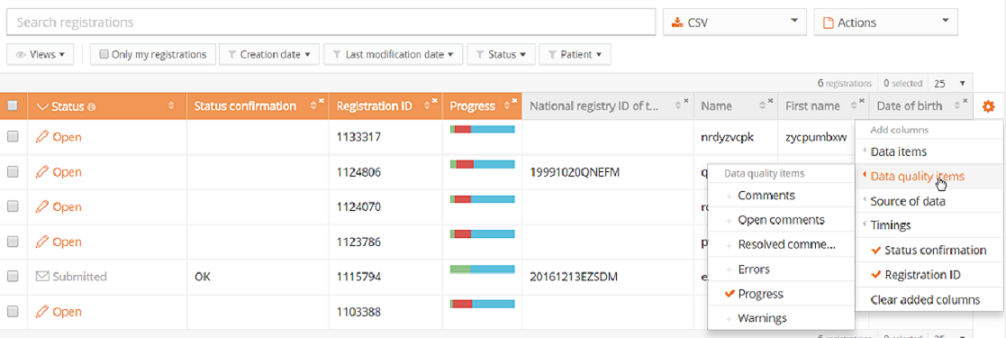
What is a Status Confirmation?
The status confirmation gives information about the arriving of the data in HD4DP. The status confirmation, which is in fact a substatus of a registration is shown in the column 'Status confirmation'.
To view the 'Status Confirmation', modify the list view add the column 'Status confirmation':
As soon as a registration is sent and has status 'Submitted', the confirmation column will show the following substatus:
- Pending
- OK: the registration has arrived
- NOK: the registration did not arrive within 48 hours
The different registration statuses
Open*: a registration is created and stored. It has not been submitted
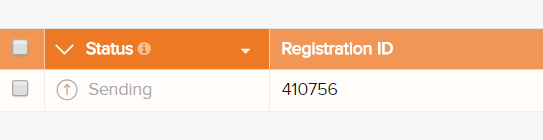
Sending: the registration is being sent to HD4RES
Submitted: the registration has been sent to HD4RES. This does not necessarily mean that the registration has arrived in HD4RES
Registrations in status 'Corrections needed'*: the researcher verified the registration and added some comments. Review the comments and correct where necessary
Approved: the researcher verified and approved the registration
Registrations with status 'Follow-up needed'*: a follow-up registration is needed for this registration. Fill in the newly available fields
Error: your account is not authorized to create and submit registration for this register. Please contact support.
* action is required from the user
The below scheme summarizes the different registration statuses in HD4DP and Processing Data and their relation to each other:
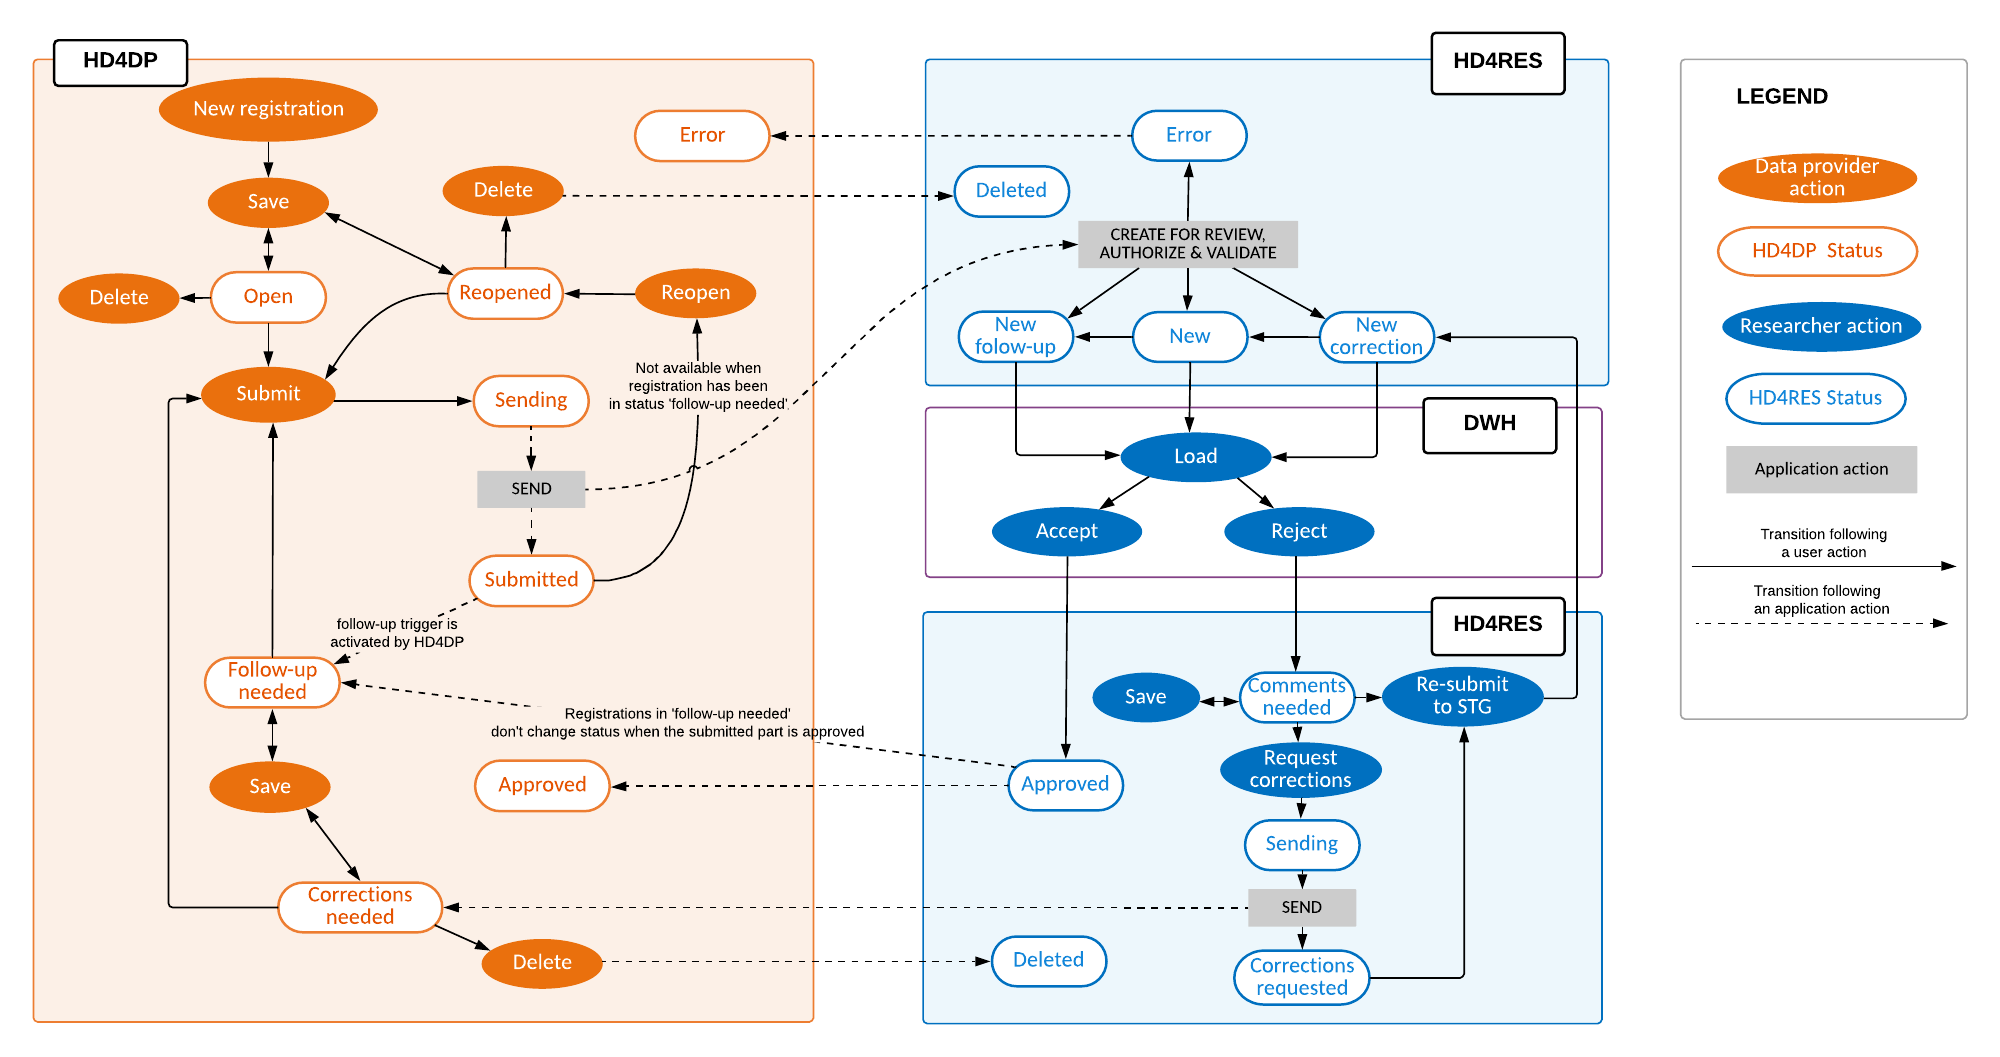
Process
Process manager Thu, 11/11/2021 - 17:04Create and submit in HD4DP v1
Create and submit in HD4DP v1The Data Collection view leads a user to the existing registers. A user can start collecting data from this view.
Creating and submitting a registration consists of 4 steps:
- Select the register for creating a registration.

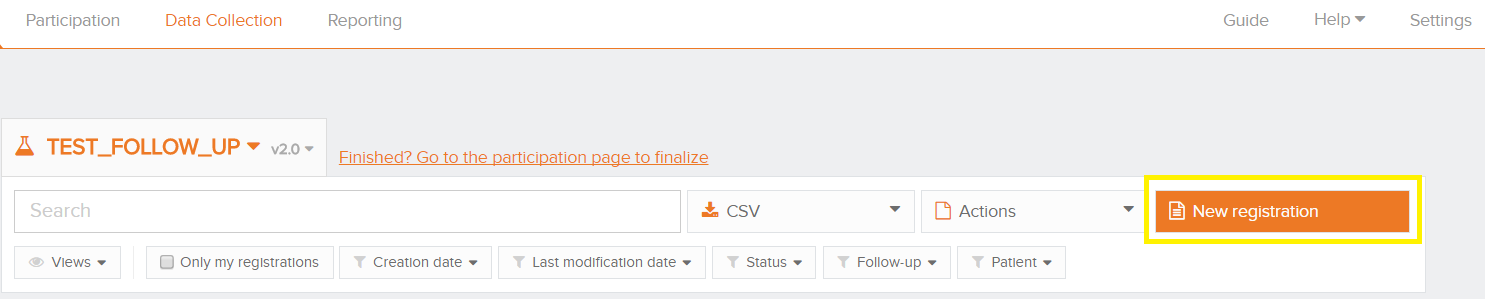
- Click on "New registration" button.
- Fill in the registration form and save or submit the registration

- Save the registration temporarily if needed. The status of the record will be "Open" for saved registrations.

- Submit the registration if no validation errors present. The status of the registration will change to "Sending".
- When the record has been processed, the status will change to "Submitted".

As soon as a registration is sent, the "status confirmation" column will show "Pending".
- It shows "OK" once the registration has arrived, and "NOK" if the registration did not arrive within 48 hours. If the status is "NOK", the software will automatically try to resend the registration up to 10 days after the initial submission.
- For the statuses "Sending","Corrections needed" and "Approved" the status confirmation will be empty because the registration has not yet been submitted.
- A registration can be "Reopened" if needed as long as the status of the registration is "Submitted".
Change or complete registrations
Change or complete registrationsA user can modify and complete a registration in four steps:
- Select the register from which you wish to modify one or more registration(s).

- Click on the registration to be changed, and complete the form in full. The status of the record is then:
- Open for registrations saved manually or by uploading a csv file
- Corrections needed for registrations with errors

- Save registration temporarily if necessary. Record status becomes Open for stored registrations.

- Send the registration if there are no more validation errors.
- Registration status changes to Sending

- When the record is processed, the status changes to Submitted.

Once a registration is sent, the message Pending appears in the status confirmation column.
- When the registration is received, the message OK appears; if the registration is not received within 48 hours, the message NOK appears. With the status "NOK", the software will automatically try to send the registration up to 10 days after the initial submission.
- For the statuses Sending, Corrections needed and Approved, the status confirmation is empty because the registration has not yet been sent.
- A registration can be Reopened if necessary, as long as the status of the registration is "Submitted".
Registrations in status 'Corrections needed'
Registrations in status 'Corrections needed'Registrations with status 'Corrections needed' need to be revised. The researcher has comments that require an update or revision.
- Select the record with status 'Corrections needed'
- Verify and react to the comments made by the researcher by selecting the ‘comments’ tab
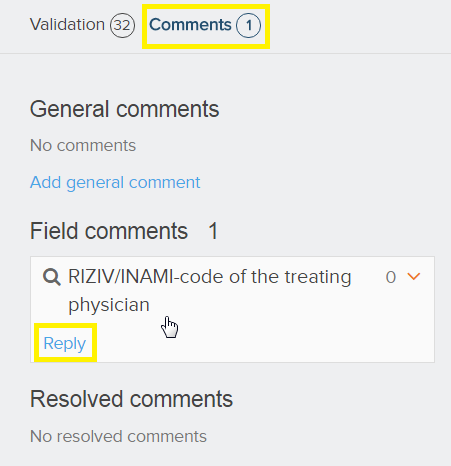
- Reply to the comments and modify the registration and save the comment
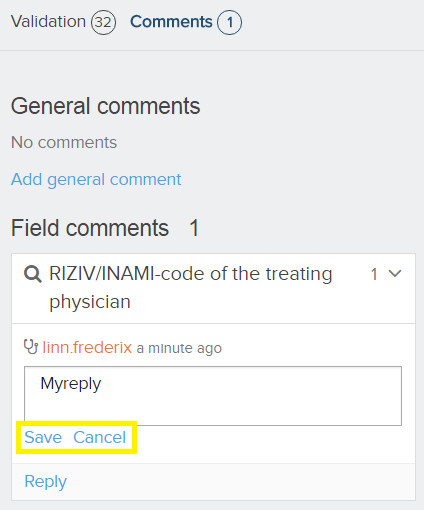
- Click 'Re-submit' to send the corrections to the researcher. Alle validation errors need to be solved before the 'Re-submit' button becomes available
Registrations with status 'Follow-up needed'
Registrations with status 'Follow-up needed'Some registrations need follow-up e.g. to monitor multiple consultations of a patient. Therefore additional information will be asked at predefined milestones, which are defined in the set-up phase of the registry.
Follow-up registrations can be triggered by:
- Timing e.g. x time after the initial registration
- Answers in the initial registration e.g. only if the patient has taken medication X
- A combination of both e.g. if the patient has taken medication X, ask follow-up information 3 months later
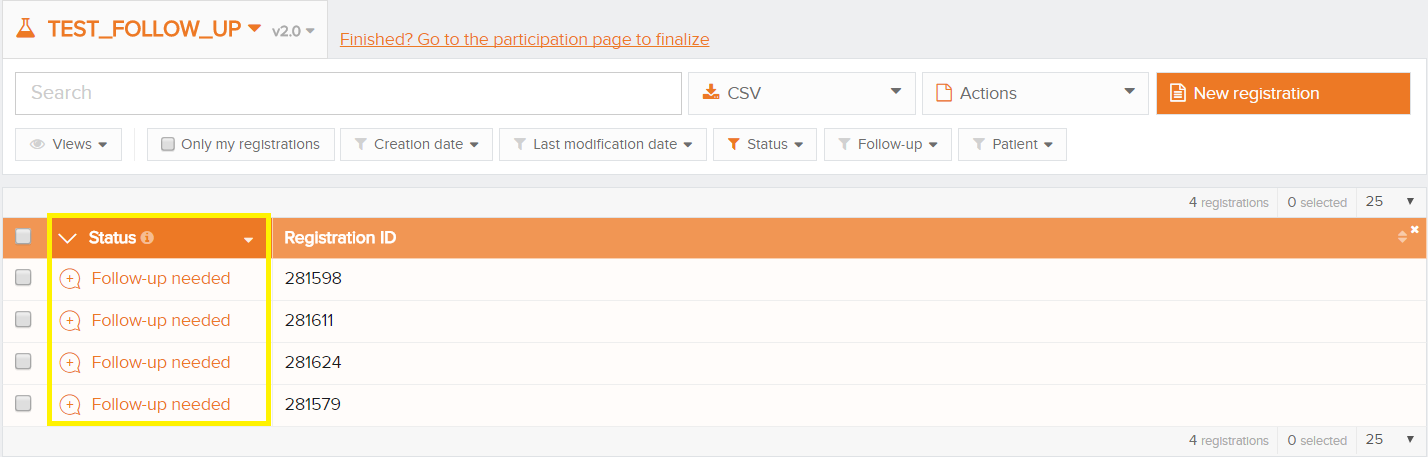
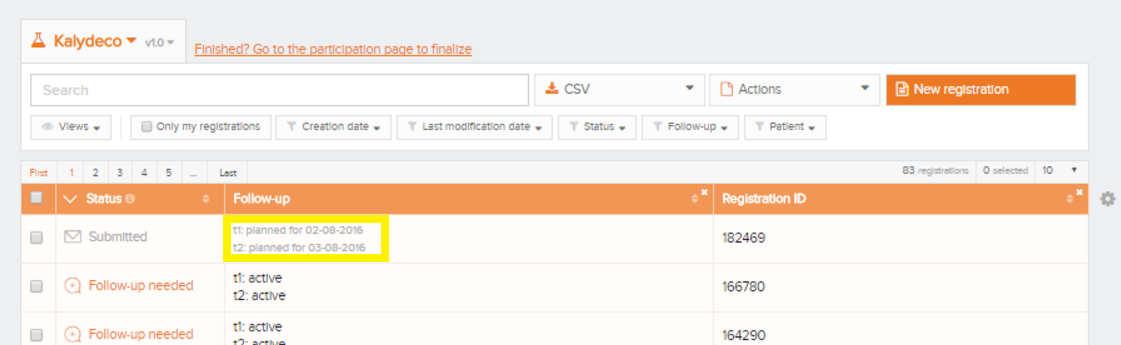
If the Status column shows 'Follow-up needed' and the 'Follow up' column is active, the user can add the extra information needed in the details of the registration.
Note: the process of validation and resending the registration(s) back for the follow-up data takes minimum 4 hours.
Select 'Follow up' in the settings of the view:
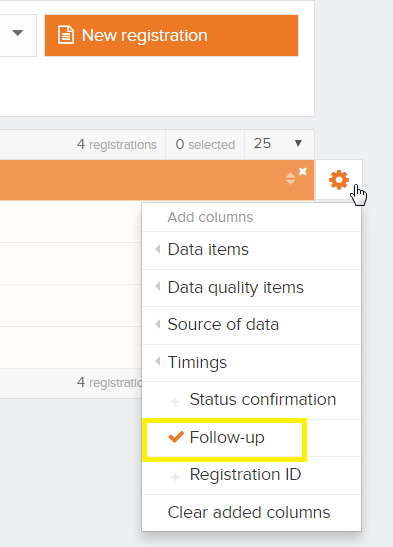
The Follow-up column is now shown in the view:
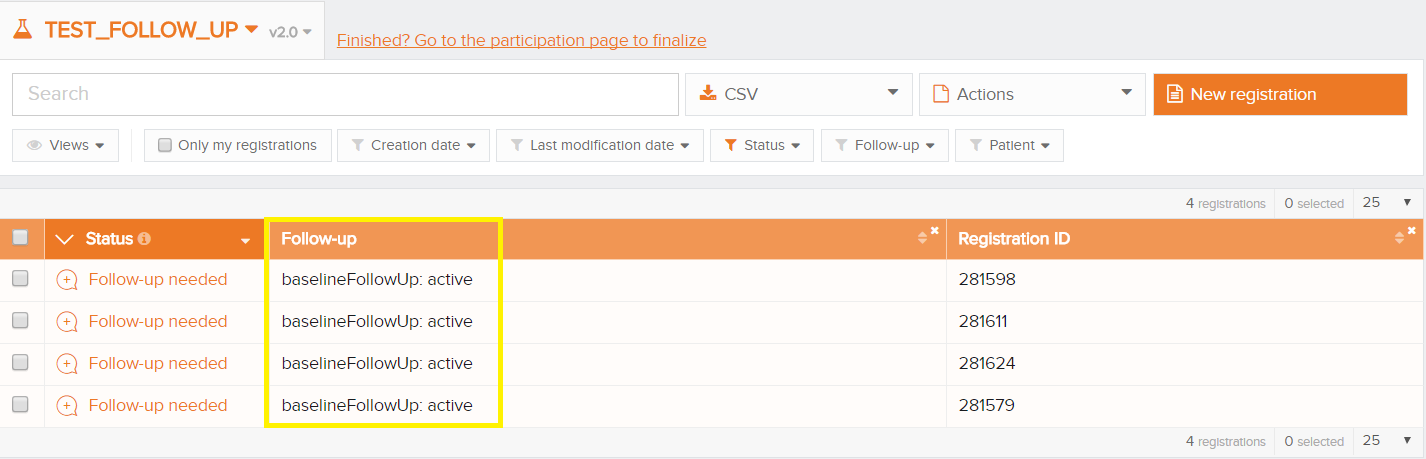
When follow-up is needed, the column 'Follow up' in the list view indicates if follow-up is needed by indicating:
- Planned: follow-up will be needed in the future, indicated by the date indication
- 'Status Column' shows 'Submitted', no action is needed at this moment
- Active: the questions for this follow up are now visible and can be filled
- 'Status Column' shows 'Follow-up needed', action is needed
- Submitted: the follow-up column will change to submitted after the additional information is given
- 'Status Column' shows 'Submitted', no more action is needed
Depending on how many times follow-up is needed, a row is added to the column. The milestones are indicated by t1, t2 etc.
Delete registrations
Delete registrationsOnly registrations with status Open or Corrections needed can be deleted.
The following steps are required to delete the registration:
- Select the record and version for which you wish to delete a registration
- Select the registration(s) you wish to delete
- Select the Actions button and select the Delete registrations option
- Select Yes to confirm

Finalize the data collection
Finalize the data collectionThe researcher needs to be notified if the data collection is ready.
There are 2 ways to finalize the data collection:
1. By using the link in the Data Collection tab:
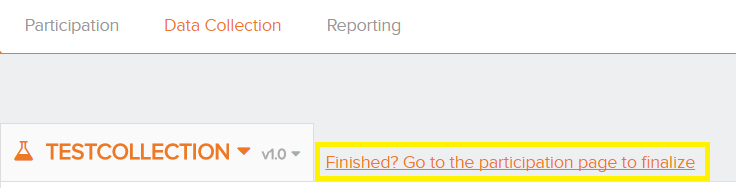
2. By using the button in the Participation tab:
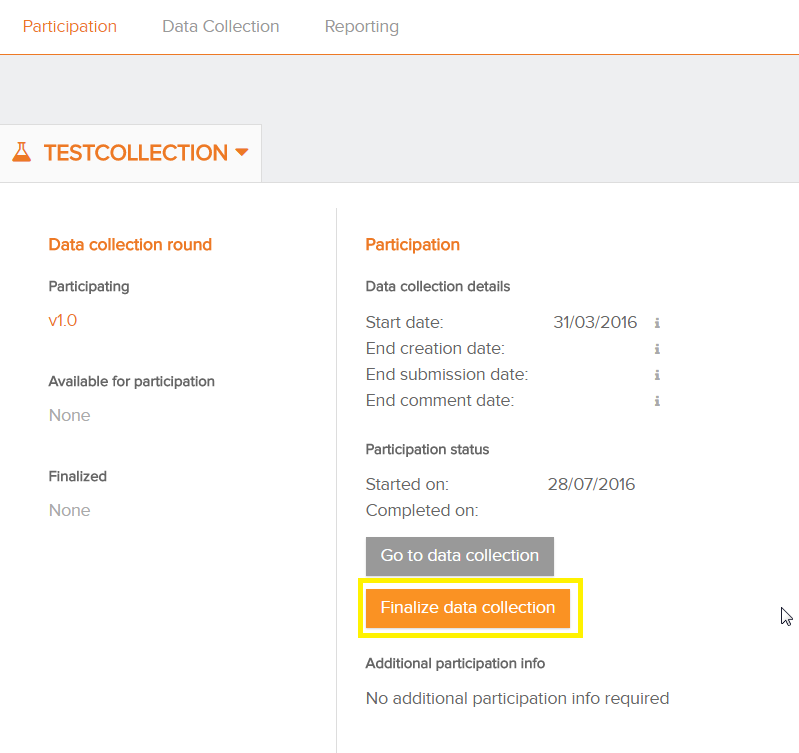
- Confirm finalization of the data collection:
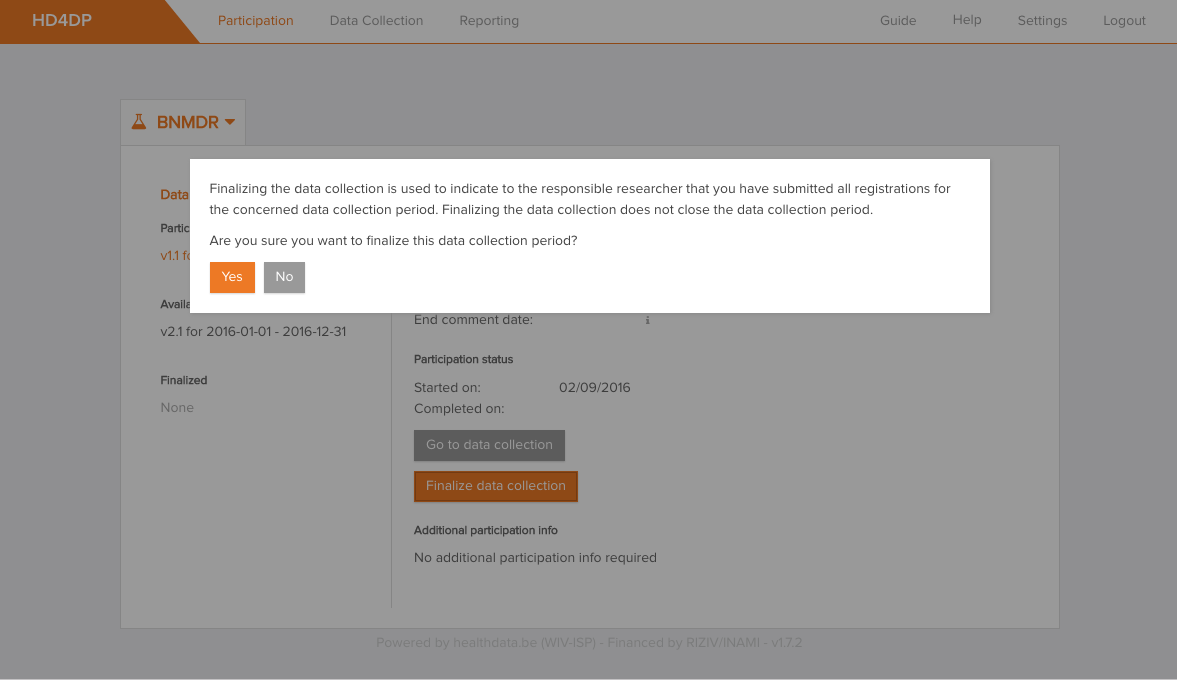
Sometimes additional data is requested by the researcher. This must be completed first before using the finalize button or link.
After you select the finalize button, the researcher will be notified.
Submit registrations in bulk
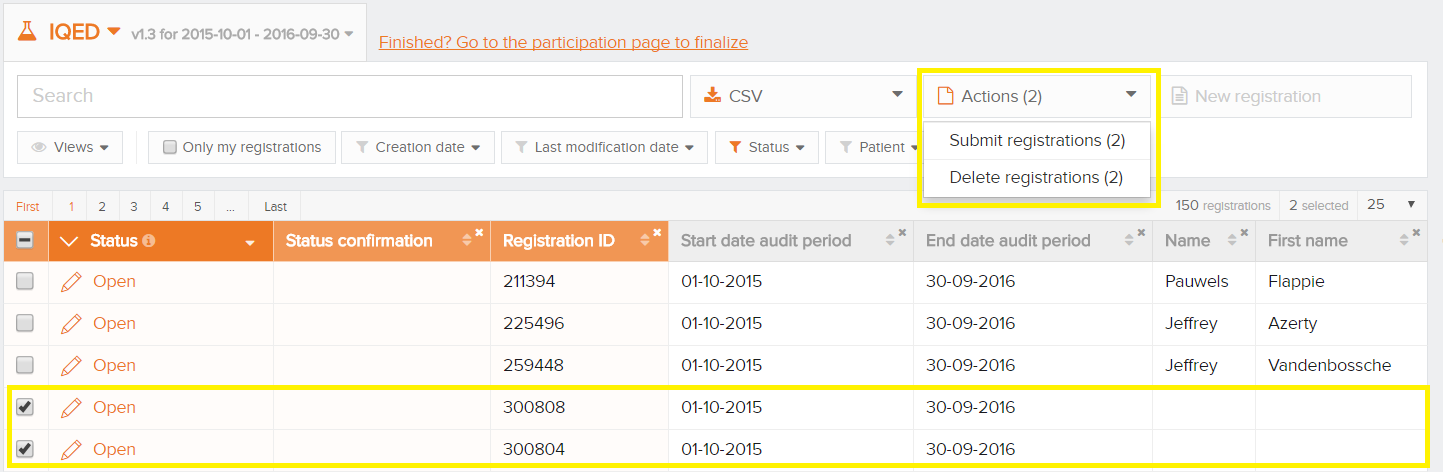
Submit registrations in bulk- The registrations that need to be submitted, have to be checked to proceed the registration in bulk
- Click on the button 'Actions' and select 'Submit registrations'. The number of selected records is displayed between brackets
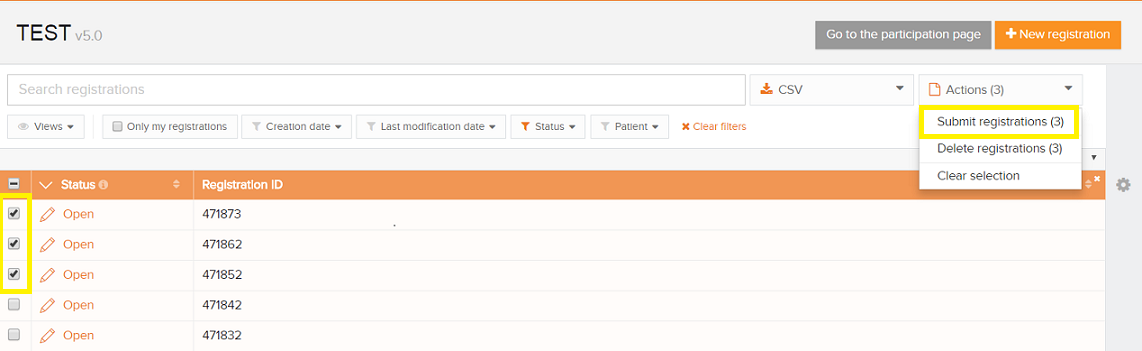
- Confirm the submission on the window that appears

- A summary of the registrations that are submitted and failed is shown. The records that contain errors will not be submitted

Using the upload center
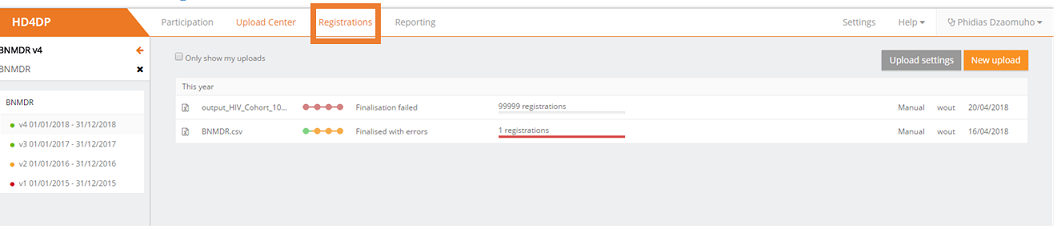
Using the upload centerThe upload center is introduced to make the upload of multiple registrations more performant and user friendly.
The link to the upload center can be reached by the main menu:
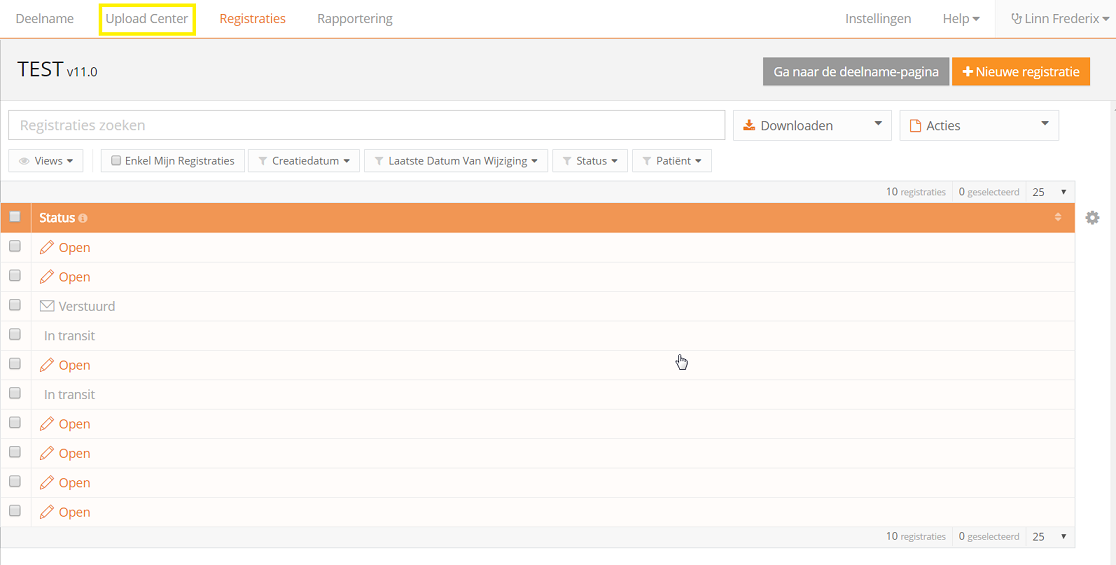
If uploads are processed, an overview with the name of the uploade file, the status and a visual representation of the status, the number of records that were processed, the way of uploading, the user and the upload date is saved in the main screen of the upload center is given to the user a quick and visual impression of the data uploaded in bulk by using the upload center:
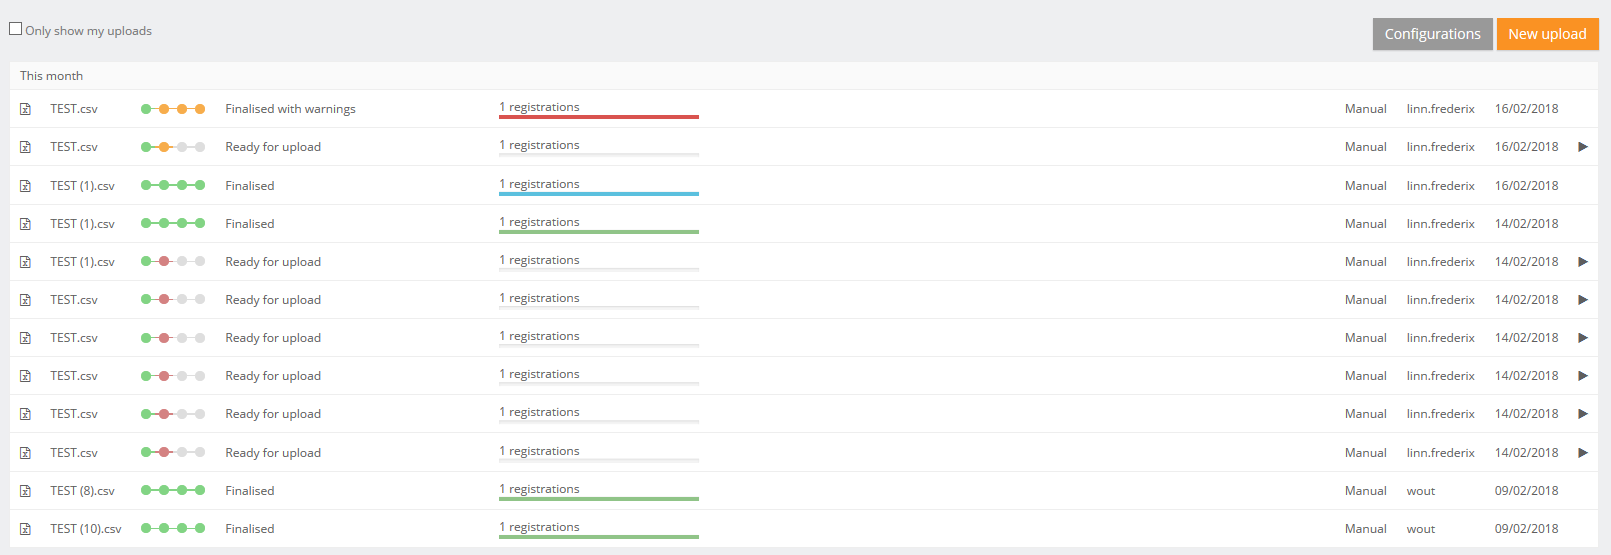
In the right upper corner two buttons are shown.
- Configuration: the default settings for a register can be set by any user that is authorized to participate in a register.

Following options are available:
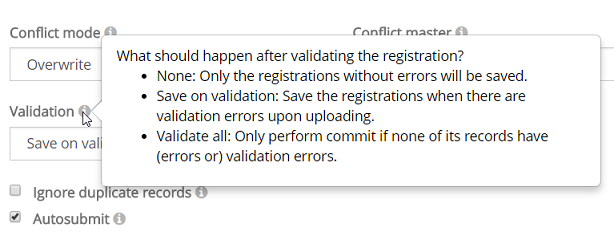
- Conflict mode: what need to be done in case of conflict
- Conflict master: is the data from the new registration of from the record in the database saved in case of conflict
- Ignore duplicate records
- Autosubmit: send the data automatically for processing in HD4RES
- Validation: what need to be done after validation the registration:
- None: only the registrations without errors will be saved
- Save on validations: Save the registrations when there are validation errors upon uploading
- Validate all: Only perform commit if non of its records have (errors or) validation errors
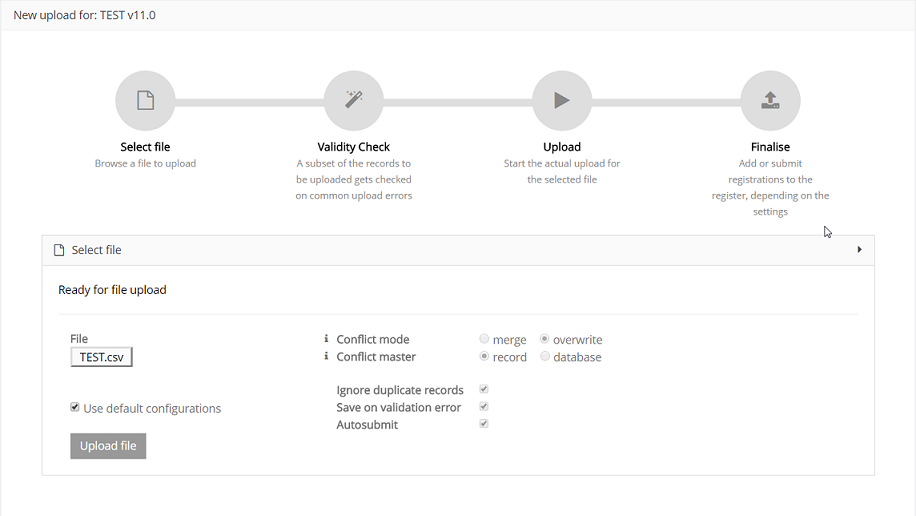
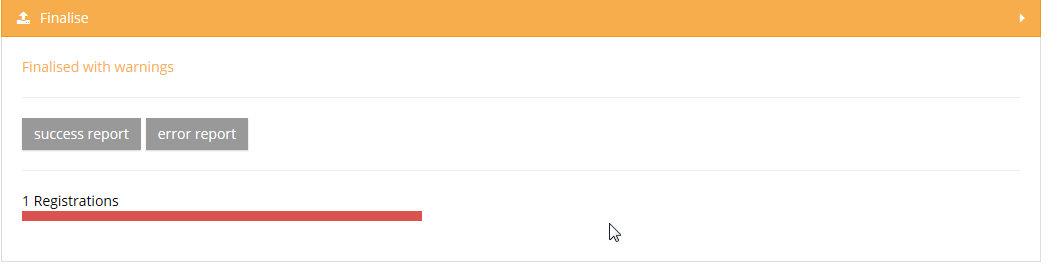
4 steps need to be executed for a new upload. When the titel bar of a separate step turns green, orange or red and the icon of the step in the overview, the step has respectively ended with success, with warnings or errors.
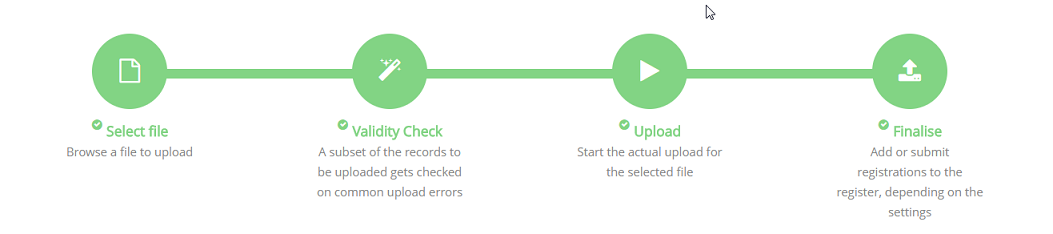
Step 1 - Select file
The first step is to select the CSV file with the data to be uploaded. The default settings for a register can be found in the Configurations on the main screen of the upload center.
Be sure to deselect the "Use default configurations" when changing the default settings:
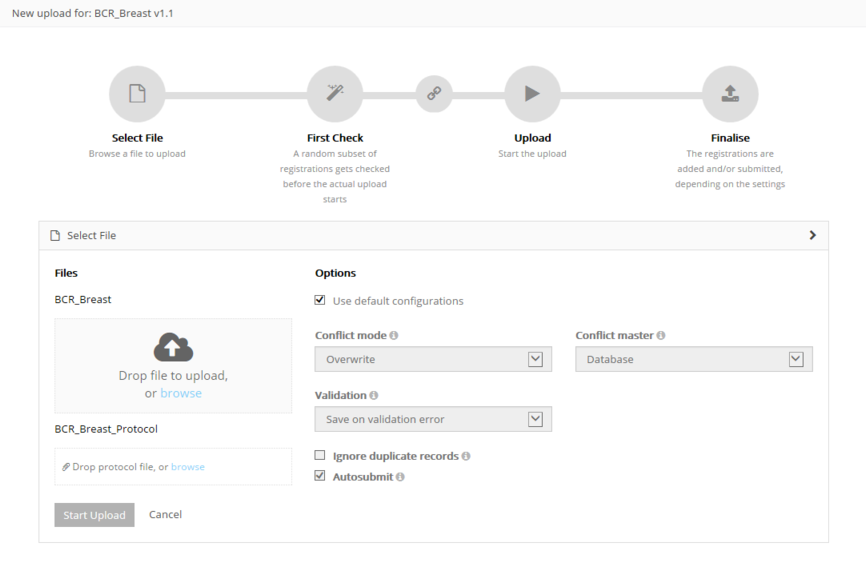
For the BCR register, the possibility exists to upload two files and link them during the process:
- Both documents will be validated separately. By using the link "Click here to see the linked upload" the user can switch between the linked documents. Refresh of push F5 on you to see the status of the upload.
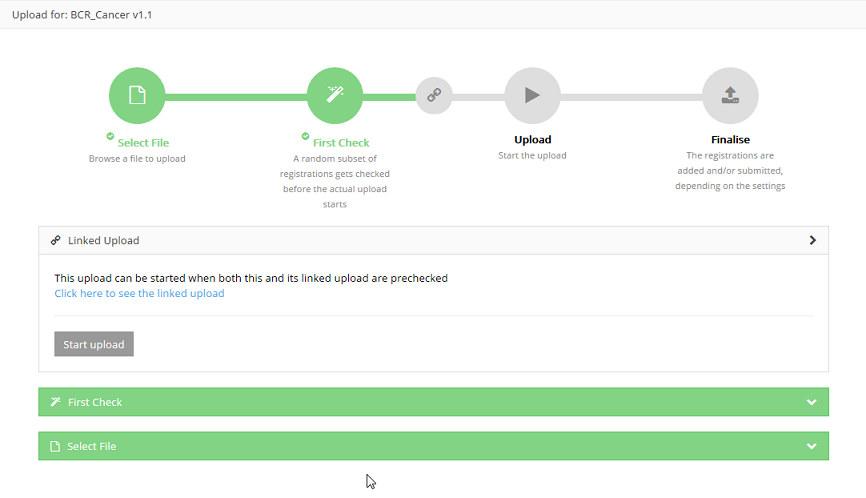
After uploading succesfully, the title bar of this step will turn green.
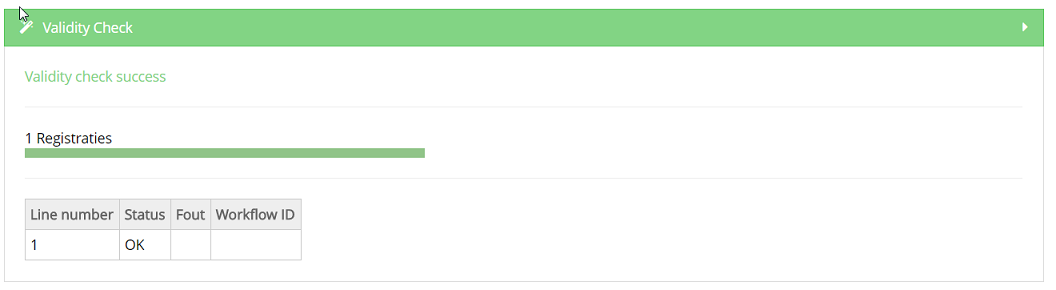
Step 2 - Validity Check
Validation checks are executed for every record.
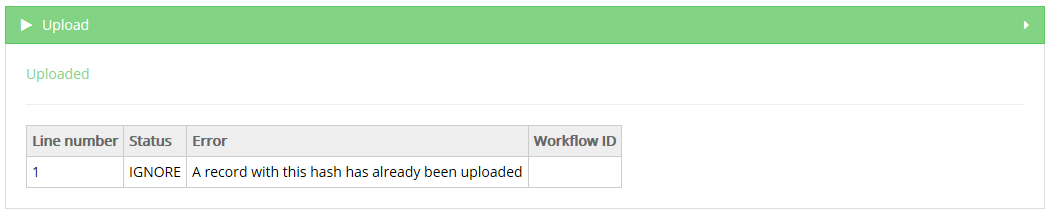
Step 3 - Upload
The file is being uploaded and the result is shown in this step per line of data added:
Step 4 - Finalize
The result is shown visually for all registrations and for all registrations in a CSV file in reports after finalization:
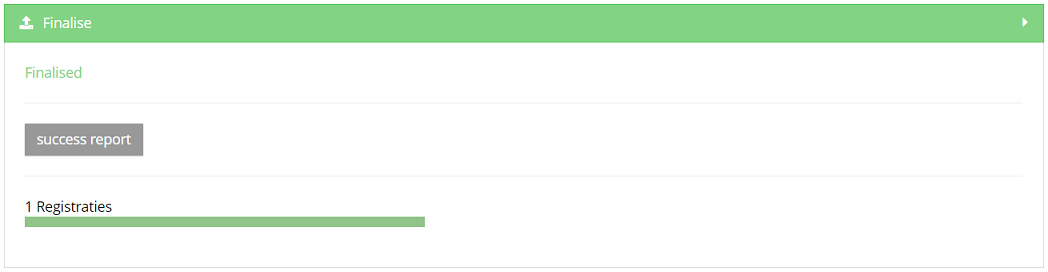
Succes report is a CSV file with all registrations who were processed succesfully.
In case of errors, a link to a detailed error report is shown too:
Please find below the movie that guides you through the functionalities of the Upload Center:
Create a CSV file
Create a CSV fileProcessing registrations in bulk is done by uploading CSV files. These files are plain text files which can contain multiple registrations at once and are extracted from your primary system.
The first step is to create the file correctly.
Using a CSV editor
While Excel is a fine tool to view CSV’s, we do not recommend it to edit CSVs. Instead use notepad++ or any other text editor. Here are a few risks you should be aware of when editing a CSV in Excel. Excel will interpret the content, which may lead to changes:
- Leading zeros disappear in fields that are recognized as numeric fields
- Entries like 3-9 can become March-9
- The only accepted date format DD/MM/YYYY can be modified (e.g. To DD/MM/YY)
- The decimal separator can differ from that in HD4DP, a semicolon wil lead to a correct upload
- When saving a file as .csv, Excel uses the default field separator. HD4DP only accepts CSV with a semicolon as separator. This default setting can be adapted in the properties of your computer.
- CSV encoding must be in UTF-8.
Setting up the document
Every column in the CSV file needs to be recognized as a field of the register by the HD4DP application. Therefor each column in the file must be identical by the technical name of the field in the register.
Tip: Downloading (manually) entered data from HD4DP will guide you in formatting a CSV file and may help during the development of the CSV extraction from the primary systems.
The Data Collection Definition (DCD) specifications for a register and its fields are defined and documented on this documentation portal.
Each field in the form can be completed through a value in a CSV file.
An example field is “Date of last follow-up”, shown in the screenshot below.
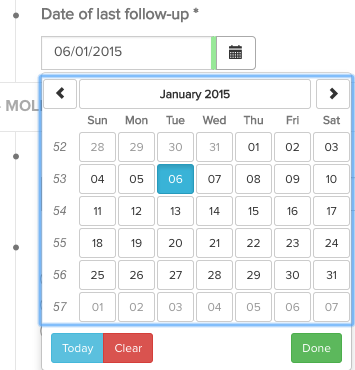
This field is of the type “date” and is required (*). Within the technical documentation of this data collection, this is shown as follows:
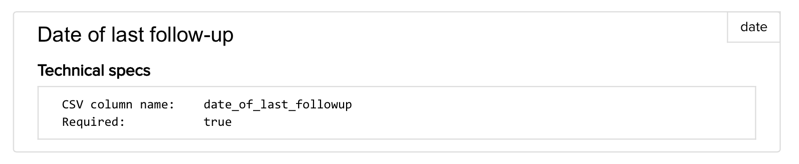
To include this field in a CSV upload file, it is sufficient to create a column with the name “date_of_last_followup” and populate it with the appropriate data i.e. a date in the format dd/mm/yyyy.
Fields can be required, read-only and computed (automatically calculated). Fields can also have a default value.
This information is present in the detailed technical description for each data collection.
General requirements
- The column separator is the semicolon (;)
- The decimal separator for numbers is the comma (,)
- The date format is dd/mm/yyyy
Basic content types
Depending on the type of the field, a different representation of the data is expected. The table below describes the different basic types and the rules on how to provide the content for these types.
| Content type | Expected format/content |
| boolean | TRUE, FALSE |
| date | dd/mm/yyyy |
| choice | code from choice list |
| list | option1_label|option2_label|etc. |
| multiline | free text |
| number | number (decimal separator = ,) |
| patientID | SSIN number. If the person does not have a SSIN, leave this field blank. |
| questionnaire | code from questionnaire answer list |
| text | ● free text ● if a binding reference list is used: a code from the reference list ● if a non-binding reference list is used: a code from the reference list or free text |
| attachment | ● expected format/content: Name of the file that must be attached (e.g. protocol.txt). ● expected extension: .txt ● file must be stored in the same folder as the folder that is used for the CSV-upload |
Advanced content types
Other than these simple types, more complex data structures can be used, as shown in the table below. Each of these types is explained in more detail below the table.
| Content type | CSV column name | Expected format |
| fields within fieldset | fieldset_label|field_label | depending on the field type |
| list (1 field) | list_label|field | value1|value2|etc |
| list (block of fields) | list_label|0|field1 list_label|0|field2 list_label|1|field1 list_label|1|field2 etc. | depending on the field type |
| nested fields below choice or multichoice | choice_label|nested_item | depending on the field type |
Fieldset
A fieldset is a collection of fields, as shown in the image below:
Anthropometry is the title of the fieldset, and this fieldset contains two fields, weight and height. Fieldsets fieldsets do not have a number cfr. image below - Anthropometry.
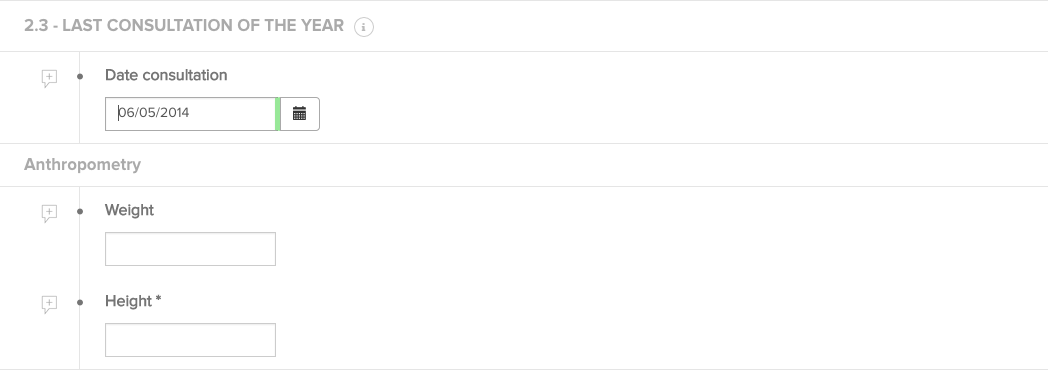
Sections do not have an impact on the CSV file, whereas fieldsets do. The title of the fieldset must be included in the field name column as follows: fieldset_label|field_label.
E.g. for the two Anthropometry fieldset fields weight and height below, the correct CSV column headers are: anthropometry|weight en anthropometry|height.
Lists
A list is also a collection of fields, like a fieldset, but with the additional property that the collection of fields can be repeated.
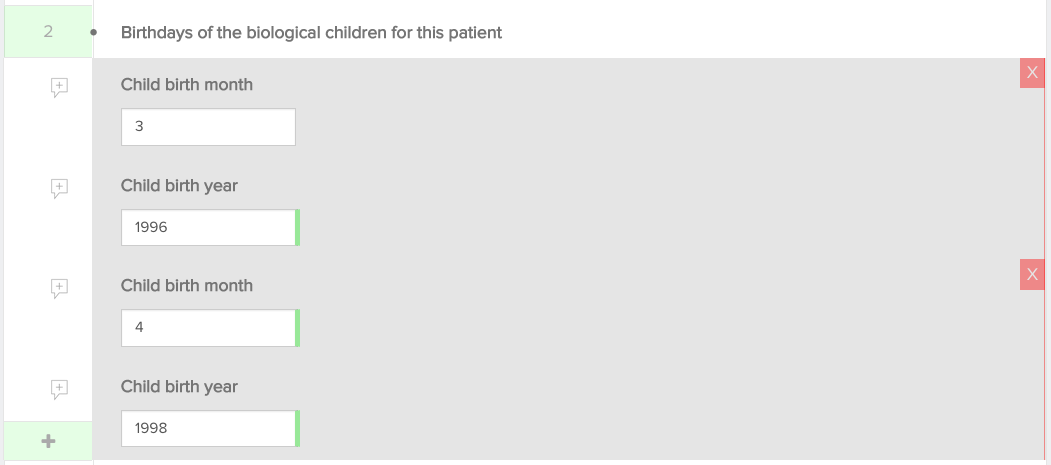
An example is shown in the image below: “Birthdays of the biological children for this patient” is a list. One list item consists of two fields, “Child birth month” and “Child birth year”. For each child, a list item can be added.
The CSV column names consist of the list header label and the field label (as for fieldsets), together with a counter to distinguish the different list items. The correct CSV column names for the two list items below are:
- birthdays_of_the_biological_children_for_this_patient|00|child_birth_month
- birthdays_of_the_biological_children_for_this_patient|00|child_birth_month
- birthdays_of_the_biological_children_for_this_patient|01|child_birth_month
- birthdays_of_the_biological_children_for_this_patient|01|child_birth_year
Please note that for every line, the numbers should increment, starting from 0 (|00|,|01|, .. is ok, |01|, |03|, ... is not). You can't have blank values for |00| and filled values for a higher number.
Please note that the numbering requires a stable format, meaning the number of characters used by the number has to be constant. You can't have one record using |00| and another using |0|. Generally we advice to use a string length of 2 digits.
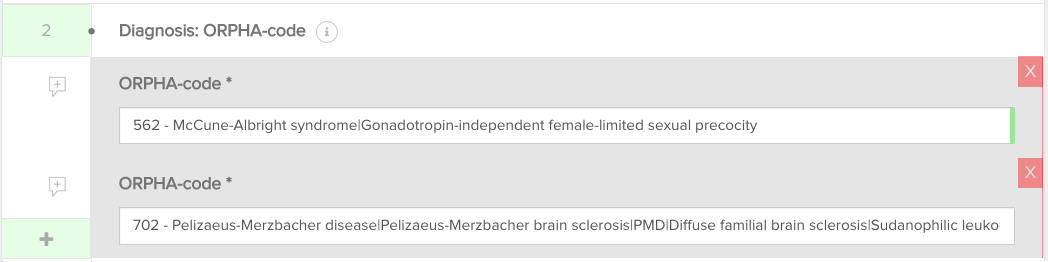
For lists consisting of 1 field a simplified implementation is possible. The CSV column header only consists of the list header label and multiple values are provided in the one column, separated by a pipe (|).
E.g. for the list in the image below, the CSV column header is diagnosis_orphacode and the content of the column is 562|702. This is the example of a text field with a reference list: providing the codes of the reference list is sufficient.
Nested fields
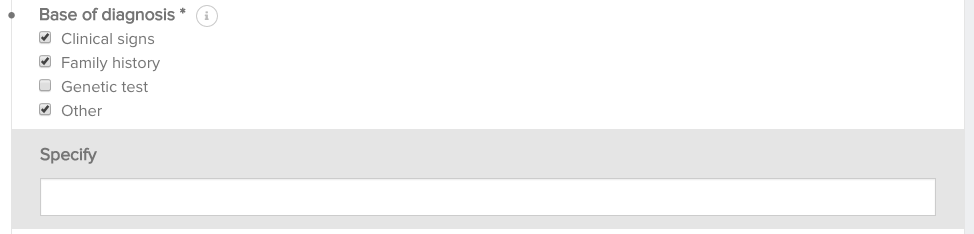
Nested fields are fields that only become available when specific options are selected in the form. An example is shown below: the field “Specify” only becomes available if the checkbox “Other” is marked. These fields also have a combined CSV column header, consisting of the choice list label and the field label. For the example below, the correct CSV column header is hence base_of_diagnosis|specify.
Attachments
When a CSV is prepared and put in the provisioning folder, it can contain references to attachments for data collections that specifically allow this.
These references are relative paths to the file location. If such a reference is present in the CSV file, the attachment content is uploaded and linked to the created registration. The attachment is then available in the HD4DP client as well as in the HD4RES client when the registration is submitted.
The maximum file size for attachments is 6 MB.
If a data collection permits you to send attachments you should have the column name to use in the CSV. If not, you should be able to find it at https://www.healthdata.be/dcd/#/collections or you can contact Support.Healthdata@sciensano.be.
Add the column name to the header of the CSV and add the file names as values in the column.
Example: “picture.png”
Put the CSV file in the correct provisioning folder (organization sub folder, then in the register sub folder), along with a “picture.png” file of your choice. The application picks the CSV file and creates a new registration.
Open the registration and verify the attachment has correctly been uploaded.
Upload a CSV file
Upload a CSV fileThere are 3 ways to upload CSV files with data into HD4DP v1:
- Manually
- In de HD4DP application
- In the specific folders on the server (provisioning)
- Automatically
- in the specific folders on the server (fasttrack)
The file can be maximum 6 MB.
When using the manual upload by using te application or putting files on the server (provisioning), the registrations still need to be manually submitted.
When using the fasttrack method, submission is done automatically.
Manually in the HD4DP application
Data can be uploaded by using the same approach as we use for the stable data.
More information can be found in the article "CSV download and upload for stable data".
Manually in the application folders
HD4DP allows to import files from the folders used by the application.
Save the created CSV file in the correct register folder of your organization or sub-organisation. The folders of the sub-organizations are to be find in the subfolders of the main organization.
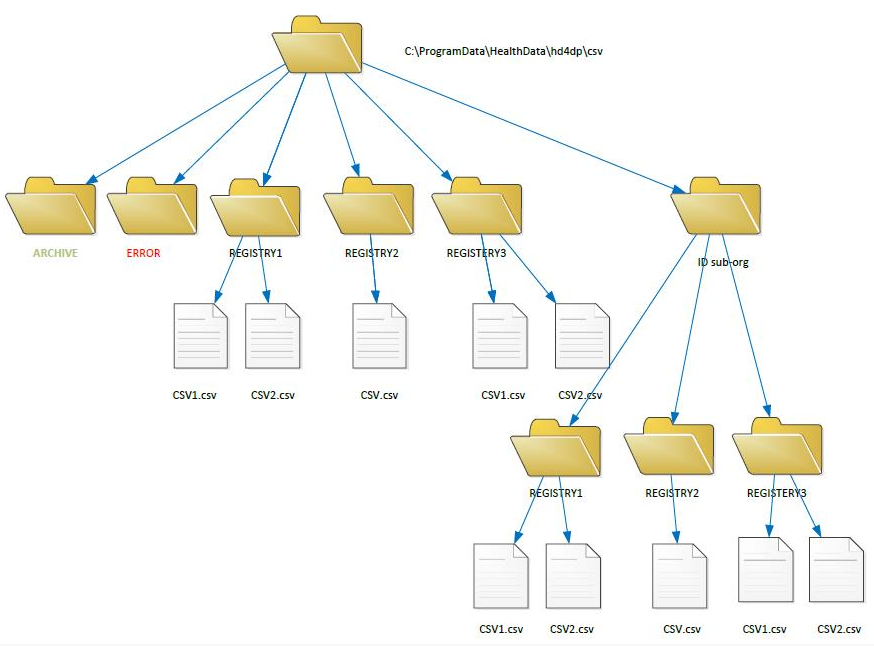
When uploading a CSV, a check is performed for each record if any corresponding record is already available in the application. The check for corresponding data is based on the unique id. If a record is already available in the application a merge takes place between the existing record and the new CSV. In case of conflicts, the values of the new CSV are implemented.
The uploaded registrations will be automaticallyuploaded in the HD4DP application.
They will need to be manually validated and submitted in the application.
Automatically in the application folders
The goal of the CSV fast track is to automatically transmit complete valid CSV files to healthdata without human intervention. The following topics must be taken into account when using the CSV fast track. HD4DP allows to automatically import files from dedicated folders. On the server where HD4DP is installed, create a new folder next to the provisioning and stable data folders.
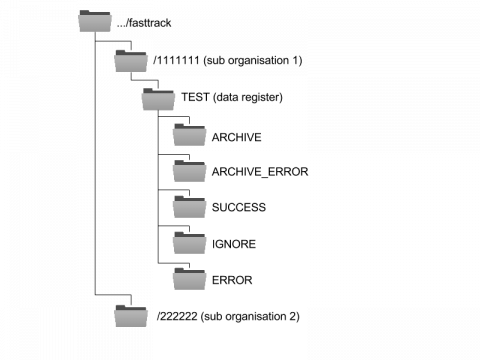
After creating the fast track folder, you must configure the location of the dedicated folder in HD4DP by adapting the configuration parameter "FAST_TRACK_DIRECTORY" in the admin configuration panel.
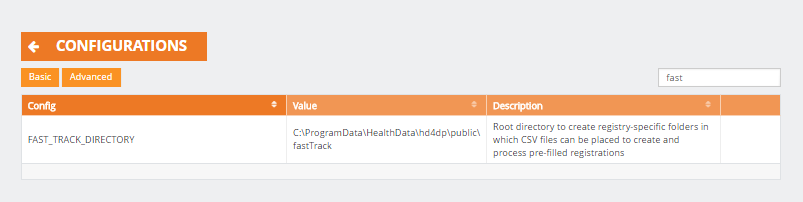
Subfolders contributing to the organization and data collections, will automatically be created according to a specific folder structure.
In this video a more profound explanation about how to set up the fast-track is given:
When a CSV file is placed in the folder of a data collection, several actions can occur:
- If the file could not be manipulated (e.g. an invalid CSV or a data collection that has not yet started) the file is moved to ARCHIVE_ERROR
- If the file was successfully read but only partially valid, the file will be split accordingly.
- e.g: line1 is valid, line2 ignored because of duplicate record, line3 contains an error
- a CSV file containing line1 will be placed in SUCCESS
- a CSV file containing line2 will be placed in IGNORE
- a CSV file containing line3 will be placed in ERROR and an extra column is added which explains why the CSVs raised an error.
- the original CSV will be moved to ARCHIVE
- e.g: line1 is valid, line2 ignored because of duplicate record, line3 contains an error
- If the file is successfully read and validated, it is moved entirely to both the SUCCESS folder and the ARCHIVE folder.
Using a CSV file : tips and tricks
Using a CSV file : tips and tricksThis document goes through a list of issues which users could encounter when uploading a CSV file in HD4DP v1. The article provides by tips and tricks to overcome these issues.
How should I create a CSV file?
Several methods can be used for creating a .csv file :
- Download the .csv file for your data collection on https://www.healthdata.be/dcd/#/collections
- Consult this article first
- Use a spreadsheet (e.g. Microsoft Excel, OpenCalc)
- Save the document using one of the 2 following methods :
- Use the spreadsheet and make sure the file saved use semi-column (;) as separator to fitting the standard of healthdata.be. Depending of the spreadsheet used, the creation of the .csv file containing semi-columns as file separators, could be carried out in 2 steps :
- save the file as .csv file containing commas as column separators
- edit the .csv file with a text editor and replace the commas by semi-column
- Copy the data in a note editor and save it as .csv file
- on Microsoft : notepad, notepad++
- on Macintosh : textedit;app
- Use the spreadsheet and make sure the file saved use semi-column (;) as separator to fitting the standard of healthdata.be. Depending of the spreadsheet used, the creation of the .csv file containing semi-columns as file separators, could be carried out in 2 steps :
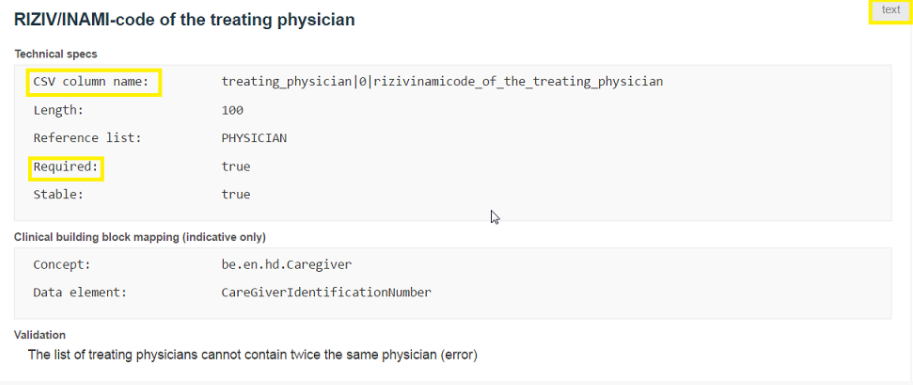
How to find the technical requirements for a field in the registration?
- Consult the registration requirements for each field in the data collection definition, as shown below :
- Field Type e.g. text, boolean, choice, date, patient
- CSV column_name
- Required : 'true' means that is a mandatory field and it has be present within the .csv extract
- Postal code missing : use the value 999
- Postal code for people living abroad : 9999
How to perform a massive deletion of records with HD4DP v1?
- If your HD4DP version is not yet version 1.10.3 (consult this website for getting informed with HD4DP version), contact support.healthdata.be@sciensano.be
- For future releases, the functionality is available
How should I treat NISS code with leading zeros when creating my csv?
For treating leading 0s of a national registry number (NISS), you can fill in the field 'patient_id' by adding a simple quote (') before the leading zeros as follows:
- as is : 0007788..
- to be: '0007788...
We advice the use of Excel TEXT function for formatting your NISS field for adding leading zeros. You can consult the following article for more information.
Can I use both Windows and Macintosh file for creating a csv file?
- From the HD4DP version 1.10.3, you create your CSV file can either on Windows or Macintosh
- For older versions, you can create a CSV on Macintosh buy you have to save it on a Windows environment before uploading it in HD4DP
How should I format the date fields within my csv extract?
The date format has to be dd/mm/yyyy, therefore make sure the date format is correct by consulting your .csv file before uploading. Open the file with a text editor and not a spreadsheet and check the format date.
How should I proceed with deceased patient?
- Put a value in the field 'patient | deceased'
- TRUE if patient deceased
- FALSE if patient alive
- Put the date of death in the field 'patient_id | date_of_death' if the patient is deceased
How can I fix errors with the automatic generation of Patient_ID?
- If you do not dispose of a national number of the patient, a patient_id will be generated automatically. This is called a 'codepat' and you can find more information in the article "What is a codepat and how is it calculated?"
- If you use a codepat, you should use the substrings function for extracting the name and first name from the codepat field to fill in the strings from the 'CODEPAT':
- patient_id | name
- patient_id | first_name
- Below, an example of use of substring functions directly applied on the 'CODEPAT' for carrying this information extraction
- patient_id | name = MID(cell,9,2)
- patient_id | first_name =MID(cell,11,2)
- patient_id | generated has to set to 'TRUE'
- patient_id | sex has to be set to 'M' (Male) or 'F'(Female)
- Test this procedure using the following csv extract, you should get the 'patient_id' filled in automatically
Example:CODEPAT;patient_id;patient_id|generated;patient_id|internal_patient_id;patient_id|
name;patient_id|first_name;patient_id|date_of_birth;patient_id|sex;patient_id|deceased;
patient_id|place_of_residence;HIVType;RNA_DATE;RNA_VALUE;RNA_SPECIMEN;
RNA_ASSAY;DNA_PCR_DATE;DNA_PCR_VALUE19711125JADAM;71112535971;;;;;25/11/1971;M;;2000;
HIV1;12/12/2016;25;B;99;;19711125JADAM;19711125JADAM;TRUE;;JA;DA;25/11/1971;M;;2000;
HIV1;05/10/2016;82;B;90;;
- Pay attention cases when the substring function returned values as DE, DU IN, LA, LE, OP in the field 'patient_id | name', you should add one characteristic
e.g. LE could become LEE or DE could become DEE
Which norm of country code should I use in my csv extract?
Fill in the field 'NATION' using the the 2-digits ISO standard 3166alpha2 format.
How can I make sure that there are no spaces in cells left empty?
Make sure there is no spaces in cells left empty by searching the 'SPACE' characters (e.g. CTRL-F and push on the SPACE touch).
Remove all the spaces in cells left empty by replacing all the 'SPACE' characters by an empty string '' (e.g. CTRL-H and replace the 'SPACE' characters by an empty field '').
How can I treat the numbers with decimals?
The decimal separator must be the comma (e.g. 1,78 ; 1,89)
What are the not supported postal codes?
| Postal Code | Locality |
| 1007 | Assemblée de la Commission Communautaire Française |
| 1005 | Assemblée Réunie de la Commission Communautaire |
| 1099 | Bruxelles X |
| 1008 | Chambre des Représentants |
| 1046 | European External Action Service |
| 1041 | International Press Center |
| 1035 | Ministère de la Région de Bruxelles Capitale |
| 1031 | Organisations Sociales Chrétiennes |
| 1110 | OTAN |
| 1012 | Parlement de la Communauté française |
| 1047 | Parlement Européen |
| 1100 | Postcheque |
| 1006 | Raad van de Vlaamse Gemeenschapscommissie |
| 1044 | RTBF |
| 1033 | RTL-TVI |
| 612 | Saint-Nicolas |
| 1101 | Scanning |
| 1009 | Senat de Belgique |
| 1105 | SOC |
| 1048 | Union Européenne - Conseil |
| 1011 | Vlaams parlement |
| 1043 | VRT |
What values to use when postal code is missing or for patient living abroad?
Missing postal code : 999
Patient living abroad : 9999
Reuse 'stable' data
Reuse 'stable' dataStable data are data that remains the same or ‘stable’ over time e.g. birht data.
Since one of the main objectives of Healthdata is to reduce the registration effort, we want to avoid that this stable data has to be entered manually over and over again.
Stable data can be reused in 4 ways:
- At first data collection via HD4DP
- After 1st data collection period via HD4DP
- Across registers
- By recoding registers
At first data collection via HD4DP v1
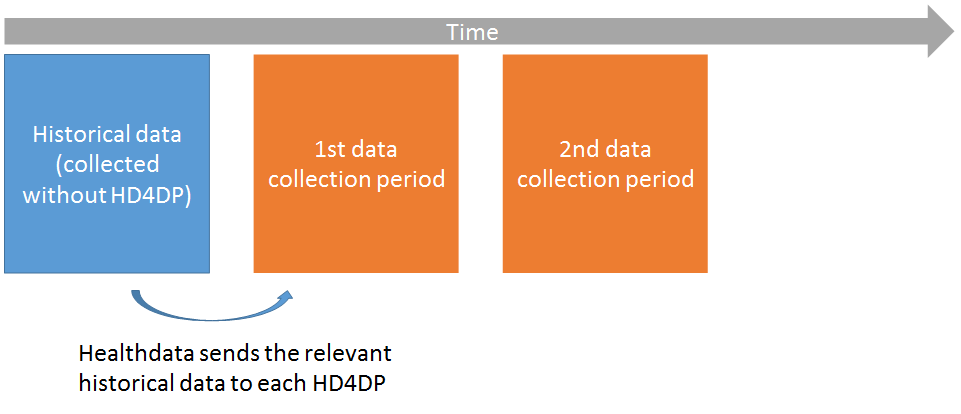
- Only for registers that used eHealth coded NISS before healthdata (BCFR, BNMDR, IQED, IQECAD)
- For these registers, a recoding needs to be done by eHealth: from the ‘old’ project-specific key to the healthdata key
- Once this is done, a subset of relevant historical data is uploaded to HD4DP

- In HD4DP v1, when creating a new registration with a NISS present in the historical data, the stable data is automatically enriched
After 1st data collection period via HD4DP
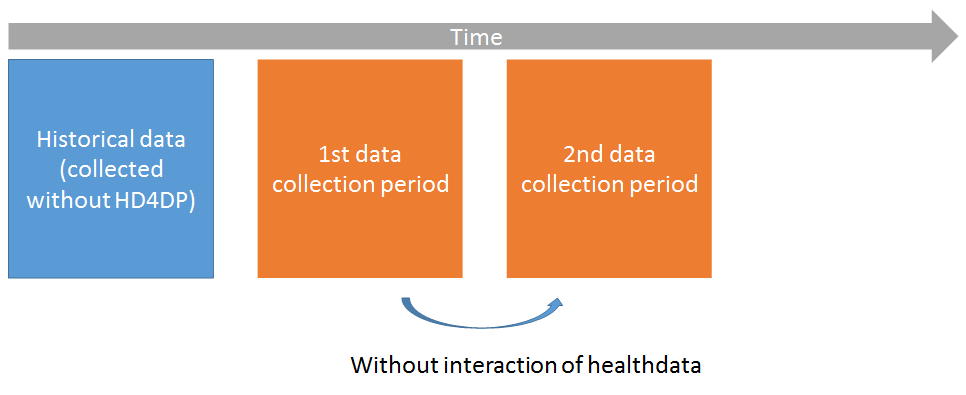
There are 2 options:
Enrichment on NISS
- When creating a new registration for a patient that was already registered in a previous data collection period, the stable data for this patient will be automatically fetched and used to prefill the new registration
- To check which fields are marked as ‘stable’, see www.healthdata.be/dcd
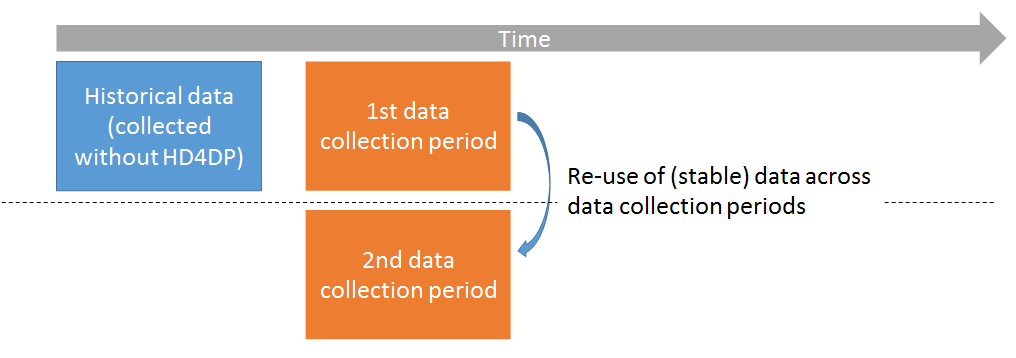
Csv download & upload
- Some registers (BCFR, BNMDR) prefer to create registrations in bulk with stable data
- Stable data from previous data collection period can be exported cf. article "CSV download and upload for stable data"
Across registers
- Currently only possible via manual csv download and upload cf. article "CSV download and upload for stable data"
- Will become automatic in Q2 or Q3 release.
Recode registers
- For registers that did not use eHealth coded NISS as patient identifiers, but that wish to link the data collected without healthdata with the data collected with healthdata (longitudinal analysis)
- A subset of relevant historical data is sent to HD4DP
- Centres are asked to complete the registration with the NISS
- Examples: BCFRecode, IQECAD_Recode, IQED_Recode
- Researchers can not validate these data in the ‘standard’ way. This has to a manual job/interaction between DWH team and researcher
- For clarifications to be done for IQED_Recode contact the support team support.healthdata@sciensano.be
CSV download and upload for stable data
CSV download and upload for stable dataBefore starting a new data collection based on stable data of another data collection, you need to finalize the data collection which serves as the starting point of your new data collection cf. article "Finalize the data collection"
To start the new data collection select the new version in the Data collection section. In this case v3.
Click the button "Go to the participation page":
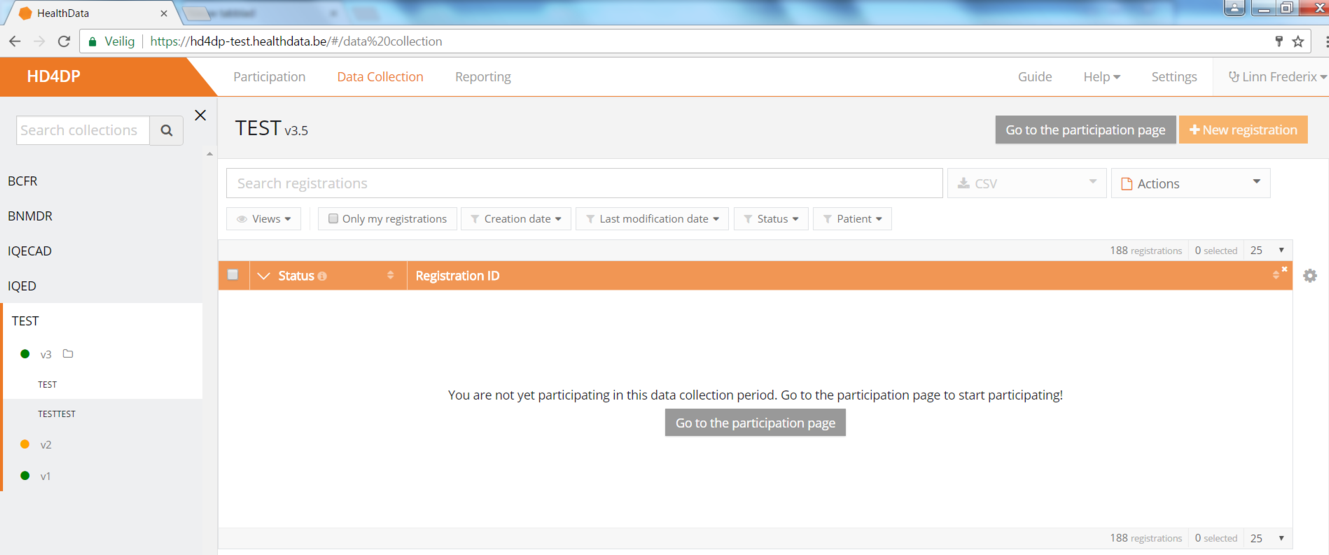
- Click on ‘Participate’:
- The Start date in the Participation status will be updated and access to the new version is completed and the user can return to the Data Collection section:
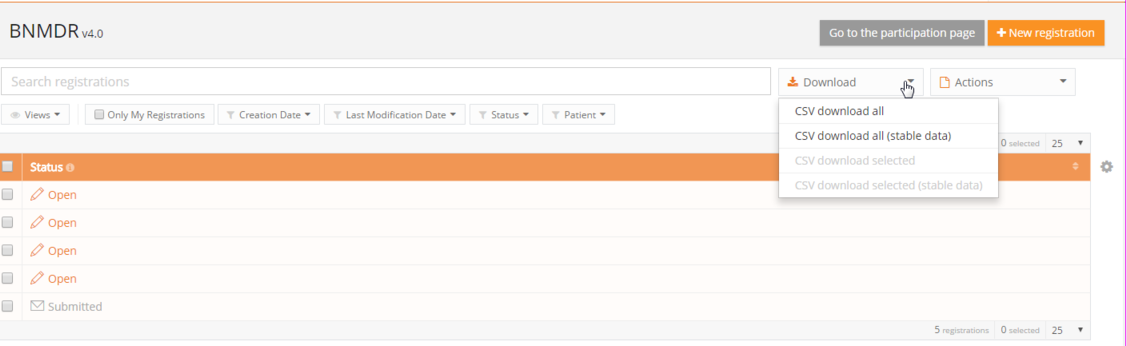
- Once the previous data collection is finalized and the new one has been started, you can download data from the first version and add those to the next version.
- Go to the Registrations tab:
- Download the data by using the Download button "CSV Download All (Stable Data)":
When everything is downloaded, you can start uploading by Using the upload center.
User Management (for ADMIN's)
User Management (for ADMIN's)To give users access to the application and data, permissions will be given by means of user accounts.
The user management is only possible for administrator accounts in the HD4DP application. User accounts with Data Provider rights are not able change the user accounts or settings.
User management for the HD4DP application can be done in two ways:
- in the HD4DP application
- via a local LDAP
LDAP is an open (non-proprietary) standard for storing and retrieving names, addresses, phone numbers and other recorded information from an online directory. Whether your HD4DP is connected to a local LDAP server can be found in the HD4DP application settings (cf. article How to know if your HD4DP is using LDAP for user management).
User management in the HD4DP v1 application
User management in the HD4DP v1 application admin Thu, 11/11/2021 - 17:07Create User Account in HD4DP v1
Create User Account in HD4DP v1New accounts have to be created to give users acces to the application and the data:
- Log in using an administrator account
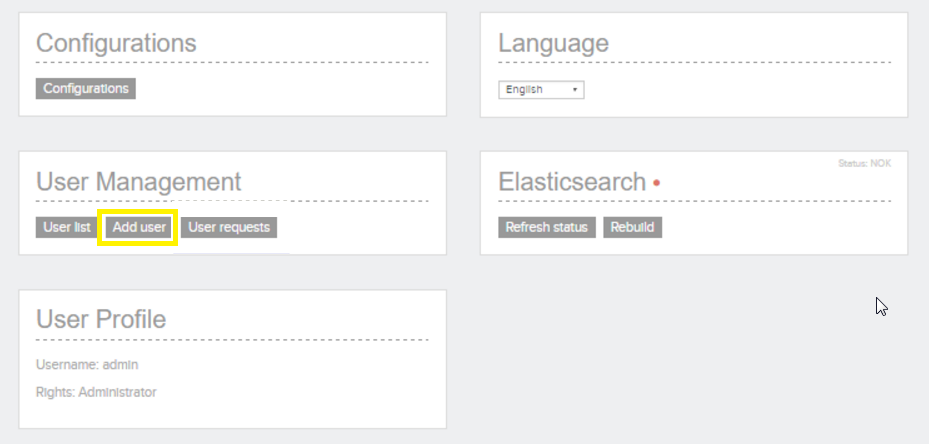
- Go to the Dashboard in the menu

- Under 'User Management', click 'Add user'

The form to create a user is shown:
- Enter a Username and create a password
- Select the User Rights for the user
- a 'data provider' account can enter and submit data
- an 'administrator' account can create users and change the configuration settings
- Choose 'Enable'
- If the user is a 'data provider', select the registries the user should have access to

- Confirm the creation of a new account by clicking 'Save'
How to approve a user request in HD4DP v1
How to approve a user request in HD4DP v1- Login as admin and select ‘User requests’
- You will see an overview of all the requests:
- Select the request that you want to approve.
- Check the data in the request
- Simply click 'Approve' and the user account is active

- The user will receive an email that his or her account is accepted. This e-mail provides the necessary information to login i.e. username, password.
User management using a local LDAP
User management using a local LDAP admin Thu, 11/11/2021 - 17:07How to know if your HD4DP v1 is using LDAP for user management
How to know if your HD4DP v1 is using LDAP for user managementThis is how to verify whether your HD4DP is connected to a LDAP server:
- Go to the 'Configurations' button in the left panel 'Configurations'

- Check the configuration parameter 'USER_MANAGEMENT_TYPE'.
- If it is set on 'DATABASE_LDAP', HD4DP is connected to your local LDAP for its authentication
If it is set on 'DATABASE', the HD4DP is used for user management.

Create HD4DP v1 account for LDAP users
Create HD4DP v1 account for LDAP usersNew accounts have to be created to give users acces to the application and the data:
- Log in using an admin account
- Go to the Dashboard in the menu

- Under 'User Management', click 'Add user'
- Search a user from LDAP list under 'Username'
- Select the non-migrated user by clicking on the name
- Select the User Rights for this user
- a 'data provider' account can enter and submit data
- an 'administrator' account can create users and change the configuration settings
- Choose 'Enable'
- If the user is a 'data provider', select the registries the user should have access to
- Confirm the creation of a new account by clicking 'Save'
Approving user requests when your HD4DP v1 is connected to LDAP
Approving user requests when your HD4DP v1 is connected to LDAPApproving user requests when your HD4DP is connected to LDAP
- Login as admin and select ‘User requests’

- You will see an overview of all the requests:

- Select the request that you want to approve
- Before accepting the user request, several things must be checked:
- Matching username: In HD4DP, the username must be the same as the person's username in the LDAP-system. If this is not the case, change the requested username in HD4DP to the LDAP username
- User search base: In the LDAP system, the user must be a member of the organizational unit (OU) where HD4DP searches for accounts. To find out the LDAP_USER_SEARCH_BASE for your organisation, go back to the dashboard, click on 'configurations' and search for LDAP_USER_SEARCH_BASE

- Check the data in the request
- Simply click 'Approve' and the user account is active

- If you would try to accept a user request for which the username is not found in the LDAP system, an error message appears
- The user will receive an email that his or her account is accepted. This e-mail provides the necessary information to login i.e. username, password.
Change User Account in HD4DP v1 using LDAP
Change User Account in HD4DP v1 using LDAPAccounts can be changed by the responsible of the HD4DP application of an organisation:
- Log in using an administrator account
- Go to the Dashboard in the menu

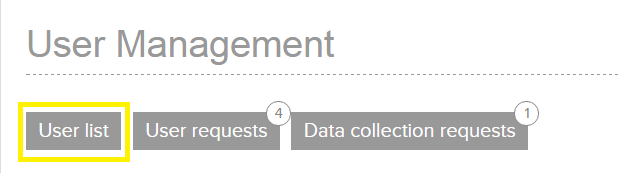
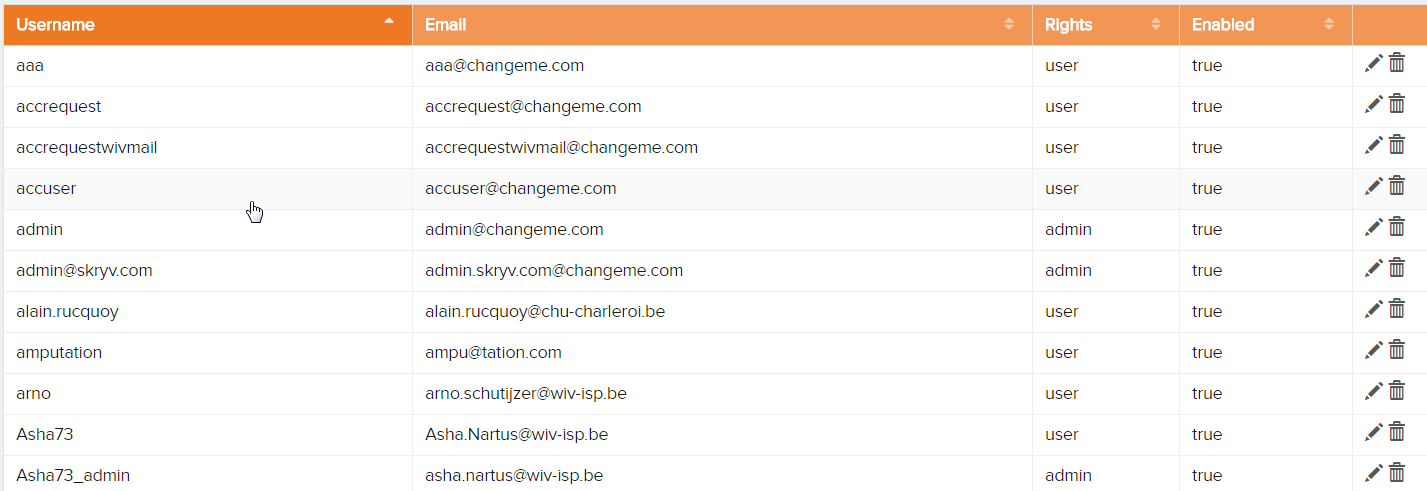
- Click 'User List' under User Management to get a list view of the registered accounts

- Click the 'Edit' button in the list view corresponding with your account

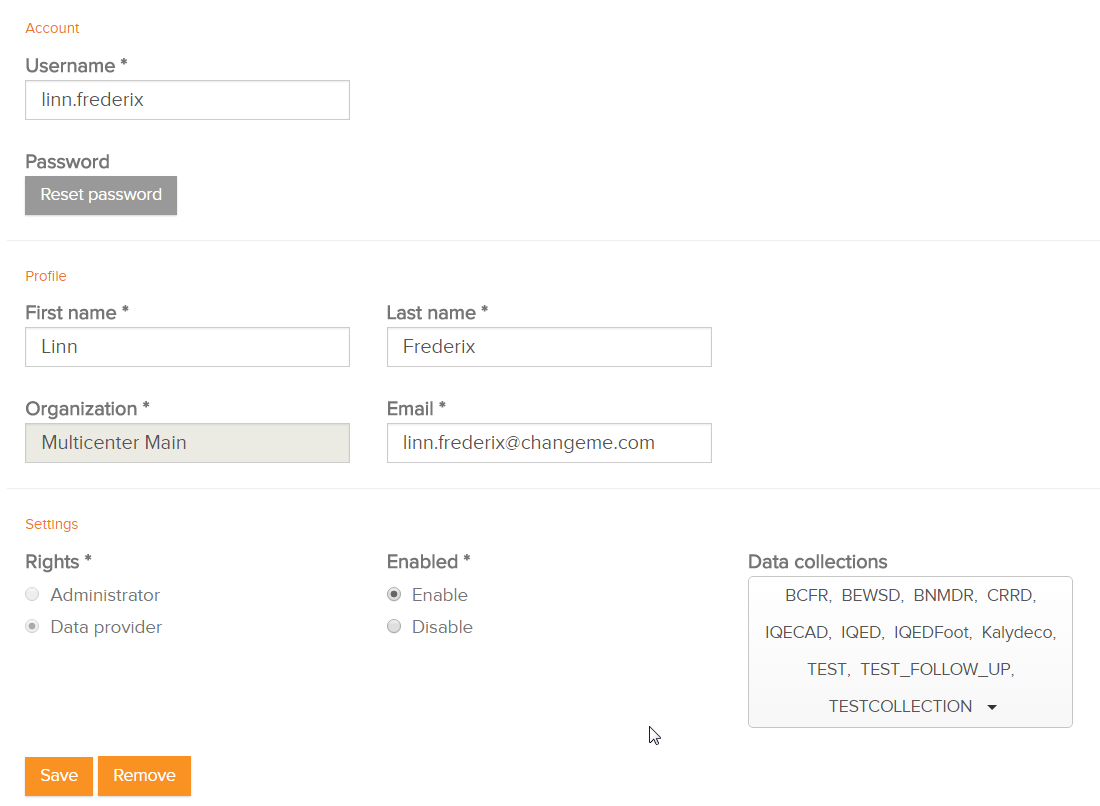
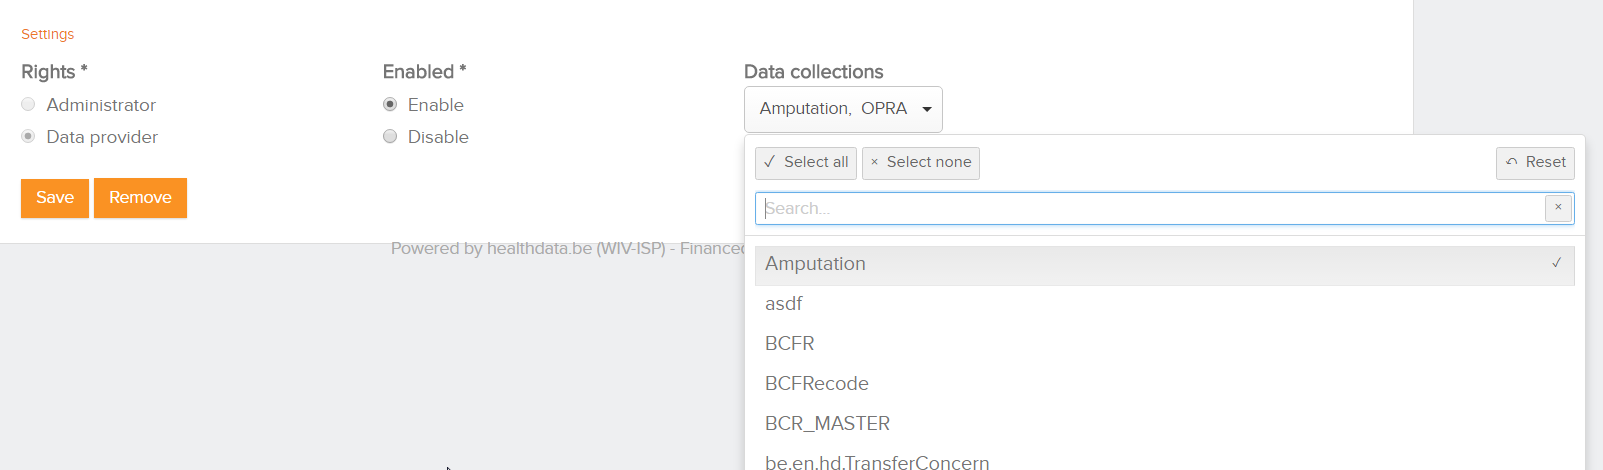
The user account can be changed:
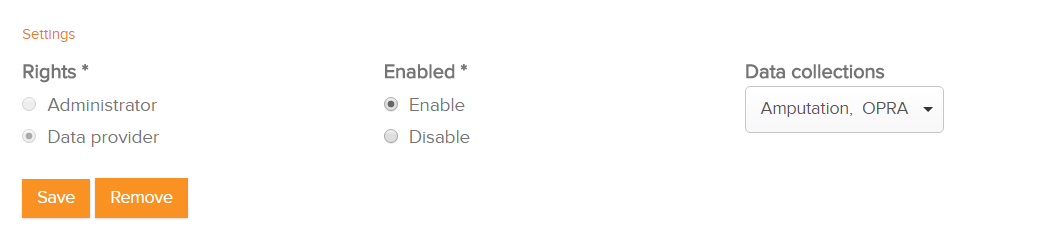
- User Rights for the user
- a 'data provider' account can enter and submit data
- an 'administrator' account can create users and change the configuration settings
- Choose 'Enable' or 'Disable', depending on the requirements
- Select the registers the user should have access to
- Confirm the changes by clicking 'Save'.